Latest news, food, business, travel, sport, Tips and Tricks...

Fabric Scrap Flower Garden Craft

Fabric Scrap Flower Garden Craft

Total Time 1 hour Ages school-age

Using craft sticks and fabric scraps, kids can create this fun and pretty flower garden activity with recycled materials – perfect for Earth Day.

Some more interesting posts:

Still Life With Flowers

Baby Food Jar Garden

Autumn Fairy Costume

by Amanda Formaro

What you'll need

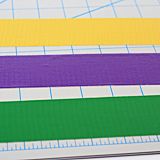
  • Fabric scraps in bright colors
  • Scissors
  • 7 craft sticks
  • White craft glue
  • 2 green skinny chenille stems
  • White craft paint
  • 1 sheet pink felt

Helpful Tip:

This looks great hanging on your child's door or wall! Simply take a long fabric scrap and create a simple hanger by gluing it to the back. Save fabric scraps in a zipper gallon storage bag or plastic container with a lid for future projects such as this. To create a sturdy frame, glue the pink felt backing to a piece of poster board or card stock.

How to make it

Fabric Scrap Flower Garden 1

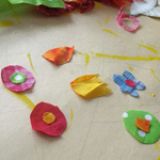
1. Cut some simple shapes from the fabric for your flowers. They should be about 1 – 1.5 inches diameter. Cut small circles and square and glue those to the center of some of your flower shapes. (See photo.)

Fabric Scrap Flower Garden 2

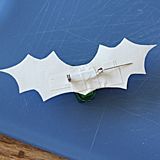
2. Line up 5 craft sticks side by side. There should be enough space between each that one craft stick will stretch across all 5 horizontally. Glue one stick at the top and one at the bottom, about an inch from the top and bottom. Let the glue dry then paint fence white. (See photo.)

Fabric Scrap Flower Garden 3

3. Cut chenille into 6 different lengths. Glue the chenille stems to the fence. (See photo.)

Fabric Scrap Flower Garden 4

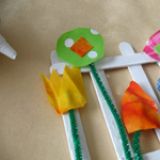
4. Glue the flowers to the tops of each chenille stem. (See photo.)

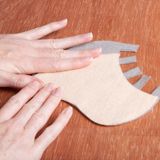
5. Glue the fence to a piece of pink felt. Trim around the edge to create an even border.

Afikomen Bags Craft

Afikomen Bags Craft

Traditionally, after the seder meal is eaten, the family patriarch hides a piece of matzoh, known as the afikomen, as a symbolic dessert. The child who finds it receives a small prize. In this variation, each child makes his or her own bag, which is filled with a piece of matzoh. The bags are hidden, and each child must find his or her own bag to get a prize.

What you'll need

  • 1 8- by 10-inch rectangular piece of wallpaper remnant
  • Hole punch
  • Yarn or ribbon
  • Markers
  • Glue (optional)

How to make it

  1. Fold the wallpaper piece in half. Punch holes along the two shorter sides.
  2. Tie a knot onto one end of the yarn or ribbon and "sew" together the two sides in order to form a pouch. Tie off the yarn at the top.
  3. Have each child write his or her name with markers on the front of the afikomen bag or cut out individual letters from another piece of wallpaper and glue them on.

Ladybug Rocks Craft

Ladybug Rocks Craft

Total Time 1 hour Ages school-age

Your kids can make these adorable ladybug rocks craft as shelf decorations, or make a large one as to be used on Mom’s desk as a paperweight. While the average ladybug is red, ours come in several vibrant colors. Let your kids pick their favorite for a colorful way to celebrate Earth Day!

More Ladybug Crafts:

Lovely Ladybug

Thumbprint Ladybugs

by  Amanda Formaro

What you'll need

  • Smooth, round or oval rocks, washed and dried
  • Acrylic craft paint in colors of our choi
  • Black acrylic craft paint
  • 2 wiggle eyes for each ladybug
  • Black permanent marker
  • Acrylic matte sealer spray
  • White craft glue (recommended: Tacky Glue)

Helpful Tip:

If you are doing this in a group setting such as scouts or a classroom, you may find it easier to prepare the rocks ahead of time. Wash, dry and apply a coat of gesso (recommended: Liquitex Basics Gesso) to each rock. This is a craft medium (white) that works well with many projects. It will also create a base so that less coats of color paint will be required. Bigger rocks are easier for small hands to manipulate. They are also heavier, so be sure that there are enough adult helpers for a group of little ones. White and black paint can be used instead of wiggle eyes. Simply dot on white paint, allow to dry, then use a smaller tool to dot on the black. If you cannot find suitable rocks outside, you can purchase them at most craft stories.

How to make it

  1. Completely wash and dry all rocks.
  2. Paint rocks in desired colors, allow to dry. Apply second and third coats if needed. Lighter colors will require more coats than darker shades
  3. Paint head on using black acrylic craft paint. There is no pattern needed, simply paint about ¼ of the rock black in the "front."
  4. Use a black permanent marker to draw a straight line down the center of the rock, starting at the center of the base of the "head."
  5. Dip the end of a large paint brush, or the eraser of a pencil, in black craft paint. Dot on the spots, reloading with paint after every dot.
  6. Once the paint is dry, spray the rock(s) with acrylic sealer spray. Allow sealer to dry completely.
  7. Using white craft glue, attach wiggle eyes and let dry.

Lacy Paper Glove Invitations Craft

Lacy Paper Glove Invitations Craft

Ages 5 to 8

Cut from paper doilies, these fancy gloves with their lacy trim make fitting invitations for a Cinderella tea.

Read More crafts:

Wicked Witch Puppet

Dazzling Dusters

by Cindy Littlefield

What you'll need

  • Paper doilies
  • Pencil
  • Scissors
  • Glue stick
  • Lightweight craft paper or stationery
  • Colored markers

How to make it

  1. Have your child place her hand on a paper doily so that her palm rests on the unperforated center and her wrist is on the lacy perimeter. Trace around her hand extending the lines on both sides an inch or two past her wrist. Then draw a line joining the ends of the two lines to complete the glove.
  2. Stack the doily atop another one and cut out the tracing, going through both doilies. Now you can use one of these cutouts as a pattern to cut out a pair of matching shapes for the other invitations.
  3. To complete each invitation, apply glue to the fingers and side edges (but not across the wrist) of one cutout in the pair. Then set the other cutout on top of it, matching up all the edges, and press down evenly to stick the two layers together.
  4. For each glove, print the party date, time, and other pertinent information on a piece of craft paper or stationery. Then fold the invitation and tuck it into the glove.

Jelly Bean Bowl: Santa Christmas Crafts

Jelly Bean Bowl: Santa Christmas Crafts

Ages preschooler

With all the plates of Christmas cookies Santa samples, it's no wonder he's a little soft around the middle. Here, Santa offers a few treats of his own--a sampling of jelly beans or other Christmas candy - stored beneath the fuzzy brim of his hat.

More Santa Christmas Craft:

Starry Santa Tin

What you'll need

  • Felt in assorted colors
  • Glue and scissors
  • Glass jar with a lid
  • White faux fur (available at craft or sewing stores)

How to make it

Jelly Bean Bowl Step 1

1. To make the hat, cut out two red felt triangles. Make sure the base of the hat will be big enough to fit over the neck of your jar. Glue together the sides of the two triangles, then trim the hat with a strip of faux fur around the bottom and a bit on top for the pompon.

2. Decorate Santa's face by cutting out and gluing on a faux fur beard, a pair of felt eyes and a felt nose.

3. Fill the jar with candy, put on the lid, then top it all off with Santa's hat.

Jack's Jolly Roger Flag

Jack's Jolly Roger Flag

Time 30 minutes or less Ages school-age

Every pirate captain worth his salt flies a Jolly Roger: a flag designed to identify a ship's crew as pirates. Generally black and bearing some variation of the classic white skull and crossbones emblem, a Jolly Roger was often raised only once the ship's target was within firing range. Of all the pirate flags hoisted in the Caribbean, the one Jack Sparrow flew on the Black Pearl is arguably the most recognizable. Not only does the skull sport a bandana and beaded braid, it also looks face to face with a bright red sparrow in flight. You and your child can create a Jolly Roger just like it by simply cutting out shapes from sticky-back felt and pressing them onto a black background.

Jack Sparrow Voodoo Doll Craft

Download Jack's Jolly Roger Flag Template

by Cindy Littlefield

What you'll need

  • Jolly Roger Template
  • Scissors*
  • Straight pins
  • Sticky-back felt (white and red)
  • Stiff black belt, 12- by 18-inch sheet

Helpful Tip:

A pair of precision scissors (in addition to regular craft scissors) comes in handy for cutting the curvy portions of the felt.

How to make it

  1. Print out the template and cut out the pieces.
  2. Pin the skull and bone pieces onto the white felt and the sparrow onto the red felt. Cut out the felt pieces. Don't worry if you stray a bit from the lines, or if portions of the cut turn out a little rough -- the outlines are meant to be slightly jagged.
  3. Arrange the cutouts, as pictured, atop the stiff black felt. Working with one piece at a time, peel the backing from the cutouts and stick them in place.
  4. When all the pieces are well adhered, your child can pin the Jolly Roger to his bedroom wall pennant-style. Or, you can fashion a hanger by snipping small holes in the upper corners of the felt, and then threading through a long piece of thin black cord or yarn and knotting the ends. You can even create a handheld flag by hot-gluing the upper portion of a wooden dowel to the side of the felt and then covering the dowel with an additional strip of black felt.

Easter Bunny Candy Holder Craft

Easter Bunny Candy Holder Craft

Total Time 1 hour

Any empty jar will work for this fun and colorful project. Filling the bunny's belly with yummy jelly beans or other Easter candies will have everyone hopping for joy. Be sure to visit our main Easter index for even more ideas including Easter egg decorating ideas, more Easter crafts, holiday recipes, printables and more.

by Amanda Formaro

What you'll need

  • 1 small empty jar
  • 4 cotton balls
  • ½ sheet pink felt
  • ½ sheet white felt
  • 4" square piece of purple felt
  • 2 large wiggle eyes
  • 3" x 1" piece of purple construction paper
  • Black marker
  • Black marker Jelly beans

Helpful Tip:

It's important to wait until after the jar lid is in place to attach anything to the jar. If you glue things to the jar first, you may not be able to line up the face with everything else. Wiggle eyes with eyelashes are available at craft supply stores. Keep a damp washcloth nearby in case your child's fingers get sticky from attaching the cotton balls to the lid.

How to make it

  1. Wash and thoroughly dry jar and lid. Fill jar with jelly beans.
  2. Cover the top of the jar lid with a thin layer of white craft glue. Pull 3 cotton balls apart and attach them to the lid. Be sure to cover the sides of the lid as well. Let dry.
  3. From the pink felt, cut out 2 long ovals for the ears and 2 smaller long ovals from the white felt. Glue the white to the pink. Set aside.
  4. Cut 2 circles for the paws from the pink felt. Glue circles on either side of the purple paper and write "Happy Easter" with the black marker. Set aside.
  5. Cut a bowtie from the purple felt. Set aside.
  6. Cut a small triangle from the pink felt for the nose and glue it to the jar lid. Glue the wiggle eyes onto the jar lid, so they are on a slant, using the cotton to help prop them up toward the top. Let dry.
  7. Put the lid on the jar and screw it in place. Once in place, glue the bowtie to the front of the jar, beneath the lid. Glue the ears to the back of the jar lid.
  8. Glue the last cotton ball to the back of the jar for the tail.
  9. Glue the paws and sign to the front of the jar.

Dumbo's Felty Ears craft

Dumbo's Felty Ears craft

Total Time 30 minutes or less Ages school-age

Get in character by creating your own felt ears with our helpful Dumbo template.

Download Dumbo's Felty Ears Template

What you'll need

  • Dumbo's Felty Ears Template
  • Scissors
  • Pencil
  • Hot glue (an adult's job)

How to make it

1. Print the template and cut it out.

Felt Dumbo Ears 1

2. Trace the gray ear template on gray felt twice and cut out each piece.

Felt Dumbo Ears 2

3. Trace the pink ear template on pink or flesh-colored felt twice and cut out each piece.


Felt Dumbo Ears 3

4. For the right ear, hot glue a pink ear to the top of a gray ear, lining the pink ear up with the bottom and sides of the gray ear.

Felt Dumbo Ears 4

5. Place the ear on a flat work surface, pink side down.

Felt Dumbo Ears 5

6. Line the headband up along the edge of the ear on top of the gray tabs -- the bottom of the ear should be just above the headband. Wrap the gray felt tabs around the headband, securing each tab to the back of the ear with hot glue.

Felt Dumbo Ears 6

7. Repeat step 4 with the left ear, making sure that the ear is flipped in the opposite direction of the right ear.

8. Allow the glue to fully dry before wearing Dumbo's ears.

Dumbo's Bubble Blowers Craft

Dumbo's Bubble Blowers Craft

Total Time 1 hour Ages school-age

Dumbo loves showing off his bubble-making skills for his buddy Timothy the mouse. Kids can create their own bubble blowers from recycled bottles and then take the fun outside!

More Bubble Crafts:

Bubble Mania

Soap Bubble Prints

by Miranda Becker

What you'll need

  • Plastic water or soda bottles, cleaned and dried with labels removed
  • Scissors
  • Duct tape, in assorted colors
  • Masking tape
  • Self-adhesive craft foam shapes
  • Stickers
  • Markers
  • Bubble solution

Helpful Tip:

These are perfect for a party. Kids can decorate their bubble-blowers and then take them home as favors. Write kids' names on their bubble-blowers to be sure no one gets them confused.

How to make it

  1. To start, decorate clean, dry plastic bottles. Draw a line around the bottle 4-6 inches below the mouth. Have kids decorate the bottle between the mouth and the line.
  2. Encourage kids to get creative when decorating their bottles. Offer pre-cut pieces of duct and masking tape in bright circus-inspired colors. Stickers and adhesive craft foam are easy to use and mess-free. Design ideas: Use yellow and red tape to make a "Big Top" blower that looks just like a circus tent. Self-adhesive craft foam circles are fun and festive on a yellow tape background. Create a crowd of pink elephants using craft foam circles with foam hearts for ears.
  3. Once bottles are decorated, turn them into bubble-blowers. Use scissors to cut-off the bottom of the bottle at the marked line - this is a parent's job.
  4. Now its time to blow bubbles! Pour bubble solution into a shallow tray (an aluminum cake pan works well) and dip the cut-end of the bottle into the bubble solution. Make bubbles by blowing gently through the mouth of the bottle.

Duct Tape Mardi Gras Beads

Duct Tape Mardi Gras Beads

Total Time 30 minutes or less Ages school-age

Make your own Mardi Gras beads this year using drinking straws and duct tape! These easy to make beads are perfect for bracelets and necklaces and can be made big or small, whatever you like. This is a great Mardi Gras make and take project as well!

by Amanda Formaro

What you'll need

  • Duct tape: green, purple and yellow (or gold)
  • Drinking straws
  • Scissors
  • Yarn or string
  • Cutting mat (optional)
  • Craft knife (optional)

Helpful Tip:

A self healing cutting mat is a must for anyone who plans to make duct tape projects on a regular basis. While it's not required, it makes working with the tape a lot easier!

Notes:

Here's a fun fact: The colors of Mardi Gras have meaning and were chosen way back in 1892! Purple represents justice, green represents faith and gold represents power.

How to make it

Duct Tape Mardi Gras Beads 1

1. Measure out one strip of each color duct tape on your cutting mat.

Duct Tape Mardi Gras Beads 2

2. Cut the strips in half lengthwise so that you have two long strips for each color. Now cut the strips of tape to match the length of your drinking straws.

Duct Tape Mardi Gras Beads 3

3. Place a straw on the edge of the tape and roll it up, covering the straw completely. 

4. Use scissors to trim the ends off of each straw, then cut them into whatever lengths you want your beads to be.

Duct Tape Mardi Gras Beads 5

5. Cut a long length of yarn, long enough to make several necklaces to fit your child. Use a piece of tape to hold one end of the yarn down on the cutting mat so that the beads do not fall off the other end when you string them on.

Duct Tape Mardi Gras Beads 6

6. Wrap the opposite end of the yarn with a piece of tape to make it easier to string the beads on.

7. Thread beads onto the yarn string, making the necklace as long or as short as you like. When finished, cut and tie off. You can use all one color on each necklace like traditional Mardi Gras beads, or use multiple colors, whatever your preference!

Duct Tape Holly Berry Brooch

Duct Tape Holly Berry Brooch

Total Time 30 minutes or less Ages school-age

Great for holiday get togethers, Christmas plays, and other festive parties and outings. These holly berry pins are made from duct tape and jingle bells and they will make a great gift for grandparents too!

Lately I've been playing around a lot with duct tape. I avoided it for a long time, and now I can't imagine why I did! So if you've been avoiding duct tape crafts because you think they are too complicated, I urge you to try out a few. This one is simple, so give it a go and have fun!

Find More Crafts:

Duct Tape Roses

Duct Tape Heart Bunting

Download Duct Tape Holly Berry Brooch Template

by Amanda Formaro

What you'll need

  • Duct tape (green, white, blue, red, etc)
  • 3 jingle bells (red, blue, green, purple, etc)
  • String or twine
  • Metal pin back
  • Scissors
Variations:
instead of pins, you can make these into festive magnets! Simple attach a magnet to the back instead of a pin-back. They would also make great barrettes, simply attach a hair clip or hair tie instead.

How to make it

Duct Tape Holly Berry Brooch 1

1. Measure and cut a piece of duct tape 8-inches long. Fold the tape lengthwise onto itself, sticky side to sticky side. Fold that piece of tape in half to create a crease. Lay one of the leaf patterns on the tape, lining up the flat side of the pattern with the crease of the tape. Cut around the pattern.

Duct Tape Holly Berry Brooch 2

2. Thread string through the three jingle bells and tie in a knot. 

Duct Tape Holly Berry Brooch 3

3. Tie the jingle bell string around the duct tape holly leaves and use small pieces of duct tape to secure the string to the back. Trim off any excess string. 

Duct Tape Holly Berry Brooch 4

4. Lay pin back onto the back of the holly leaves and secure with small pieces of duct tape. Attach pin to shirt or sweater!

Halloween Costumes: Big Bad Wolf Costume

Halloween Costumes: Big Bad Wolf Costume

Total Time afternoon or evening Ages all-ages

This furry critter, perfect for a parent accompanying his little piglets while trick-or-treating, is a fairy tale favorite. 

What you'll need

  • Fake fur, 4 by 5 feet
  • Scissors
  • 4 pipe cleaners
  • Double-sided tape
  • Cloth tape
  • Knit cap
  • Adhesive-backed Velcro
  • Long-sleeved shirt
  • Permanent marker
  • Jeans, dark socks, and lace-up shoes
  • Dark cotton work gloves
  • Necktie
  • Rubber wolf or dog nose (sold at many party stores)

How to make it

  1. First, make the wolf's hood. Fold a 15- by 40-inch piece of fake fur in half and cut out a rounded section for the face. Make fur ears by cutting out the shape, and then cutting a 1-inch slit centered at the bottom of each ear. Cover one inner half of each shape with double-sided tape, avoiding the 1-inch tabs. Press pipe cleaners on top of the taped section. Fold the shape closed. and attach them to the hood: snip 2 holes for each one, 3 inches apart and 3 inches from the front edge of the hood
  2. Next, apply two long strips of double-sided tape to a knit hat as shown and attach the fur hood to the hat, centering the widow's peak just below the hat brim. Tape the back of the hood closed. Stick Velcro tabs to the inside bottom corners just below the wolf's chin so you can close the front. Then tuck the bottom of the hood into the wolf's shirt.
  3. For wolf feet, use a marker to trace the costume wearer's shoes onto the underside of a piece of fake fur, leaving a 1-inch margin all around. Draw three pointy toes at the front of each outline, then cut out the shapes. Cut an X in the center of each heel and snip two shoelace holes, as shown. When it's time to wear them, have the wolf roll up his pant legs, slide each stockinged foot through the X from the fur side, and then put on his shoes. Thread the shoelaces up through the holes and tie them to hold the fur.
  4. For paws, trace the work gloves onto fake fur, again leaving a 1-inch margin. Attach the cutouts to the backs of the gloves with double-sided tape. Then make a tail to attach to the wolf's jeans, and have him put on his tie and rubber nose.
  5. Cut out the tail from the remaining fabric. Cut a 1-inch slit centered at the bottom of the tail. Cover one inner half of the shape with double-sided tape, avoiding the 1-inch tabs. Press pipe cleaners on top of the taped section. Fold the shape closed.
  6. To attach the wolf tail, spread the tabs and stick them onto the wolf's pants with more double-sided tape. 

Beaker and Dr. Honeydew Spoon Puppets

Beaker and Dr. Honeydew Spoon Puppets

Ages 5 to 8

Scientist Dr. Bunsen Honeydew and his faithful assistant, Beaker, are always stirring up trouble at Muppet Labs. Re-enact your favorite Muppet mishaps with these handy spoon puppets.

Little Red Riding Hood Mini Marionettes

by Bonnie Burton

What you'll need

  • Regular wooden spoon and a wider rice spoon
  • Orange fake craft fur
  • Black chenille stem
  • Fabric glue
  • Small orange pom-pom
  • Yellow foam sponge
  • White, red, blue, pink, light blue, black, and beige felt squares

How to make it

Bunsen & Beaker Spoon Puppets 1

1. For Beaker's hair, cut a small strip of the orange fake fur and glue it around the regular-sized wooden spoon.

Bunsen & Beaker Spoon Puppets 2

2. Glue on the googly eyes, orange pom-pom and a small rectangle of black felt to the back of the spoon to form Beaker's face.

Bunsen & Beaker Spoon Puppets 3

3. Cut out 2 long v-neck t-shirt shapes from the white felt. Cut out another 2 long t-shirt shapes from the white felt without the V-necks. This is the front and back of their lab coats.

Bunsen & Beaker Spoon Puppets 4

4. Cut out the lab coat accents such as two lapels, small circles for buttons, and a tiny pocket from the white felt. Cut a square each from the pink and blue felt, as well as two small rectangles. Cut tie shapes from the red and black felt.

Bunsen & Beaker Spoon Puppets 5

5. Glue the red tie shape on top of the pink colored square. Then glue it under one of the V-neck lab coats.

Bunsen & Beaker Spoon Puppets 6

6. Add the lapels, buttons, pocket, and cuffs to the lab coats.

Bunsen & Beaker Spoon Puppets 7

7. Cut out two pairs of hands from the beige felt.

Bunsen & Beaker Spoon Puppets 8

8. Glue hands to the ends of the arms of Beaker's lab coat. Now glue the front of the wooden spoon.

Bunsen & Beaker Spoon Puppets 9

9. For Dr. Honeydew's face, twist the black chenille stem into a pair of eyeglasses. Fold back onto the wide rice spoon to secure them. Cut out an oval shape from the yellow sponge and glue it onto the spoon for his nose. Glue a thin rectangle from the black felt for his mouth.

Bunsen & Beaker Spoon Puppets 10

10. Glue hands to the ends of the arms of Dr. Honeydew's lab coat. Now glue the front of the wide wooden rice spoon.

11. Be sure to glue on the backs of the lab coats of Beaker and Dr. Honeydew.

Balloon Ghouls Craft - Halloween Crafts

Balloon Ghouls Craft - Halloween Crafts

Total Time 1 hour Ages school-age

by Amanda Formaro

Place these darling little balloon ghouls on the table to greet guests--and at night, place a battery operated tea light underneath to give a ghostly glow to the room! Be sure to visit all of our other ghostly crafts, our fabulous costume ideas and these spook-tackular Halloween recipes!

Some more interesting posts:

Paper Doll

Pumpkin Hollow Decoration

What you'll need

  • White T-shirt material
  • Round balloons
  • Wide mouth jars (to use as stands)
  • White craft glue
  • Water
  • Bowl
  • Paintbrush
  • Large wiggle eyes
  • Battery operated tea lights
  • Scissors

How to make it

  1. Partially blow up balloons, big enough to fit in one hand (about the size of a large orange).
  2. Place balloon, tied end down, on top of a jar.
  3. Mix 1 part water and 2 parts white glue to make a paintable mixture.
  4. Tear or cut t-shirt material into strips long enough to drape over your balloon.
  5. Paint the top of the balloon with the glue mixture. Place a strip of material across the balloon and paint more mixture over the top of the fabric.
  6. Continue this process, crossing fabric over itself to cover all sides. Let it dry completely.
  7. Have an adult use a sharp knife to pop the balloon. Carefully peel it out of the material mold.
  8. Trim the ends of the material so that the ghouls will stand up by themselves.
  9. Glue wiggle eyes on the front.
  10. Wait until it starts to get dark and put the ghosts over a battery operated tea light and watch them glow .

Halloween Costumes: Asian Princess Costume

Halloween Costumes: Asian Princess Costume

Total Time 1 hour Ages school-age

This silky number, featuring chopsticks, sandals, and a cool trick for creating big hair, is a very regal look.

More Princess Crafts:

Sparkly Princess Mosaic

Fairy Princess Costume

What you'll need

  • Two 1- by 2-foot pieces of Bubble Wrap
  • Scotch tape
  • Women's black opaque tights
  • Safety pins
  • Silk flowers
  • Chopsticks
  • Black tape
  • White shirt and tights
  • Sandals
  • Silky bathrobe
  • Silk or satin scarf
  • Face makeup

How to make it

  1. To make the wig, individually roll each piece of Bubble Wrap into a narrow tube and Scotch-tape it closed. Stuff one tube into each leg of the black tights. Pull the waist of the tights onto your child's head. Wrap one leg around her head and safety-pin it in place. Tie the second leg into a knot and pin it in place at the center of the wig. Decorate the wig with silk flowers and chopsticks, using black tape to secure them.
  2. Have your child put on the white shirt and tights, the sandals, and the bathrobe. Then tie and pin the scarf in place just above her waistline.
  3. Apply a little lipstick to the center of her lips, some eyeliner, and a round of rouge on each cheek.

Cookie Tube for Dad Craft

Cookie Tube for Dad Craft

Ages school-age

Recycle a cylindrical potato chip container into a modern art cookie tin for Dad! Paint it however you like and fill it will your dad's favorite homemade cookies.

Sugar Cookie Puzzles

by Amanda Formaro

What you'll need

  1. Potato chip cylinder
  2. Gesso or white acrylic paint (recommended: Liquitex Basics Gesso)
  3. Acrylic paints in green, yellow and blue
  4. Paintbrush
  5. Acrylic sealer spray
  6. Homemade cookies

Helpful Tip:

1. If Dad doesn't have a favorite cookie, try some of our cookie recipes. 2. If your dad's favorite are brownies, make the brownies and use a round cookie cutter or biscuit cutter to make them round (after they are baked)! 3. Add a leftover Christmas bow to the top or make one from ribbon.

How to make it

  • Bake your dad's favorite cookie recipe and set aside to cool.
  • Wash out the potato chip container carefully and let dry.
  • Paint the container with a coat of gesso or white paint and let dry.
  • Paint container with different colors in an abstract art fashion. We did fat brush strokes in random places using three different colors.
  • While the paint is still drying, use a paintbrush to add the lightest color, filling in the gaps and overlapping the other colors.
  • Have an adult spray with acrylic sealer spray and let dry.
  • Wrap stacked cookies in tissue paper and fill container.
  • Replace lid and add a bow to the top if you like.

The Lilliputian Kids Holiday Card

The Lilliputian Kids Holiday Card

Transform your holiday family photo from a still life study to a dazzling display of unexpected illusions. Kids, grown-ups, and "Stuart Little" fans in particular will appreciate this sleight-of-eye picture. And for a fun variation, try an open gift box or a festive-looking drum instead of ski boots.

by Frederick G. Levine

What you'll need

  • Ski boots
  • Photograph
  • Glue
  • Textured handmade paper or construction paper

How to make it

The Lilliputian Kids - Step 1

1. Getting the Shot: Place the boots in the foreground and have your subjects stand in the background, ideally on an incline, as shown. For the best angle, lie on your belly to take this picture. Angle the shot so you can't see inside the boots — that will kill the illusion. Move the camera up and down until the subjects appear to be sticking up out of the boots — and if you like, tilt the camera to make it look as if they're skiing downhill.

The Lilliputian Kids - Step 2

2. Making the Card: We glued the photo to textured handmade paper (available at craft stores), but construction paper works too. Make the decorative torn edges by painting each edge you want to rip with water. While the edge is still wet, tear it gently along a ruler.

//