Latest news, food, business, travel, sport, Tips and Tricks...

Recycled Tote | Recycled Crafts

Recycled Tote

Total Time Needed: 1 Hour

Fuse a stack of plastic shopping bags into a durable, water-resistant carryall, great for toting sleepover gear, wet bathing suits, or sandy beach treasures.

Materials

  • 9-10 plastic shopping bags (use only those labeled No. 2 HDPE)
  • Scissors
  • Parchment paper
  • Iron
  • Ironing board
  • Colored duct tape

Instructions

Recycled Tote - Step 1

1. Cut the handles and bottoms from 8 shopping bags. Arrange the bags into two equal stacks. Make sure any printing on the top and bottom bags faces inward.

Recycled Tote - Step 2

2. Sandwich one of the stacks between two pieces of parchment paper, making sure the plastic is entirely covered. Beginning with the iron on a low setting, such as synthetics, move it steadily over the stack until the bags shrink and fuse together. If the bags do not fuse after 2 or 3 minutes, increase the iron's temperature. You may need to experiment to get the heat just right. Avoid touching the plastic directly with the hot iron. Set the fused sheet aside and repeat with the other stack.

Recycled Tote - Step 3

3. To create one long sheet of plastic, lay the two sheets end-to-end, overlapping by one inch. Then iron the overlap between layers of parchment paper to fuse the sheets together.

Recycled Tote - Step 4

4. Have your child choose colored plastic bag strips to decorate the outside of the sheet. Iron these plastic pieces to the sheet between parchment paper, as in step 2.

Recycled Tote - Step 5

5. Lay the sheet decorated-side down. Fold it so that the short ends match up, and tape the sides of the bag together. Trim the top of the bag to even the edges. For each handle, lay a 9-inch-long piece of tape in the center of an 18-inch-long piece, sticky sides together, then tape the handles to the inside of the bag.

Thanksgiving Crafts: Turkey Table Topper

Turkey Table Topper

Total Time Needed: 1 Hour

Not only can this festive bird really dress up a Thanksgiving table, it also does double duty serving up your dinner rolls.

Materials

  • Large brown paper bag
  • Piece of corrugated cardboard
  • Paper plates
  • Stapler
  • Mod-Podge glue
  • Colored paper
  • Orange or red balloon and googly eyes
  • Glitter, stickers, or other notions
  • Craft clothespins
  • Tacky glue

Instructions

Turkey Table Topper - Step 1

1. The Turkey's Body:

Trim the bag so that it measures about 8 inches tall. Then fold down the sides so that they are half the height and double the thickness. Cut the cardboard to fit in the bottom of the bag and insert it. Next, fold a paper plate in half and fit it inside the bag where the tail will go, bending the sides as needed.

Turkey Table Topper - Step 2

2. Staple the plate in place. Then staple a second plate (don't fold this one) to the outside of the bag behind the first plate. For wings, fold 2 paper plates in half and staple one to each side so the bag is sandwiched between it.

Turkey Table Topper - Step 3

3. For the turkey's head, fold and staple another paper plate, as illustrated. Decorate all the paper plates, including the head, by gluing on torn bits of colored paper. Then add a balloon wattle and googly eyes.

Turkey Table Topper - Step 4

4. The Feathers:

Have your kids glue colored paper shapes on paper plates, layering different prints or creating bold patterns if they like.

When the glue is dry, cut feather shapes out of the plates and stick a craft clothespin to the back of each with tacky glue so your child can attach the feathers to the paper plates. For an extrafancy finish, they can add decorative notions or even their names.

Recycled Piggy Bank | Kids' Painting Ideas

Recycled Piggy Bank

Total Time Needed: Afternoon Or Evening

Turn a 2-liter bottle into the cutest economic recovery package you'll ever see.

Materials

  • Paintbrush
  • Pink acrylic paint
  • 2 toilet tissue tubes
  • Scissors
  • Pink tissue paper
  • Clean 2-liter plastic bottle
  • Mod Podge, or a mixture of 2 parts tacky glue to 1 part water
  • 2 googly eyes (ours are 5/8-inch wide)
  • Pink two-holed button (ours is 3/4-inch wide)
  • Tacky glue
  • Craft knife
  • Pink pipe cleaner

Instructions

Recycled Piggy Bank - Step 1

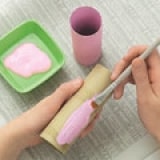
1. Paint the outside of both tubes pink. Paint half of the inside of one tube pink. Set them aside to dry.

Recycled Piggy Bank - Step 2

2. Cut the tissue paper into 1 1/4-inch squares. (To save time, stack several sheets and then cut them.) Brush a small section of the bottle with Mod Podge or diluted glue, lay a square on it, and brush Mod Podge on top of the square. Repeat the process until the bottle, including the capped spout, is entirely covered. Let it dry.

Recycled Piggy Bank - Step 3

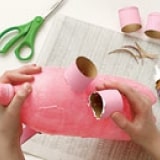
3. For the ears, cut two deep U shapes from the tube that's painted pink inside. Cut three 1/4-inch slits in the base of each ear. Bend back the flaps to create gluing tabs. For the legs, cut four 1 1/2-inch-long sections from the tubes. Trim each leg to fit the contour of the bottle. Attach the legs, the ears, the googly eyes, and the button nose with tacky glue. Let them dry.

Recycled Piggy Bank - Step 4

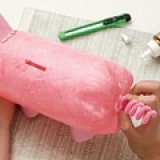
4. Use the craft knife (a parent's job) to cut a rectangular coin slot in the pig's back. Wind the pipe cleaner around a finger to make a tail shape, then glue it in place.

Recycled Piggy Bank - Step 5

5. With scissors, trim the legs as shown so that the pig will stand flat. When you're ready for some pork barrel spending, cut a flap in the underside of the bank with the craft knife.

Fourth of July: Uncle Sam Pin

Uncle Sam Pin

Total Time Needed: 1 Hour

Pin on a patriotic face that's sure to stand out in any Fourth of July crowd.

Materials

  • White craft foam
  • Scissors
  • Markers
  • Wooden craft spoon
  • Googly eyes
  • Cotton balls
  • Glue
  • Self-adhesive pinback

Instructions

  1. To make one, cut out a basic Uncle Sam-style hat (about 2 inches tall and 1 inch wide) from white craft foam.
  2. Use markers to color the brim blue and to draw red stripes on the top.
  3. Glue the hat to the handle of a wooden craft spoon (if necessary, first use scissors to trim the wooden handle so that it's shorter than the hat).
  4. Glue on googly eyes and a cotton ball beard, then draw on a small L-shaped nose.
  5. Attach a self-adhesive pinback (sold at many craft and bead stores), and your Uncle Sam pin is ready to wear.

Recycled Barrettes | Nature Crafts

Recycled Barrettes

Total Time Needed: 1 Hour

Redo boring barrettes with bows, beads and little trinkets.

Materials

  • Poster board
  • Assorted odds and ends, including ribbons, buttons, puzzle pieces, balloons, bows and shells
  • Nontoxic white glue
  • Plain barrettes or barrette backs
  • Hot glue gun

Instructions

Recycled Barrettes - Step 1

1. Cover a large surface with newspaper and spread out all of the items. Then cut a piece of poster board that is slightly larger than your barrette back.

2. Once you've finished the design, carefully push aside the materials and cover the pattern with glue. Press the collage items on the glue and allow to dry completely.

3. To finish, hot-glue the poster board to the barrette (a parent's job).

Two Crafts in One Box | Homemade Doll Crafts
Two Crafts in One Box

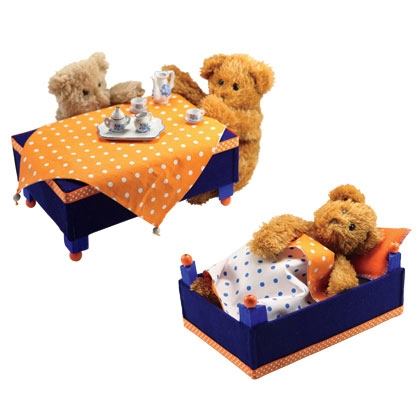
Five-pound boxes of clementines hold more than just fruit - those wooden crates are full of crafty possibilities. We've found that a box makes a perfectly sized table or bed for dolls and plush pals.

Materials

  • paint
  • glue gun (an adult's job) or tacky glue
  • wooden beads
  • felt
  • ribbon trim
  • fabric

Instructions

  1. To make one, first paint the corner posts, then use a glue gun or tacky glue to attach a wooden bead to each one.
  2. Cut felt to cover the crate's bottom and sides, measuring each side panel so that it folds over to cover the interior walls (snip slits to fit it around the corner posts).
  3. Affix the felt and some ribbon trim with more glue. A fabric tablecloth can double as a blanket when the table is turned into a bed. If desired, sew up a little felt pillow for snoozing.

Valentine Jewelry: Puzzle Pin

Puzzle Pin

Total Time Needed: 1 Hour

Give a valentine a piece of your heart with this clever pin made from old jigsaw puzzle pieces.

Materials

  • Puzzle pieces
  • Red spray paint
  • Newspaper
  • Glue
  • Pin backing (available at craft stores)

Instructions

  1. Place 20 to 25 old jigsaw puzzle pieces, excluding the straight-edged border pieces, on newspaper and spray-paint them red (brush-applied paint will also work).
  2. Let the pieces dry thoroughly before gluing them into a heart shape. Use only as many as you need; each heart will look different.
  3. Glue on a pin back and present it to your true love.

Variations:

Glue on magnetic backing to create a sweet magnet.

Use-Your-Noodle Headboard | All Kids' Room Crafts

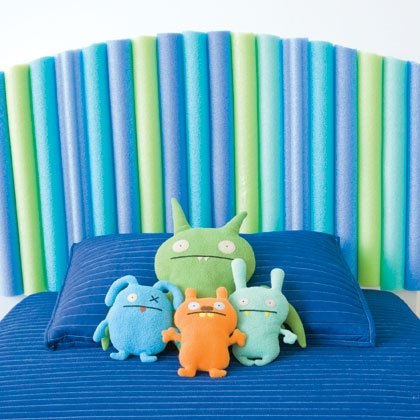
Use-Your-Noodle Headboard

Sweet dreams are a sure thing when your bed is adorned with cushy and colorful pool noodles. You can attach your creation right to the wall or use it to cover up an old headboard. Kids can choose the colors, but cutting and gluing the foam core and noodles are jobs for adults.

Materials

  • wrapping or kraft paper
  • large foam core sheet or 2 smaller sheets joined with duct tape
  • craft knife and serrated kitchen knife (an adult's job)
  • pool noodles
  • hot glue gun (an adult's job)
  • picture hanging strips (we used large 3M Command Picture Hanging Strips)

Instructions

  1. To make a template, draw the desired headboard shape (or trace your old headboard) on the wrapping or kraft paper. Cut it out.
  2. Lay the shape on the foam core sheet and trace around it. With the craft knife, score along the traced lines, then cut out the shape.
  3. With the serrated kitchen knife, trim the pool noodles to approximately the same height as the foam core, then cut each noodle down the middle.
  4. Starting at the headboard's center and working toward the sides, use the hot glue to adhere the noodles' flat sides to the foam core.
  5. Secure the foam core to the wall or the old headboard with the picture hanging strips.

Halloween Costumes: Pirate Costume

Pirate Costume

Total Time Needed: 1 Hour

Looking for some swashbuckling fun this Halloween? Let your child pillage the back of your closet for this creative pirate costume.

Materials

  • old black pants
  • gold or white blouse
  • red scarf
  • gold costume jewelry
  • bandana
  • eye patch
  • pirate's hook
  • black face paint

Instructions

  1. Find a pair of old black pants and fringe the edges with scissors.
  2. Tuck in a big gold or white blouse. Tie a red scarf around the pirate's waist and a bandanna around his head.
  3. Clip on some gold costume jewelry, then add an eye patch and a pirate's hook (all inexpensive party store finds).
  4. Dab on black face paint for a beard and missing-tooth makeup.
  5. If you've got a stuffed bird in your toy box, use craft wire to attach it to your pirate's shirtsleeve. Now he's ready to collect his Halloween booty.

Craft: Plastic Pocket T-Shirt

Craft: Plastic Pocket T-Shirt

Total Time Needed: 1 Hour

We've seen a lot of custom T-shirt projects, but none that allow kids to customize their shirts on a daily basis. This shirt's clear plastic pocket lets kids display their obsession du jour.

Materials

  • T-shirt
  • Clear plastic trading card page (available at hobby or office supply stores)
  • Scissors
  • Masking tape
  • Embroidery needle
  • Embroidery floss
  • Flattish object to place in pocket, such as a photo, iron-on appliqué, artificial flower, etc.

Instructions

  1. Cut 1 pocket from the center of a trading card page, leaving a 1/4-inch margin around the seams.
  2. Secure the pocket's top and bottom in place with masking tape.
  3. Thread the needle with the floss, knot the end, and use a simple whipstitch to attach one side of the pocket to the shirt. Remove the bottom tape and continue stitching, leaving the top open.
  4. Remove the remaining tape. Place an object in the pocket.

Tips:

When drying the T-shirt, always hang-dry to protect the plastic pocket.

Watercolor Butterflies | Preschool Crafts for Kids

Watercolor Butterflies

Total Time Needed: 1 Hour

Watch closely as coffee filters metamorphose into beautiful butterflies.

Materials

  • Paper coffee filters
  • Watercolors and brushes
  • Markers
  • Glue
  • Glitter
  • Clothespins
  • Colored paper

Instructions

  1. To color the filters, either dab on watercolor paint with a brush or draw on designs with markers -- or both. The watercolors will bleed into each other. If using markers, sprinkle the filter lightly with water to make the ink blend together. For a shimmery effect, add glitter-and-glue designs.
  2. Once the filter is dry, pinch it in the middle like a bow tie. Slide or clip a clothespin onto it and fan out each side of the filter to resemble a butterfly's wings.
  3. Cut two strips of construction paper, approximately the size of matchsticks, and glue them onto the clothespin for a pair of antennae. Then clip them to curtains, hang them from the kitchen chandelier, and even fasten a few to the telephone cord.

How to... Create a Sand Castle That Lasts

How to... Create a Sand Castle That Lasts

Total Time Needed: 1-2 Hours

Turn sand from your next beach vacation into this easy-to-use clay, then build a permanent, air-hardened sand castle for a keepsake.

Materials

  • 1 cup sand
  • 1/2 cup cornstarch
  • 1 teaspoon alum (sold in the spice section of grocery stores)
  • Saucepan
  • Wooden spoon
  • 3/4 cup water
  • Shells (optional)
  • Twig (optional)
  • Tacky glue (optional)

Instructions

How to ... Create a Sand Castle That Lasts - Step 1

1. Add the sand, cornstarch, and alum to a saucepan and use a wooden spoon to combine them completely.

How to ... Create a Sand Castle That Lasts - Step 2

2. Add the water and stir the mixture until it is smooth and the cornstarch is dissolved.

How to ... Create a Sand Castle That Lasts - Step 3

3. Cook the clay over medium-low heat, stirring occasionally. The clay should start to thicken within a minute or two. Stir more vigorously, being sure to scrape the mixture from the sides and bottom of the pan.

How to ... Create a Sand Castle That Lasts - Step 4

4. After about 3 minutes of cooking, the clay will have thickened to the consistency of play dough. Remove the clay from the pan. Once it's cool enough to touch, you can start sculpting. (For best results, use the clay within a day or two of mixing it.)

How to ... Create a Sand Castle That Lasts - Step 5

5. Create your sand castle with towers and crenellated walls. We added a shell door and flag (a shell glued to a twig). The clay should dry completely within a week. If any pieces fall off after the clay dries, reattach them with tacky glue.

Thanksgiving Crafts: Village People Table Decorations

Village People Table Decorations

Total Time Needed: 1 Hour

Decorate the table with paper Pilgrims and Native Americans.

Materials

  • Scissors
  • Cardboard tissue tubes
  • Colored paper
  • Fine-tipped markers
  • Glue

Instructions

  1. For each figure, wrap a cardboard tissue tube with a 4- by 6-inch rectangle of colored paper and glue the paper in place.
  2. Draw the facial features on a 2- by 3-inch piece of paper with markers. Glue the face onto the tube.
  3. For the hair, cut fringe along one side of a small paper rectangle. Roll the hair around a pen to make curls, trim it, and glue it into place.
  4. Cut and decorate headbands and feathers for the Native Americans and collars for the Pilgrims.
  5. For the Pilgrim girl's bonnet, wrap a 2- by 5-inch paper rectangle around the top of the tube with the ends overlapping and glue at the back.
  6. For the Pilgrim boy's hat, cut out a black circle 2 1/2 inches in diameter. Roll and glue a black, 2- by 5-inch paper rectangle into a tube shape. Cut slits along one end, fold in the tabs, and glue them to the center of the paper circle. Add a 1/2-inch band and square buckle and glue the hat to the boy's head.

Summer Craft: Sand Castle Scrapbook

Sand Castle Scrapbook

A scrapbook that contains the memories of your exciting summer adventures deserves a cover with true grit - such as this castle made of sandpaper.

Materials

  • Pencil
  • Sandpaper (we used 60 grit for a coarse, sandy look)
  • Scissors
  • Toothpick
  • Tape
  • Card stock
  • Marker
  • Scrapbook
  • Double-sided foam tape

Instructions

Sand Castle Scrapbook - Step 1

1. Download our castle template or draw your own castle elements. Trace the castle shapes on the smooth side of a sheet or two of sandpaper and cut them out.

2. Tape a toothpick to the back of the triangular tower top. Cut out a pennant from card stock and write a message on it, if desired.

3. Adhere the shapes to the cover of a scrapbook using double-sided foam tape.

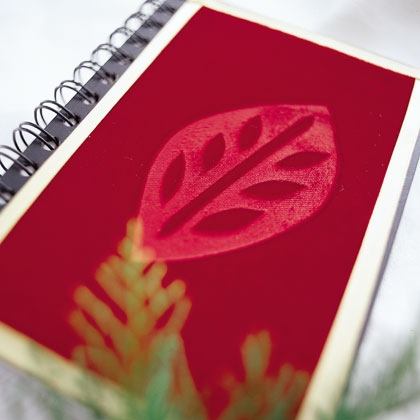
Craft: Velvet Journal

Craft: Velvet Journal

Total Time Needed: 1 Hour

These velvet-covered journals are easy enough for even young kids to help make, yet they look delightfully fancy.

Materials

  • Blank hardcover book or notebook
  • Ruler and scissors
  • Velvet
  • Fabric stamps
  • Ironing board and iron
  • Tacky glue
  • Flat ribbon

Instructions

  1. Measure the cover of your book, then cut out a piece of velvet that's just slightly smaller.
  2. Place the fabric stamp on your ironing board with the stamp side up. Put the velvet over the stamp, fuzzy side down, then spritz the back of the fabric with water. With the iron set on high, press down evenly for about 25 seconds (a parent's job). Carefully lift the iron, peel the fabric back from the stamp, and let the fabric dry. To add more patterns, repeat this process.
  3. Put glue on the back side of the velvet and attach it squarely to the front of the journal. Cover the rough edges of the velvet by gluing a strip of flat ribbon on top of them.

Tips:

Although cotton and polyester velvet do work, rayon and silk velvet make the best prints. Use fabric stamps (which cost about the same as rubber stamps) because they are tested for use with high heat.

Halloween Craft: Salt Dough Ghosts

Halloween Craft: Salt Dough Ghosts

Total Time Needed: 1 Hour

Your kids will quickly get into the spirit with this craft project: shaping a batch of mini sprites to use as party decorations or favors. For an even spookier effect, add these easy-to-make Paper Bag Trees.

Materials

  • 1 cup flour
  • 1 cup salt
  • 1/2 cup water
  • Bowl
  • Wooden spoon
  • Fine-point permanent black marker

Instructions

1. Combine the flour, salt, and water in a bowl. Stir the mixture with a wooden spoon until smooth.

Salt Dough Ghosts - Step 2

2. Divide the dough into 6 equal pieces and shape each into a ghost, flattening the base so it will stand up.

3. Microwave the ghosts on a plate one or two at a time for 20- to 30-second intervals until the dough is fairly firm (about 1 1/2 to 2 minutes in total). Let the ghosts cool (they can get quite hot).

4. Use a fine-point permanent black marker to draw on eyes and a mouth.

Christmas Craft: Rudolph the Red-Nosed Handprint

Rudolph the Red-Nosed Handprint

Total Time Needed: 1 Hour

Your child gets to lend a hand in crafting this ultraeasy decoration, which makes a sweet gift for grandparents this Christmas.

Materials

  • Pencil
  • Brown craft foam or card stock
  • Black marker
  • Red glitter glue
  • Gold sequins
  • Glue
  • Googly eyes
  • Red pom-pom
  • Brown pipe cleaner
  • Paper clip or clothespin

Instructions

  1. To assemble one, first use a pencil to trace your child's hand onto a piece of brown craft foam or card stock.
  2. Cut out the shape and add black marker hooves to the fingertips.
  3. Next, add a red glitter glue collar with gold sequins for bells, then glue on a googly eye, a red pom-pom nose, and a tail cut from the brown craft foam or card stock.
  4. For the reindeer's antlers, cut a brown pipe cleaner in half. Bend each half in two (slightly off-center) and curl the ends. Glue together the pipe cleaner pieces, holding them in place with a paper clip or clothespin until the glue dries. Finally, glue the antlers in place on the reindeer.

Christmas Craft: Rudolph Table Topper

Rudolph Table Topper

Total Time Needed: 2-3 Hours

This reindeer's nose isn't his only noteworthy feature. His antlers also make a festive display rack for hanging your Christmas ornaments.

Materials

  • 12- by 18-inch piece of brown craft foam
  • Scissors
  • 64-ounce juice bottle with a red cap, emptied and rinsed
  • Craft knife
  • Sand
  • Funnel
  • 2-inch Styrofoam ball
  • 3- by 2-inch scrap of black craft foam
  • Craft glue (we used tacky glue)
  • 2 branched sticks (ours were about 2 feet tall)
  • 2 clothespins
  • Holiday ornaments and ribbon

Instructions

Rudolph Table Topper - Step 1

1. On the brown craft foam, draw 2 ears and a pear-shaped head, as shown. Draw 2 asterisks at the top of the head where the antlers will go and trace the bottle cap at the other end for the nose. Use scissors to cut out the head, ears, and nose hole, then cut the asterisks to make holes.

Rudolph Table Topper - Step 2

2. Mark 2 asterisks at the bottom of the bottle, about 4 inches apart, and cut those with a craft knife (a parent's job). Use the funnel to fill the bottle with sand.

Rudolph Table Topper - Step 3

3. Put the head shape onto the bottle by pushing the spout through the nose hole. For eyes, cut the Styrofoam ball in half with a craft knife (a parent's job). Cut 2 quarter-size circles from black craft foam and glue one on each of the Styrofoam pieces. To help the foam circles stick, turn over each eye and press down hard, flattening the rounded edge.

Rudolph Table Topper - Step 4

4. Screw the cap on and lay the bottle on its side. Glue the eyes in place. Next, line up the asterisk holes in the head with the ones in the bottle, then push the antler sticks through. Glue on the ears, using clothespins to hold them in place while they dry. To finish, decorate Rudolph's antlers with holiday ornaments tied on with ribbons.

Rudolph and Co. Holiday Ornaments | Easy Crafts for Kids

Rudolph and Co. Holiday Ornaments

These ornaments are so easy to make, you'll have herds of them hanging around the Christmas tree when your little elves are done. So watch out, Comet and Cupid! My kids came up with names like Flyer and Skywalker for their reindeer.

Materials

  • Craft glue
  • Craft sticks
  • Several shades of brown felt
  • Scissors
  • Googly eyes
  • Red and brown pom-poms
  • Off-white felt
  • Ribbon

Instructions

Rudolph and Co. Step 1

1. Glue 3 craft sticks together in a triangle, allowing some overlap on two corners for antlers, as shown. Glue 2 more craft sticks to the triangle, one on each side between the overlapped sticks, and let dry.

2. Next, glue a triangular piece of brown felt to the craft stick triangle and trim so the edges of the felt match up with the sticks. Glue on googly eyes, a pom-pom nose, brown felt triangle ears, and a small off-white felt triangle blaze to the reindeer's forehead. Add a loop of colorful ribbon on the back to hang this festive fauna.

The Very Hairy Caterpillar | Garden Crafts

The Very Hairy Caterpillar

This soddy creature makes a fun first-time gardening project while bringing a little bit of spring into your home.

Materials

  • 4 cups potting soil
  • 4 tablespoons quick-sprouting grass seed (we used ryegrass seed)
  • Small yogurt container or paper cup
  • Knee-high nylon stocking
  • Colorful ponytail holders
  • Scissors
  • Plastic bag
  • Bobby pin
  • Googly eyes
  • Pipe cleaner
  • Small pom-poms

Instructions

1. Combine the potting soil and grass seed in a large bowl.

The Very Hairy Caterpillar Step 2

2. Cut the bottom from a small yogurt container or paper cup for a funnel, then slide a knee-high nylon stocking over it, as shown.

The Very Hairy Caterpillar Step 3

3. Pour or spoon 3⁄4 to 1 cup of the soil mixture into the stocking, then slide a colorful ponytail holder over the end of the stocking to section off the pocket of soil. Repeat this process to make 5 soil-filled segments. Tie a knot in the top of the stocking and trim away any excess nylon.

4. Submerge the caterpillar in water for 10 minutes, then place it in a plastic bag and let it sit overnight.

The Very Hairy Caterpillar Step 5

5. Remove the bag and loop a semi-straightened bobby pin through the front of the stocking, then glue a googly eye onto each end of the pin. For antennae, cut a pipe cleaner in half, glue a small pom-pom onto one end of each half, and stick them in place.

6. Set your caterpillar on a plate by a sunny window and generously water the whole thing every other day. Your critter should sprout hair in about 4 to 5 days.

//