Latest news, food, business, travel, sport, Tips and Tricks...

Valentine's Day Card: Animal Attraction

Valentine's Day Card: Animal Attraction

Total Time Needed: 1 Hour

There's nothing tame about these fun and funky jungle-print wristbands.

Materials

  • Cardboard tubes
  • Stapler
  • Black elastic
  • Tacky glue
  • Animal-print felt
  • Ribbon
  • Card stock

Instructions

Cut cardboard tubes into 2-inch lengths. Snip each so that it opens into a cuff shape.

Animal Attraction - Step 1

Using a stapler, attach the ends of a 3 1/2-inch piece of 1/4-inch-wide black elastic as shown; make sure the staple points are facing outward.

Apply tacky glue to the outside of the cuff and cover the cuff and the elastic ends with a 2- by 6-inch strip of

animal-print felt.

Let the glue dry, then trim the felt as needed.

Use a ribbon to tie on a note cut from card stock.

Batty Cupcakes Recipe | Halloween Cupcakes

Batty Cupcakes Recipe

Here's a frightfully good Halloween surprise your kids will really want to sink their teeth into.

Ingredients

  • Cupcakes (baked from your favorite recipe)
  • Chocolate icing
  • White frosting
  • 2 M&M's Minis
  • Jujube candy
  • Thin Mint (we used Haviland brand)
  • Andes Creme de Menthe candy

Instructions

Frost a cupcake (baked from your favorite recipe) with chocolate icing.

For the bat's face, set two M&M's Minis in place for eyes and add a jujube candy nose.

For the wings, cut a Thin Mint (we used Haviland brand) in two and set the halves in place as shown. Then cut an Andes Crème de Menthe candy in half diagonally and set the pieces in place for the bat's ears.

Finally, add a white frosting mouth, fangs, and pupils.

,

Basil Chicken Burgers with Pesto Mayonnaise

Basil Chicken Burgers with Pesto Mayonnaise

Ken Haedrich, cookbook author and FamilyFun contributor, came up with this extra juicy burger that's made with ground chicken -- often a leaner alternative to ground beef. Pesto, used both in the burgers and in the special sauce, adds a savory, garden-fresh flavor to his version of a cookout classic.

Ingredients

FOR THE BURGERS:

  • 1 1/2 pounds ground chicken
  • 3/4 cup grated sharp Cheddar or 1/2 cup finely grated Parmesan
  • 1/2 teaspoon salt
  • 1/4 teaspoon ground pepper
  • 1/3 cup mayonnaise
  • 2 tablespoons pesto (store-bought or your favorite recipe)
  • Oil for brushing the burgers
  • 6 burger rolls
  • Lettuce
  • Sliced tomatoes

FOR THE PESTO MAYONNAISE:

  • 1/2 cup mayonnaise
  • 2 tablespoons pesto

Instructions

Line a medium-size baking sheet with plastic wrap and set it aside. In a large mixing bowl, combine the ground chicken, cheese, salt, and pepper, gently tossing the mixture with your hands or a large fork, until evenly blended.

In a small bowl, mix the mayonnaise and pesto, then add it to the ground chicken mixture and combine until evenly blended. Shape the meat into six 1/2-inch-thick patties, placing each one on the lined baking sheet as you go. Cover the burgers with plastic wrap and refrigerate them for at least 30 minutes to firm them. (Note: The patties will be softer than traditional hamburgers.)

While the meat is chilling, prepare the grill and make the Pesto Mayonnaise (just combine the ingredients in a small bowl). Then brush one side of each of the burgers with a little oil and place them on the grill, oiled side down. Lightly brush oil on the other side of the burgers and cook them for 5 minutes on each side, turning once, or until the meat is no longer pink inside.

Serve the burgers on the rolls, dressed with the lettuce, tomatoes, and Pesto Mayonnaise. Makes 6 burgers.

Nutritional Information

Per serving (1 cheddar-based burger on a bun with 1 1/2 tablespoons of pesto mayonnaise):

Calories 572

Total Fat 41 g (62% DV)

Saturated Fat 9 g (47% DV)

Cholesterol 122 mg (41% DV)

Sodium 833 mg (35% DV)

Total Carbohydrate 23 g (8% DV)

Fiber 1 g (5% DV)

Sugars 3 g

Protein 28 g (55% DV) (Percent daily values are based on a 2,000-calorie diet. Your daily values may be higher or lower depending on your calorie neeeds.)

,

Basketball Cupcakes Recipe

Basketball Cupcakes Recipe

Score big with resident hoop fans by making a batch of these tournament-time treats.

Ingredients

  • Mini white cupcakes (ours is 1 inch tall)
  • White frosting
  • Orange decorators' gel
  • Sugar cookies (ours is 3 inches in diameter)
  • Mini basketball chocolates (available at candy stores or online at chocolateexpressions.com)

Instructions

For each basket, trim the cupcake flush with the wrapper's edges, if needed. Frost the cupcake and pipe a ring of decorators' gel around the edge.

For the backboard, frost half of a cookie, then add decorators' gel details. Keeping the cookie flat, dab frosting where the basket will go and gently press the cupcake in place.

Use another dab of frosting to secure a chocolate basketball. Let the treats set for at least a half hour before standing them up.

,

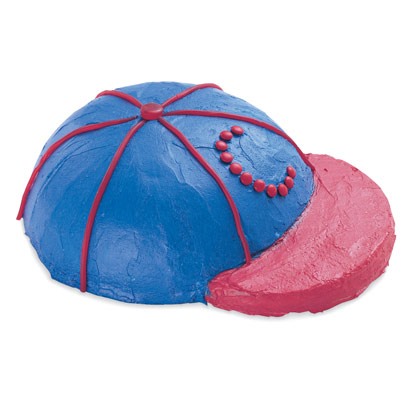
Baseball Hat Cake Recipe

Baseball Hat Cake Recipe

If your eight-year-old eats, sleeps and breathes baseball, this cake is for him or her. Invite a group of baseball fans to play a few innings. Then serve up some ballpark dogs and popcorn, and cap off the party with this hat cake.

Ingredients

  • 1 baked 8-inch round cake
  • 1 dome cake (baked in a 1 1/2-quart bowl or 6-inch sphere)
  • 3 cups frosting (blue and red)
  • Red shoestring licorice
  • 1 red gumdrop
  • Red M&M's

Instructions

Baseball Hat Cake Step 1

Cut the 8-inch cake so that it is shaped like a brim and arrange it next to the bowl cake. Frost the hat blue and the brim red.

Add shoestring licorice to the crown with a gumdrop button. Outline your child's initial in M&M's.

, ,

All That Glitters | All Easter Crafts

All That Glitters

This spring, you and your child can adorn your home with these faux Fabergé eggs. They're far more fun than their bejeweled distant cousins, and they don't cost a family fortune.

Materials

  • Toothpicks
  • 2-1/2-inch foam egg (sold at craft stores)
  • Stiff paintbrush
  • Tacky glue
  • Glitter
  • Colorful plastic beads or jewels
  • 6-inch pipe cleaners
  • Pencil

Instructions

To make each one, first stick 3 toothpicks into one end of a 2-1/2-inch foam egg to create a temporary stand.

All That Glitters - Step 2

Use a stiff paintbrush to spread a thin layer of tacky glue on the egg.

All That Glitters - Step 3

Then sprinkle on a coating of glitter. When the glitter has set securely, glue on colorful plastic beads or jewels in a pattern of your liking. (You can use another toothpick or a pin to pick up and set the beads in place.) Allow the egg to dry completely before removing the toothpicks.

All That Glitters - Step 4

To make a stand for your egg, first twist together the ends of a 6-inch length of pipe cleaner to form a 1-1/2-inch-diameter ring. Now make the stand's legs. One at a time, fold 3 more 6-inch pipe cleaner pieces in half around a pencil and twist together the 2 halves, leaving an inch or so of the ends free, as shown.

All That Glitters - Step 5

Remove the pencil and twist the free ends around the pipe cleaner ring. Finally, bend up the loops to create the stand's feet.

,

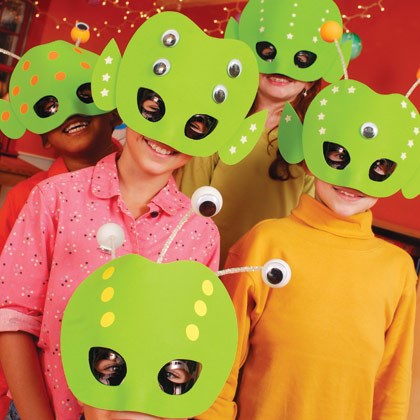
Alien Invasion Masks | Tween Crafts - Fun, Cool Crafts for Tweens

Alien Invasion Masks

Total Time Needed: 1 Hour

These creatures come in peace! As party guests arrive, let them launch right into action with a mask-making project. We created ours with glow-in-the-dark craft foam and stickers so we could dim the lights and set an otherworldly mood (you could also use fluorescent materials, then switch on a black light).

Materials

  • Black plastic masks (available at craft and party stores
  • Green craft foam (1 sheet per mask)
  • Scissors
  • Craft knife
  • Double-sided foam tape (we like Duck brand mounting tape)
  • Black permanent marker
  • Duct tape
  • Pushpin
  • Ping-Pong balls
  • Pipe cleaners
  • Googly eyes (1 inch in diameter)
  • Glow-in-the-dark stickers

Instructions

Alien Invasion Masks - Step 1

Preparty prep:

Cut out craft foam headpieces with scissors so that they are slightly wider than the mask and approximately twice as tall. Click here to print out a mask template.

Line up the mask at the bottom of the headpiece and trace the eye openings onto the craft foam with a marker. Using the craft knife, cut out the eyeholes.

Use foam tape to attach a headpiece to the front of each mask. (Some brands of foam tape work better than others; if yours isn't sticking well, duct tape works too.)

Draw and cut out alien ears, including a tab on the inside edge as shown so you can tape the ears to the back of the headpieces. Click here to print out the alien ears template.

With a pushpin, poke a hole into each Ping-Pong ball.

During the party: The kids can make antennae by inserting a pipe cleaner into the hole in each Ping-Pong ball, then attaching the other end of the pipe cleaner to the back of a headpiece with duct tape. They can use the foam tape to attach alien ears and googly eyes, then decorate the masks with stickers.

Tips:

Plan an Out-of-This-World Party!

,

A Herd of Eggimals | Easter Egg Decorating

A Herd of Eggimals

After they've given up all their Easter candy, give your plastic eggs an adorable second life as an owl, skunk, dog, cat, pig, or mouse.

Materials

  • Plastic Easter eggs
  • Tiny pom-poms
  • Felt
  • Crafter's Pick The Ultimate glue or hot glue
  • Black permanent marker

Instructions

To make the felt features for your critters, you can download our template. We used Crafter's Pick The Ultimate glue (hot glue also works well) to attach the pieces to the eggs and a black permanent marker to draw the face details.

Pig: Curl a 4-inch piece of pipe cleaner around a pen to make the tail, then glue it in place.

Mouse: For its tail, glue on a 3-inch length of yarn, knotted at the end.

Skunk: First glue the rear half of the stripe to the tail, then glue the tail and front of the stripe to the body.

,

Balloon Cupcakes Recipe | Spring Cake & Dessert Recipes

Balloon Cupcakes Recipe

Whether you're planning a circus party or a neighborhood penny carnival, this bunch of colorful balloons makes a festive ending. Be sure to make a balloon for every child at the party. Tip: Cover your cake cardboard with sky blue wrapping paper and arrange the balloons on top so they look like they are flying up in the air.

Ingredients

  • Baked cupcakes
  • Frosting (equal amounts of yellow, green, blue, and red)
  • Curling ribbon (yellow, green, blue, and red)

Instructions

Frost the cupcakes yellow, green, blue, and red and arrange them on a large platter or cake cardboard.

Tape a length of ribbon to the bottom of each cupcake.

Tie all the ribbons together and curl the ends as shown.

,

Crafts: Honey of a Hat | Homemade Hats

Crafts: Honey of a Hat | Homemade Hats

Total Time Needed: 2-3 Hours

Here's a bee your kids needn't flee: she happily hovers over a delightfully springy straw hat.

Materials

  • Straw hat
  • Cardboard egg carton
  • Acrylic paint
  • Bubble packaging
  • Glue
  • Craft knife
  • Pipe cleaner
  • Pom-pom
  • Googly eyes
  • Gauge wire
  • Duct tape
  • Silk flowers

Instructions

A Honey of a Hat - Step 1

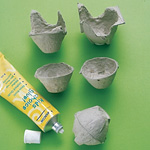
To make the bee's body, cut 2 cups from a cardboard egg carton. Trim them and glue them together as shown, then coat them with yellow acrylic paint.

A Honey of a Hat - Step 2

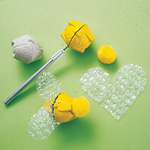
For the wings, cut a 4-inch heart shape from a piece of bubble packaging. Use a craft knife to make a slit in the top of the bee's body, as shown, then tuck the tip of the heart into it, adding a dab of glue to help keep it in place. To give the bee her stripes, poke one end of a black pipe cleaner into the back of the egg cup. Wrap the pipe cleaner around the body, gluing it in place, then push the free end into the cup as well.

A Honey of a Hat - Step 3

Glue on a 1-inch yellow pom-pom head. For antennae, glue K-inch black pom-poms to the ends of half a black pipe cleaner, then wrap the pipe cleaner around the head, twisting the ends together. Glue on googly eyes and a mini black pom-pom nose, then add a black fabric paint smile.

A Honey of a Hat - Step 4

Finally, stick one end of a 12-inch piece of 18-gauge wire into a straw hat (we got ours at Michaels). Twist the wire into a spiral and flatten it against the inside of the hat, securing it with duct tape, as shown. Poke the free end of the wire into the bee and secure it with a dot of glue, then glue some silk flowers onto the hat to keep the honeybee happy.

Source FamilyFun.com

,

A Gumdrop Garden

A Gumdrop Garden

Total Time Needed: 1 Hour

Give mom, or any garden lover, their just dessert -- a sweet bouquet of edible flowers.

Materials

  • Pound cake or other loaf-shaped cake
  • Chocolate frosting
  • Ladyfingers
  • Chocolate wafer cookies
  • Sugar
  • Gumdrops
  • Green toothpicks
  • Kitchen scissors
  • Coconut
  • Green food coloring

Instructions

Ice the top and the sides of the pound cake with chocolate frosting.

Trim the top of each ladyfinger into a point resembling a picket fence.

Gently press the pickets against the frosted sides of the loaf cake.

Seal a handful of chocolate wafer cookies in a plastic bag and crush them with a rolling pin.

Sprinkle the crumb "soil" on top of the loaf cake.

Sprinkle sugar onto a waxed-paper-covered surface and, using a rolling pin, flatten gumdrops to a 1/4-inch thickness.

Use kitchen scissors to cut notches in the tops of the flattened gumdrops to create tulip shapes.

Insert a toothpick stem into the base of each blossom.

Make a pair of leaves for each tulip by trimming flattened green gumdrops into teardrop shapes.

Spear the base of each leaf with the toothpick stem and push it halfway up the stem.

Plant the tulips in the cake.

Sprinkle coconut tinted with green food coloring around the garden to resemble grass.

,

Balls of Energy Recipe | Snacks for School

Balls of Energy Recipe | Snacks for School

These nutritious bites are easy to mass-produce and just as easy for players to pop in their mouths during halftime or whenever they need a boost.

Ingredients

  • 1 small banana
  • 1/2 cup chunky peanut butter
  • 1/2 cup toasted wheat germ
  • Finely chopped peanuts, mini-chocolate chips, or shredded coconut for coating

Instructions

In a medium bowl, mash together the banana and the peanut butter.

Stir in the wheat germ. Roll individual tablespoons of the mixture into balls, then roll the balls in one, or a mix, of the coatings listed above. Chill until firm. Makes 14 balls.

Variation: For a peanut-free version, substitute sunflower-seed or soy-nut butter for the peanut butter, and omit the peanuts and chocolate chips (which can contain traces of peanut).

,

A Garden Playhouse | Outdoor Crafts for Kids - Outdoor Craft Projects

A Garden Playhouse | Outdoor Crafts for Kids - Outdoor Craft Projects

Practicality and whimsy are perfect playmates in this outside-in room.
Materials

  • Plywood
  • Wallpaper sample
  • Hot glue gun
  • Wooden birdhouses
  • Fabric
  • Cedar shake
  • Masonite
  • Molding
  • Fake plants
  • Craft board
  • Rope
  • Screws

Instructions

A Garden Playhouse - Step 1

To create a robin, cut out from wallpaper samples and hot-glue a craft-store nest and eggs next to it.

A Garden Playhouse - Step 2

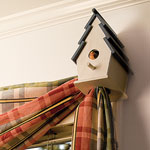
For curtain holders, paint two wooden craft-store birdhouses. Drill holes for the fabric, then screw them to the window frame. A craft-store bird perches in the entry hole.

A Garden Playhouse - Step 3

Use a third birdhouse into a floor lamp by drilling a hole through the bottom and mounting it on a hollow post made from narrow boards.

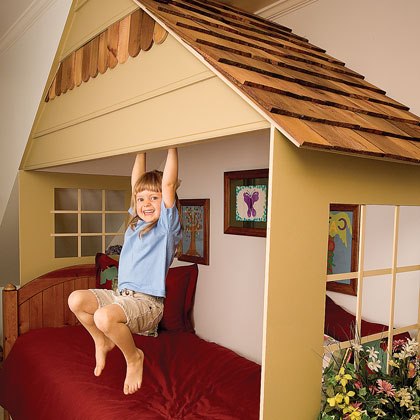
The plywood playhouse is topped with cedar shakes and faced with Masonite. Thin strips of molding staple-gunned together create the illusion of windowpanes , while a wooden window box filled with fake flowers, moss, and ivy adds a welcoming touch.

The swing is made from a craft board purchased at Home Depot, strung on rope, and attached to lag screws drilled through the ceiling into the joists.

Source FamilyFun.com

,

A Fool's Dinner | Crafts with Food

A Fool's Dinner | Crafts with Food

Do your kids balk when it comes to eating their peas and carrots? With this meal, they're in for a sweet surprise.

Materials

  • Peanut butter log candy
  • Peas-and-carrots candy mix
  • Vanilla ice cream
  • Caramel or butterscotch topping

Instructions

On each dinner plate, arrange four or five peanut butter logs (to look like chicken nuggets) and a small handful of the candy mix (for vegetables).

Right before serving, add a scoop of vanilla ice cream or frozen yogurt to each plate for "mashed potatoes." Top with gravy -- a spoonful of caramel sauce or butterscotch topping.

,

Bake Sale Bars Recipe

Bake Sale Bars Recipe

A candy surprise makes this snack a best seller. Fun to make and easy to package, bake sale bars have long been a favorite of fund-raising parents. Our bar, made with unsweetened coconut and toasted pecans (an ingredient kids will have fun crushing up), packs a lot of taste, but it gets its surprise crunch from crushed Heath bars. A word of advice: once you've sampled the batch, wrap the rest quickly, or you may see your profits disappear.

Ingredients

  • 1 1/2 cups pecan halves
  • 1 1/4 cups unsweetened shredded coconut
  • 5 Heath bars (1.4-ounce size)
  • 3/4 cup (1-1/2 sticks) unsalted butter
  • 1 cup packed light brown sugar
  • 1/2 cup white sugar
  • 2 eggs, lightly beaten
  • 3 tablespoons milk
  • 1 tablespoon vanilla extract
  • 1 1/2 cups flour
  • 2 tablespoons cornstarch
  • 1 teaspoon baking powder
  • 1/2 teaspoon salt

Instructions

Heat the oven to 350º. Grease the bottom and sides of a light-colored 13- by 9-inch baking pan, then lightly flour it, knocking out the excess. Set the pan aside.

Step 2 - Bake Sale Bars

On a separate baking sheet, spread the pecan halves and toast them in the oven for 7 minutes. Once they're cool to the touch, set the pan on a solid work surface and use a saucepan to finely crush the pecans. Then transfer them to a medium-size bowl.

Step 3 - Bake Sale Bars

Toast the coconut in a nonstick skillet over medium heat, stirring with a wooden spoon, until the coconut is light golden in color, about 10 minutes. Transfer the coconut to the bowl with the pecans.

Seal the Heath bars in a heavy-duty gallon-size plastic bag, then crush them with a rolling pin. Transfer the bits to the bowl with the pecans and coconut, breaking up any larger pieces by hand.

Melt the butter, pour it into a large bowl, and let it cool to lukewarm. Using a wire whisk, blend in the sugars until they're smooth. Whisk in the eggs, milk, and vanilla extract.

Using a wooden spoon, combine the flour, cornstarch, baking powder, and salt in a medium bowl. Add the dry ingredients to the butter mixture, stirring until they are evenly blended, then stir in the pecans, coconut, and Heath bar bits.

Use the back of a large spoon to evenly spread the dough in the prepared baking pan. Bake the bars on the center oven rack until the top is a light, golden brown and the edges are crackly, about 25 minutes. Transfer the pan to a wire rack and cool thoroughly, about 1-1/2 hours, before slicing. Makes 24 bars.

,

A Family Tree Skirt | Christmas Display Ideas

A Family Tree Skirt | Christmas Display Ideas

Inspired by a letter from the Kuklis family of Cozad, Nebraska, we offer this Christmas tree skirt craft. A variation on the Kuklises' original version, which featured white cotton fabric sewn and edged in eyelet lace, we've used stretch velvet (it's easy to glue, making it suitable for us sewing-challenged elves!), glue-on trim, and gold glitter paint. However, there are countless fabrics and paints your family can use to make your own handprint creation (see below for some other easy suggestions). Whatever you choose, this handmade project is sure to be the most treasured gift underneath your tree each year.

Materials

  • 60-inch square of red stretch velvet (1 2/3 yards of 60-inch-wide fabric)
  • Black fabric marker
  • Yardstick
  • Scissors
  • Mug
  • Tacky glue or thick fabric glue
  • 5 ½ yards of fancy gold trim
  • Gold acrylic craft paint
  • Paper plate
  • Paintbrush
  • Gold glitter paint in a squeeze bottle
  • White felt

Instructions

A Family Tree Skirt - Step 1

Find the center of the fabric square: Fold the fabric in half horizontally, right side in, and then in half vertically (thereby folding it into quarters). Mark the center of the square -- the corner of the fold -- with the marker.

A Family Tree Skirt - Step 2

Cut a circle from the fabric: Place one end of the yardstick on the center dot, measure out 30 inches, and mark another dot. Do this every 3 to 4 inches to create an arc. Cut the fabric along this dotted line (you may not be able to cut through all four layers at once). Unfold the fabric; you should now have a 60-inch circle.

A Family Tree Skirt - Step 3

Make an opening for the tree stand: Open up the fabric, place a mug (ours was 5 inches in diameter) over the center dot, and trace around it. Cut in a straight line from the edge of the tree skirt to the center dot, then cut out the mug-size circle.

A Family Tree Skirt - Step 4

Hem the edges: Lay the fabric right-side down. Squeeze a 12-inch line of glue along the outer edge of the tree skirt. Fold over a ½-inch hem and press it down to secure. Continue gluing 12-inch segments until you've hemmed the entire skirt, then use the same technique to hem the center circle and the straight-cut line. Let the glue dry.

A Family Tree Skirt - Step 5

Trim the skirt: 12 inches at a time, glue the fancy gold trim around the edge of the tree skirt, about 2½ inches in. Let the glue dry.

A Family Tree Skirt - Step 6

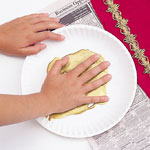
Make the handprints: Pour a shallow pool of gold acrylic craft paint on the paper plate. One at a time, have each child press her palm into the paint so it's coated, then have her press it down firmly and evenly on the skirt. Advise her not to wiggle her hand on the skirt and to lift it straight up when she is done (it can be helpful to practice on paper first).

A Family Tree Skirt - Step 7

Do any touch-up: If the prints are uneven, you can fill in thin spots with a paintbrush and some gold paint. Or you can completely paint over the handprint with gold glitter paint, as shown here.

A Family Tree Skirt - Step 8

Add the names: Have each child use the squeeze bottle of paint to write her name next to her handprint (you'll have to write for the little ones). Again, practicing on paper can be helpful.

A Family Tree Skirt - Step 9

Add the date: Cut an ornament shape from the felt, use the squeeze bottle of paint to add decorations and the date, and let it dry. Glue the ornament onto the skirt, near the most recent handprints.

A Family Tree Skirt - Step 10

Dress up your tree: Place the center hole around the tree stand and arrange the skirt around the base.

Tips:

Red velvet and gold paint were our materials of choice for the tree skirt shown on these pages -- we liked the rich, festive colors -- but you can select the fabrics and paints that best suit your family. Whatever you choose, here are a few tips to keep in mind. Nonraveling fabrics like fleece, felt, and stretch velvet are the easiest to glue. With woven fabrics, you'll probably want to sew the hem instead. We recommend acrylic craft paint instead of fabric paint, which can be hard to wash off your kids' hands. Don't sweat the occasional mistake. Little drips, blobs, and misspellings will always remind you of a moment in your child's life.

Variations:

Consider experimenting with other prints on the skirt. For example, you might include the whole family's prints, your kids' feet alongside their hands, or even include a print from the family pet. Want to avoid the messy hands? Here are two fun options: trace around your child's hand with a marker, then go back over the outline with puffy paint. Or trace your kids' hands onto colored felt, cut out the hand shapes, and glue them onto the tree skirt.

,

Advent Calendar | Countdown Calendars

Advent Calendar | Countdown Calendars

Count down the days 'til Christmas with a calendar filled with sweet surprises.

Materials

Construction paper

Scissors

25 small treats

2-inch wide colored tape

Puff paint

Tape or glue

Rickrack

Pencil

Colored yarn

Instructions

Advent Calendar - Step 1

Gather 25 small treats, such as gumball-machine prizes, wrapped candy and trinkets. Cut a 4 1/2-foot length of 2-inch wide colored tape. Lay the tape sticky side up and place the treats along the length of it, approximately 1 inch apart.

Advent Calendar - Step 2

Next, tape together several pieces of construction paper or sections of a paper grocery bag to create a 6-foot long, 3-inch wide strip. Place it atop the treat-covered tape and press together the paper and tape around each treat . Trim off any excess paper.

Advent Calendar - Step 3

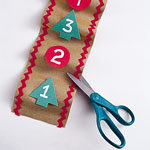
Write the numbers 1 through 25 in puff paint on pieces of colored construction paper and cut them out. For extra fun, shape pieces into green trees, red Christmas balls and a yellow star. Starting at the bottom, tape or glue the numbers to the paper strip, one over each treat. Finally, glue rickrack along the edges of the paper and tape the top of the calendar to a pencil.

Tie a length of colored yarn to the ends of the pencil, and the Advent calendar is ready to hang.

,

A Felted Wreath | Homemade Christmas Wreaths

A Felted Wreath | Homemade Christmas Wreaths

FamilyFun contributor Catherine Newman and her family have a custom of making gifts by hand for friends and family. Last year they shared the warmth of the holidays by recycling thrift shop wool sweaters into sweet wreath ornaments. They used a classic technique known as felting -- shrinking the wool in the washer and dryer until it's thick and fluffy. You can make a solid color wreath from one sweater, or mix and match several for our look.

Materials

  • Wool sweater (one sweater makes 3 to 5 wreaths)
  • Needle
  • Embroidery floss
  • Red ribbon (ours is 1/4-inch wide)
  • Fabric glue

Instructions

Wash the sweater in hot water with a cold water rinse, then dry it on high heat. Repeat, if necessary, until the sweater has shrunk and the weave is so tight it can be cut without fraying.

Cut the sweater into 1 1/2-inch-wide strips, then cut the strips into squares. (We used 60 squares for our 4 1/2-inch-diameter wreath.)

Thread the needle with the embroidery floss and string on the squares. Pull the floss and squares together tightly to form a circle, and tie off the floss. Make a small bow from the ribbon, glue it to the bottom of the wreath, and loop another piece of ribbon around the top for hanging.

Source FamilyFun

,

Bagel Buoy Recipe | Quick School Breakfast Ideas

Bagel Buoy Recipe | Quick School Breakfast Ideas

Fishing for a fun and hole-some breakfast? This snazzy snorkeler, made of cream cheese and veggies, is just the thing.

Ingredients

  • Bagel
  • 1 (8-ounce) package of strawberry cream cheese or plain cream cheese and Nutella
  • Bell peppers
  • Shredded cheese

Instructions

Put the strawberry cream cheese into a plastic freezer bag and snip off a small corner (for a darker skin tone, stir Nutella into plain cream cheese).

Pipe the cheese through the hole in the bag to create arms and legs, then hold the tip in place to fill the bagel hole and squeeze out a ball for the head.

Cut out a mask, snorkel, and pair of flippers from bell peppers and pat the pieces with a paper towel to remove excess moisture. Put the snorkel gear in place, top the head with shredded cheese, and set your skin diver afloat on your breakfast table!

,

Raspberry Crumble Bars Recipe

Raspberry Crumble Bars Recipe

For a potluck dessert, we stand by these bar cookies, which combine the buttery flavor of shortbread with the sweet-tart taste of jam. Preparing them can be a fun family project: Kids of all ages can help mix the dough and pat it into the pan, as well as sprinkle on the crumb topping. Although simple, the success of this recipe relies on good ingredients, so be sure to use real butter (not margarine) and a quality jam. This recipe comes from the kitchen of Susan G. Purdy, author of "The Family Baker" and "The Perfect Cake" (Broadway Books), and her daughter, Cassandra Purdy, a caterer and former baker at the Cafe Pongo in Tivoli, New York, where she developed this popular dessert.

Ingredients

  • 1 cup unsalted butter, at room temperature, cut up
  • 1/2 cup sifted confectioner's sugar
  • 2 cups unbleached flour
  • 1/2 teaspoon salt
  • 1/2 cup old-fashioned rolled oats (not instant oatmeal)
  • 1/2 cup chopped walnuts
  • 3/4 cup raspberry jam (preferably seedless)

Instructions

Heat the oven to 375°. Grease a 9- by 9-inch baking pan with butter or non-stick cooking spray.

In a mixing bowl, beat the butter and sugar until well blended. Add the flour and salt and beat just until the dough forms clumps. Don't overmix. Turn out the dough onto a piece of waxed paper. Lightly flour your hands and squeeze the dough into a ball (the warmth of your hands will soften the dough enough to hold it together).

Divide the dough into thirds. Crumble one third into a bowl and set it aside. Press the remaining two thirds evenly into the greased pan and bake it on the center oven rack for about 10 minutes, until the edges of the dough are lightly golden. Set the pan on a wire rack. While the dough cools, add the oats and nuts to the reserved dough in the bowl and pinch the ingredients together so that the mixture becomes crumbly.

Spread the raspberry jam on the baked shortbread (it's OK if the dough is still warm), then cover the jam with an even layer of the crumb topping. Bake the bars for 20 to 24 minutes, until the top crumbs are golden brown, then set the pan back on the wire cooling rack. While the shortbread is still slightly warm, cut it into 21/4-inch squares. Once the bars cool completely (they are very fragile while warm), lift them from the pan with a spatula. Makes 16 bars.

,

Recipes with Summer Fruit: Raspberry Creamsicles

Recipes with Summer Fruit: Raspberry Creamsicles

According to legend, when the Greek god Zeus was a baby and the sounds of his crying echoed throughout the mountains, the nymph Ida searched for raspberries to soothe him. Now that's a testament to the taste of these luscious berries!

A member of the rose family, raspberries grow on straight stalks called canes, and they come in four colors — red, amber, purple and black. Like all berries, they are quick to perish, so buy them right before you plan on using them, and look for a box with no juice stains on the bottom.

This recipe, which combines the delicate sweetness of raspberries with the creaminess of vanilla yogurt, is great for getting the best return on your basket of berries. The pops take several hours to freeze, so prepare them in the morning if you're planning on an afternoon snack.

Be sure to hand out aprons before you start stirring and whisking to shield everyone's clothing from pretty pink stains.

Ingredients

  • 1 pint raspberries
  • 1/2 cup sugar
  • 1-1/4 cups water
  • 1/2 cup cream (heavy or light)
  • 1 tbsp. lemon juice
  • 1 cup vanilla yogurt
  • 8 (5-oz.) waxy paper cups
  • 8 Popsicle sticks

Instructions

In a blender, puree 1 pint of the raspberries with the sugar and water. Then use a jelly bag or sieve to strain out the seeds (this should yield about 2 cups of pulp).

Transfer 2/3 cup of the raspberry puree into a separate container, add the cream, and whisk well to mix. Meanwhile, have your child stir the lemon juice into the rest of the raspberry puree. Now you should have two containers of raspberry sauce—one that's deep red and another that's creamy pink. Chill both sauces.

In a bowl, stir together the vanilla yogurt and the remaining raspberries (another good job for kids). Pour the mixture into the paper cups until they are about half full. Set the cups in an 8- x 8-inch pan (for ease in transferring them in and out of the freezer). Cover each cup with aluminum foil and poke a Popsicle stick straight through the center of the foil and into the mixture. Freeze until set (about 2 hours).

Remove the foil and pour a layer of the deep red puree on top of the frozen yogurt. Freeze again until solid (about 2 hours). Finally, pour a layer of the raspberry cream mixture into each cup and freeze until solid. To serve, peel the cups away from the creamsicles. Makes 8 creamsicles.

,
//