Latest news, food, business, travel, sport, Tips and Tricks...

Cherry Cheesecake Recipe

Cherry Cheesecake Recipe

Legend has it that young George Washington gained a reputation for honesty because he couldn't fib about chopping down his father's cherry tree. We can't vouch for that, but we can say that this easy, no-bake treat, which combines the flavors of chocolate, cherries, and cheesecake, is the perfect way to mark National Cherry Month-and that's no lie.

Ingredients

  • 1 1/4 cups chocolate graham cracker crumbs
  • 1/2 cup sugar, divided
  • 1/3 cup butter or margarine, melted
  • 12 ounces cream cheese, softened
  • 2 teaspoons grated lemon peel
  • 2 teaspoons vanilla extract
  • 2 cups frozen whipped topping, thawed
  • 1 20-ounce can cherry pie filling

Instructions

  1. In a medium mixing bowl, combine the graham cracker crumbs, 1/4 cup of the sugar, and the butter or margarine, mixing well.
  2. Firmly press the crumb mixture into the bottom of a 9- by 9- by 2-inch baking pan (a great job for kids).
  3. Place the pan in the refrigerator to chill while you make the cheesecake filling.
  4. In a large mixing bowl, combine the cream cheese, lemon peel, vanilla extract, and the remaining 1/4 cup of sugar. Beat with an electric mixer until light and fluffy, about 2 minutes.
  5. Fold in the whipped topping, then spread the mixture onto the chilled crust.
  6. Spread the cherry pie filling over the cheese mixture. Chill the cheesecake in the refrigerator until ready to serve. Serves 9.

,

Cosmic Crafts: The Trash Masters

Cosmic Crafts: The Trash Masters

Total Time Needed: 1 Hour

Your kids will love creating and playing with these miniature action figures. To create the green illuminater, slide the cut-off bottle bottom from the Two-liter Transporter over a battery-operated touch lamp (available at drug and discount stores).

To make a space-case backpack, tape a pair of twist-tie straps to the back of a dental floss container.

Materials

  • Face: trimmed from a photograph or magazine
  • Head: 1 small, clear gumball-machine bubble
  • Neck: 1 paper fastener
  • Body: 1 small plastic container, such as a rectangular mint box, a film canister, a food coloring bottle, or an empty pill bottle
  • Limbs: 2 pipe cleaners
  • Tools: pencil, scissors, pushpin, colored electrical tape

Instructions

  1. Head: To get the right face size, trace your bubble head cap. Cut out the face and place it inside the head. Perforate the cap of the bubble and the cap of the body and use a paper fastener to attach them.
  2. Limbs: Perforate the body and thread pipe cleaners through four holes. If the plastic is impenetrable, tape the pipe cleaners to the sides of the body.
  3. The Trash Masters wear recycling ID badges (stickers with symbols drawn in marker). Their chairs? Trimmed shaving cream can caps attached to soda or water bottle caps with pipe cleaners.

Chewy Brownies Recipe

Chewy Brownies Recipe

A plate of these very moist, rich chocolate bars won't last long after school--especially when accompanied by tall glasses of milk.

Ingredients

  • 3 oz. unsweetened chocolate squares
  • 1/2 cup butter (1 stick)
  • 3 eggs
  • 1 cup sugar
  • 3/4 cup light brown sugar
  • 1 1/2 tsp. vanilla extract
  • 3/4 cup all-purpose flour
  • 1/2 tsp. baking powder
  • 1/4 tsp. salt
  • Confectioners' sugar (optional)

Instructions

  1. Unwrap the chocolate squares and the stick of butter, then place them both in a medium-sized saucepan.
  2. Place the saucepan on the stove top and heat over medium-low, stirring occasionally, until the chocolate and butter are melted and smooth. Set aside until cool (this will take 15 minutes or so).
  3. Meanwhile, heat the oven to 350 degrees. Lightly grease a 13- by 9- by 2-inch rectangular baking pan or a 9- by 9-inch square baking pan (the square pan will produce thicker, more cakelike brownies).
  4. Crack the eggs into a large mixing bowl and whisk until foamy. Pour in the sugar and brown sugar and whisk until the mixture is well combined. Whisk in the vanilla extract, then carefully add the cooled chocolate mixture and stir until thoroughly combined.
  5. In a medium-sized bowl, stir together the flour, baking powder and salt. Add this mixture to the egg and sugar mixture and beat for about 50 strokes or until the flour has been fully incorporated and the batter is smooth.
  6. Pour the batter into the prepared baking pan and bake for 25 to 30 minutes for the 13- by 9- by 2-inch pan, 40 minutes for the 9- by 9-inch pan. Test the brownies for doneness. Cool thoroughly in the pan.
  7. To cut the cooled brownies into uniform squares, use a sharp knife (adults only) to first score the top in a grid pattern, then slice the brownies and remove them from the pan.
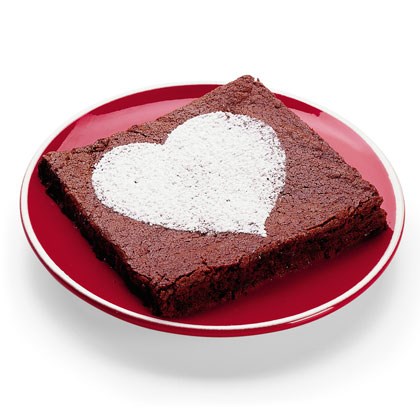
  8. For a fun Valentine's Day presentation, stencil confectioners' sugar hearts on top of each brownie. To make a stencil, cut out a heart from the center of a piece of paper. Place the stencil on top of the brownie and sift confectioners' sugar over it. Carefully lift the paper to reveal the confectioners' sugar heart. Makes 24.

,

Cosmic Crafts: Junkmobile

Cosmic Crafts: Junkmobile

Total Time Needed: 1 Hour

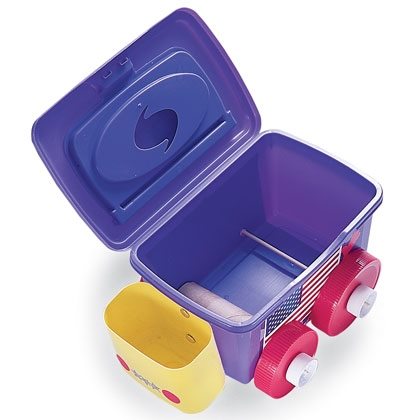
Drive the sturdy, smooth-riding Junkmobile around the neighborhood on regular collection days, or park beneath the Waste Shooter for a quick fill.

Materials

  • 4 plastic lids, cardboard liners removed (we used peanut butter jar lids)
  • Axles: 2 bamboo skewers or wooden dowels, 1/8 inch thick and a few inches longer than your truck body is wide
  • Hubcaps: 4 small plastic caps (we used soda caps)
  • Axle guards: 1 toilet paper tube, cut in half lengthwise
  • Body: 1 lidded plastic box (we used a wet-wipes box)
  • Driver's cab: 2 paper fasteners and 1 plastic container (we used a Nestle's Quick container)
  • Tools: craft knife, pushpin, pointy scissors, wire snips, tape

Instructions

Wheels and hubcaps: Make a hole in the center of each wheel and hubcap. The skewer axles should fit through snugly. Using the same method, create two evenly spaced larger holes near the bottom of each long side of the box.

Push a lid and a cap onto the pointed end of a skewer. Thread the skewer through the holes and attach a second lid/cap pair on the other side, as shown. Trim the excess skewer with wire snips. Repeat for the second set of wheels. Rest the trimmed toilet tube halves over the axles so the truck's contents won't interrupt wheel movement. Tape them down.

Driver's cab: Trim the smaller plastic container so that it fits beneath the edge of the truck body. Pierce holes and use paper fasteners to attach the cab to the body.

Cheese Fondue Recipe

Cheese Fondue Recipe

This milk-based fondue is milder than the traditional Swiss cheese fondue, which contains wine. If your kids don't like the strong taste of Swiss, substitute Cheddar or a mixture of Cheddar and Swiss.

Ingredients

  • 12 oz. Swiss cheese (or Cheddar, Gruyere, or a combination)
  • 4 tbsp. all-purpose flour
  • 1/4 tsp. paprika
  • 1/4 tsp. ground nutmeg
  • 1 garlic clove
  • 3 tbsp. butter
  • 2 1/4 to 2 1/2 cups milk
  • Juice from a lemon
  • Salt and pepper to taste
  • Dippers, such as French bread, carrots, peppers, broccoli or cherry
  • tomatoes

Instructions

First, grate the cheese into a bowl. Toss with 1 tablespoon of the flour. Set aside. Ask kids 10 and up to grate the cheese. Hold the handle firmly, grip the cheese, tuck fingers back and rub against the holes

In a separate small bowl, stir together the remaining 3 tablespoons of flour, paprika and nutmeg.

Ask your child to peel the garlic clove. Next, rub the cut clove on the inside of a medium-size saucepan until the bottom and sides are completely seasoned (a fun job for kids).

Melt the butter in the pan over medium-low heat and stir in the flour mixture until it is smooth. Explain to your children that this is called a roux (pronounced roo) and serves as the base that will help the fondue thicken. Add the milk, 1 cup at a time, and stir constantly until the creamy sauce is warm.

Next, add the grated cheese by the handful, stirring well after each addition. Continue until the cheese is used up and the sauce is thoroughly combined. Once the cheese has melted, stir in the lemon juice and salt and pepper to taste.

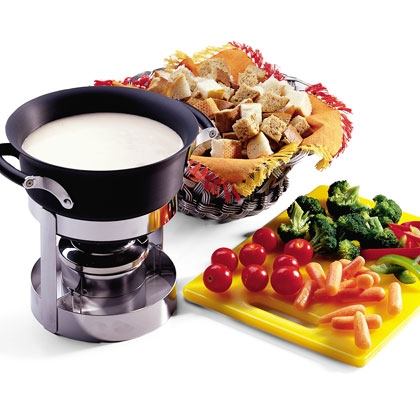
Meanwhile, prepare the dippers for the fondue. Cut the bread into cubes. Cut vegetables into bite-size pieces and steam for a few minutes, if desired, to bring out the flavor.

Arrange the vegetables on a large platter and the bread cubes in a basket or bowl. Pour the fondue into a fondue pot. Invite everyone to spear the bread or vegetables on their fondue forks, then dip into the cheesy sauce. Serves eight people as an appetizer or four as a main course.

,

Cool Creatures | Kids' Painting Ideas

Cool Creatures

Total Time Needed: 1-2 Hours

Don't just throw away those take-out tubs you get at the deli or supermarket. Instead, let your kids use them as canvases for reverse painting, a style that calls for painting in layers - from the details out - on the inside of a clear container.

Materials

  • Clean, see-through plastic container
  • Acrylic paint and brush
  • Craft foam
  • Scissors
  • Tacky glue
  • Markers
  • Googly eyes

Instructions

On the inside of the container, paint the first layer of detail, such as the black spots on the ladybug, the teardrops on the turtle shell, or the swirls on the butterfly wings (we trimmed our butterfly container first to resemble wings). Let it dry for 10 to 15 minutes or until the paint no longer smudges.

Add as many more layers as you wish -- each in a different color -- by painting right over the original design. Just be sure to leave some plastic exposed if you plan to apply another coat and allow each layer to dry before moving on to the next.

Use the container as a guide to cut a body from craft foam. Glue on or draw details such as eyes and antennae, then glue the craft foam to the painted shell.

Thanksgiving Craft: Complete the Pass

Complete the Pass

Total Time Needed: 1 Hour

You don't need a whole team to kick off this sporty variation on pin the tail on the donkey - just a felt football, a ready receiver, and a blindfold.

Materials

  • Felt
  • Poster board
  • Cord
  • Scissors
  • Thread and needle
  • Newspaper or batting
  • Glue
  • Velcro

Instructions

Start by making two small holes in the top corners of a 12-by-15 1/2-inch piece of poster board. Then fashion a hanger by threading a cord through the holes and knotting the ends.

From felt, cut out the head, chest, and hands of a football player in uniform and glue them onto the poster board.

For a football, stitch together the edges of two matching felt ovals, leaving a 2 1/2-inch gap. Stuff the ball with newspaper or batting, then stitch the gap. Glue a strip of Velcro onto the football. Now, one at a time, blindfold the contestants and see who can stick the ball onto the receiver's hands.

Carrot Cake Recipe | Easter Cake

Carrot Cake Recipe

Filled with finely grated carrots and crushed pineapple, then spread with a smooth coating of cream cheese icing, this classic dessert will be an extra-special treat for your aspiring baker to make. For the finishing touch, she can even tint some of the frosting and top off the cake with sweet piped-on carrots.

Ingredients

FOR THE CAKE

1-1/4 cups flour

1 cup sugar

1 teaspoon baking soda

1/2 teaspoon each of baking powder, salt, cinnamon, nutmeg, and ground ginger

1/4 teaspoon ground cloves

3 large eggs

3/4 cup vegetable oil

1 teaspoon vanilla extract

1-1/4 cups finely grated carrots

1/2 cup each of finely chopped walnuts and chopped raisins

FOR THE ICING

12 ounces regular cream cheese, at room temperature

4 tablespoons butter, softened

1-1/2 teaspoons vanilla extract

3 to 3-1/2 cups sifted confectioners' sugar

Food coloring

FILLING AND GARNISH

3/4 cup crushed pineapple, well drained

1-1/2 cups sweetened flaked coconut (optional)

Instructions

Carrot Cake - Step 1

Prepare two 8- by 2-inch round cake pans. Trace around one of the pans to create 2 waxed paper circles and cut out the circles. Lightly grease the pans and line them with the waxed paper circles. Then grease the papers and dust the pans with flour, knocking out the excess. Heat the oven to 350 degrees.

Carrot Cake - Step 2

Sift together the flour, sugar, baking soda, baking powder, salt and spices into a large bowl. Make a well in the center and add the eggs, oil, and vanilla extract.

Using an electric mixer on low speed, beat the liquids briefly in the well, then blend the entire batter on low speed just until evenly mixed.

Carrot Cake - Step 4

Using a rubber spatula, fold the carrots, walnuts, and raisins into the batter between the cake pans, smoothing it with a spoon.

Bake the cakes on the center oven rack for about 25 minutes, until toothpick inserted into the center of the layers comes out clean. Transfer the pans to a large cooling rack. Cool the layers in the pans for 10 minutes, then run a butter knife around the edges to loosen them.

Carrot Cake - Step 6

Remove each cake from its pan by topping the pan with a wire rack, holding the an and the rack together, and inverting the whole ensemble. Then slowly lift the pan from the cake and peel away the waxed paper. Let the cakes cool completely (at least 1 hour) before icing them.

Prepare the Icing: Using an electric mixer, beat the cream cheese and butter in a bowl until smooth. Blend in the vanilla extract.

Add the confectioners' sugar, about 1 cup at a time, beating until smooth and fluffy after each addition. Reserve about 2/3 cup of the icing, dividing it between 2 small bowls. Cover and chill the bowls.

Carrot Cake - Step 9

Decorate the Cake: Place the first cake layer on a serving plate. Smooth a generous layer of the icing over the top (if the icing is too soft, chill it for about 30 minutes before continuing). Then spread the crushed pineapple over the icing.

Carrot Cake - Step 10

Place the second layer on top of the first, then ice the top and sides of the cake. Cupping some of the coconut in one hand, gently pat it onto the side of the cake, working your way around the whole perimeter.

Carrot Cake - Step 11

For the finishing touch, dye one of the reserved batches of frosting orange and the other green. Use a pastry bag to pipe carrots on top of the cake. Store the finished cake in the refrigerator until you plan to serve it, then let it sit at room temperature for 20 to 30 minutes before slicing. Makes 8 to 10 servings.

Notes:

Cook's Dictionary

Fold: This method of blending is typically used to mix ingredients, such as grated carrots or berries, into a batter without chopping or crushing them. Instead of stirring or beating the batter, you use a spatula to gently turn or "fold" it until all the ingredients have been evenly incorporated.

,

Butternut Squash | Apple Recipes
Butternut Squash

Give it an "A." Just one cup of butternut squash boasts close to three times the recommended daily allowance of vitamin A*. It's also high in vitamin C and a good source of fi ber, magnesium, and potassium. Need a kid-pleasing recipe? Try this sweet and savory side dish.

Serves: 6

Total Time: about 1 hour

Ingredients

  • 1 tablespoon vegetable oil
  • 1 butternut squash (about 2 pounds), peeled and cut into ¾-inch cubes
  • 3 medium apples, peeled, cored, and cut into small cubes
  • ¼ cup brown sugar
  • 1 tablespoon flour
  • ½ teaspoon cinnamon
  • 2 tablespoons butter, melted

Instructions

Heat the oven to 350°. Lightly oil a large baking pan, then combine the butternut squash and apples in the pan.

In a small bowl, stir together the sugar, flour, and cinnamon. Sprinkle the mixture over the squash and apples, pour the melted butter on top, and cover the dish.

Bake until the ingredients are fork-tender, about 45 minutes.

Nutritional Information:

Per serving (about 1 cup): Calories 176 ● Total Fat 4 g (6% DV) ● Saturated Fat 2 g (12% DV) ● Cholesterol 10 mg (3% DV) ● Sodium 40 mg (2% DV) ● Total Carbohydrate 37 g (12% DV) ● Fiber 5 g (21% DV) ● Sugars 19 g ● Protein 2 g (4% DV) ● Vitamin A 15,255 IU (325 % DV) ● Vitamin C 36 mg (60% DV)

,

Chewy and Louie

Chewy & Louie

Total Time Needed: 1 Hour

Whether slip-sliding across Lake Lollipop or waddling up to greet guests at the chalet, these dapper penguins are a cool yet comical pair.

Materials

  • Toothpicks
  • 2 small white gumdrops
  • 2 large white gumdrops
  • 2 orange jelly beans, halved
  • Royal icing
  • 2 purple Necco wafers, halved
  • 2 orange M&M's, halved
  • Scissors
  • Black shoestring licorice

Instructions

To make each penguin, use a toothpick to attach the small gumdrop (the penguin's head) on top of the large one (the body). Snap a toothpick in half and use the same technique to attach the jelly bean halves to the penguin's body as feet.

Using small dabs of royal icing, glue the Necco wafer halves in place as wings and the M&M half as a beak.

Snip off two tiny lengths of shoestring licorice and affix them with royal icing to make the eyes.

,

Bug Mountain Cake Recipe

Bug Mountain Cake Recipe

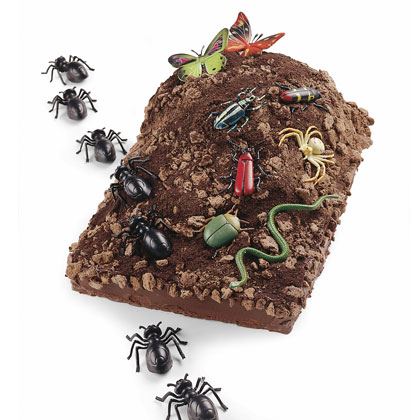
Mother Nature never tasted so good!

Ingredients

  • 1 dome cake (baked in a 2-liter bowl, such as Pyrex)
  • 1 baked 13" x 9" x 2" cake
  • 3 to 4 cups chocolate icing
  • 2 to 3 cups crushed chocolate cookies (we combined chocolate graham crackers, fudge cookies, and chocolate wafer cookies)
  • Plastic bugs, spiders, and snakes, washed and dried

Instructions

Bug Mountain Cake Recipe

Arrange the round cake atop the rectangular cake, as shown, securing in place with icing.

Cover the cakes with the icing, then sprinkle on the cookie crumbs. Decorate with the plastic bugs, spiders, and snakes. (For safety, remove the toys before serving.)

Tips:

For the dirt, you can pulse the cookies in a food processor.

,

Easter Craft: Milk Carton Bunny Basket

Easter Craft: Milk Carton Bunny Basket

Total Time Needed: 1 Hour

Collect and stash your Easter loot in this colorful, long-eared basket.

Materials

  • Scissors or craft knife
  • Half-gallon milk or juice carton
  • Stapler
  • Pastel construction paper
  • Glue or double-sided tape
  • Hole punch
  • Pipe cleaners
  • Googly eyes

Instructions

With scissors or a craft knife (adults only), remove one panel of the carton (on the same side as the open spout) and save it to make the handle. Staple the open spout closed.

Cover the sides of the carton with one color of construction paper, using glue or double-sided tape to affix. Trim to fit.

Punch a hole in the center of the the spout ridge and insert pipe cleaners for whiskers. Glue on a pair of large googly eyes.

For ears, cut out large paper ear shapes from the same color you used to cover the carton. Cut pink shapes a size smaller and glue them in place in the middle of the ears. Staple the ears to the top of the bunny base so they stand up.
For a handle, trim the cut carton side, cover it with paper, and staple it to the basket.

Buildable Bird | Homemade Christmas Ornaments

Buildable Bird

Total Time Needed: 1 Hour

Let your holiday greetings take wing! These two-piece avian ornaments can be tucked inside cards and assembled in seconds by the recipient. (You're allowed to make one or two for yourself too.)

Materials

  • Stiff felt (white for dove, red for cardinal)
  • Tacky glue
  • Silver sequins
  • Black seed beads
  • Large needle
  • Embroidery floss

Instructions

Buildable Bird - Step 1

Using our downloadable template as a guide, cut out the wings and body of the bird from stiff felt. For each eye, use tacky glue to add a silver sequin and a black seed bead.

Buildable Bird Step 2

Use a large needle and embroidery floss to make a hanging loop right above the slot for the wings. Place the two pieces inside a card with instructions to slide the pieces together at the slots.

Beef and Onion Stew Recipe

Beef and Onion Stew Recipe

This Saturday-night stew is best started in the afternoon, as it takes 3 hours to slow-cook to perfection.

Ingredients

  • 2 pounds lean round or stew beef, cut into 1-inch cubes
  • Salt to taste
  • 2 large red onions, halved and thinly sliced
  • 1/3 cup olive oil
  • 2 teaspoons brown sugar
  • 3 tablespoons flour
  • 2 cups beer (preferably dark, but light or nonalcoholic
  • beer is fine too)
  • 1 cup beef stock (enriched with 1 teaspoon miso, if you have it)
  • 3 bay leaves
  • 1 teaspoon dried thyme
  • 1 teaspoon dried sage, crumbled

Instructions

For the stew, heat the oven to 325º. Sprinkle the beef cubes with salt and set them aside. In a large frying pan, cook the onions in the olive oil over low to moderate heat, stirring occasionally and turning up the heat a bit to slightly caramelize them. Transfer the onions to a heavy, medium-size ovenproof pot with a lid.

In the frying pan, brown the salted beef (do not cook it through), in batches if you need to, over fairly high heat. Then transfer it to the pot with the onions.

Lower the heat under the frying pan, then add the brown sugar and stir it around. Add the flour and cook for 5 minutes, stirring constantly. Slowly pour in the beer (it will foam up), stirring and scraping to loosen caramelized bits from the pan. Stir in the stock and bring it to a boil, then remove it from the heat (don't worry if it's lumpy).

Taste the mixture and add more salt if desired. Add the bay leaves, thyme, and sage to the pot with the beef and onions and pour in the liquid from the frying pan. Bring the stew to a boil on the stovetop. Then transfer it to the oven, tightly covered, for about 3 hours.

,

Carrot Muffins Recipe | Marvelous Muffins

Carrot Muffins Recipe

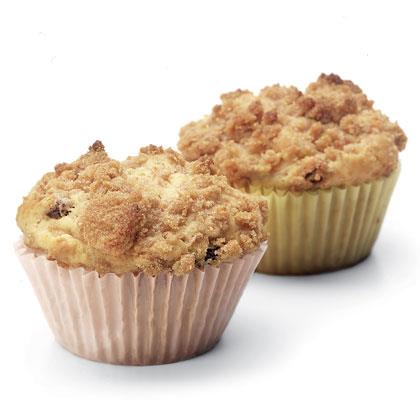
These soft, moist muffins have all the ingredients little ones love: raisins, nuts, a crumb topping, and, of course, grated carrots for flavor, texture, and a splash of color.

Kids' Cooking Skills: Use this recipe to teach your child how to fold bulky ingredients, such as grated carrots, into muffin batter and how to blend a butter crumb topping.

Ingredients

  • 2 cups all-purpose flour
  • 1/2 teaspoons baking powder
  • 1/2 teaspoon baking soda
  • 1/2 teaspoon salt
  • 1/2 cup raisins
  • 1/2 cup chopped walnuts
  • Grated zest of 1 orange
  • 1 large egg
  • 1 1/4 cups buttermilk
  • 1/2 cup packed light brown sugar
  • 1/3 cup vegetable oil
  • 1/2 cup packed grated carrot

BUTTER CRUMB TOPPING:

  • 1/4 cup all purpose flour
  • 1/4 cup light brown sugar
  • 1/4 teaspoon cinnamon
  • 2 tablespoons of unsalted butter

Instructions

Heat the oven to 400ºF. Place paper liners in 12 muffin pan cups.

Sift the flour, baking powder, baking soda, and salt into a mixing bowl. Stir in the raisins, walnuts, and orange zest.

Crack the egg into a medium-size mixing bowl. Add the buttermilk, brown sugar, and oil. Whisk well.

Make a well in the dry mixture. Pour in the liquid all at once and stir until the ingredients are almost blended. Then fold in the carrot.

Have your child use a large spoon to divide the batter evenly between the muffin cups. Gently press a little of the crumb topping (see below) on each one.

Bake the muffins on the center rack for 20 minutes, or until the tops are golden brown.

Cool the muffins in the pan for two to three minutes, then transfer them to a wire rack. Serve warm or at room temperature. Makes 12.

Butter Crumb Topping Gently pressed on top of the batter just before baking, this sweet muffin topping works well with most recipes.

To make enough for a dozen muffins, combine 1/4 cup of all-purpose flour, 1/4 cup of packed light brown sugar, and 1/4 teaspoon of cinnamon in a bowl and mix them with your fingertips.

Add 2 tablespoons of cold, unsalted butter cut into small pieces. Rub it thoroughly into the dry ingredients with your fingers until the topping is gravelly in texture.

If you like nuts, chop up a handful of your favorite ones and toss them in too.

,

Carp Wind Sock | Kids' Painting Ideas

Carp Wind Sock

Total Time Needed: 2-3 Hours

In Japan, families make and fly carp-shaped wind socks called koinobori for Children's Day on May 5. Our version is made out of a recycled Tyvek envelope (often used for overnight shipping).

Materials

  • Fish template
  • 12- by 15 1/2-inch Tyvek envelope
  • Acrylic paint
  • Paintbrush
  • Tacky glue
  • 3-inch-wide plastic cup
  • Clothespins
  • Embroidery needle
  • String
  • Dowel

Instructions

Carp Wind Sock - Step 1

Download and print our fish template. Cut the envelope open and lay it flat, blank side up, on a table. Trace the template twice onto the envelope and cut out both pieces.

Carp Wind Sock - Step 2

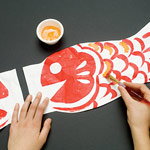
Paint a fish design on both pieces; one should be a mirror image of the other. Leave an unpainted border of at least an inch on the edge near the mouth.

Carp Wind Sock - Step 3

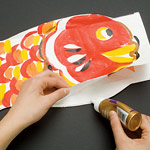
Glue the two pieces together, right-sides out, along the two long seams; leave the tail and mouth seams open. Let the glue dry.

Carp Wind Sock - Step 4

Cut an inch-wide ring from the top of the plastic cup and slip it into the fish's mouth. Fold the top inch of the Tyvek over the ring and glue it in place. Use clothespins to clamp the Tyvek in place as the glue dries.

Carp Wind Sock - Step 5

Double-thread an embroidery needle with about five feet of string. Poke the needle through one side of the mouth, across the inside, and out the other side. Cut the needle free and knot the two ends of the string for the hanging loop. Wrap or tie the string to a dowel or a flagpole, and let it swim in the breeze.

Candy Cane Twists

Candy Cane Twists

Prep Time: 40 minutes

Cook Time: 10 minutes

These colorful treats offer a clever twist on the classic sugar cookie. Peppermint extract adds that authentic candy cane flavor.

Total time: 1 hour, 20 minutes

Servings: 18

Ingredients

  • 1 cup unsalted butter, softened
  • 3/4 cup sugar
  • 1 large egg
  • 1 1/2 teaspoons vanilla extract
  • 1 teaspoon peppermint extract
  • 1/2 cup butter, slightly softened
  • 1/4 teaspoon salt
  • 2 1/2 cups flour
  • 1/2 teaspoon red food coloring
  • 1/2 teaspoon green food coloring

Instructions

Using an electric mixer set on medium-high speed, cream the butter. Continue beating and gradually add the sugar.

Beat in the egg until evenly mixed, then add the vanilla extract, the peppermint extract, and the salt and blend well.

Use a wooden spoon to stir in the flour, one third at a time, until evenly mixed.

Divide the dough into thirds. Add the red food coloring to one third and the green food coloring to another, then knead the coloring into the dough. Flatten each third into a K-inch-thick rectangle, cover it in plastic wrap, and refrigerate until firm, about 30 minutes.

Heat the oven to 375°. On a lightly floured surface, roll a pair of tablespoon-size pieces of contrasting colored dough into 8-inch-long ropes. Twist them together, pinch the ends, then bend the cookies into a candy cane shape. Repeat with the remaining dough.

Bake the cookies on an ungreased cookie sheet until set but not brown, about 10 minutes, rotating the sheet halfway through. Cool the sheets on a wire rack for 5 minutes, then transfer the cookies to the rack to continue cooling.

,

CandleEyebra | Halloween Decorations

CandleEyebra | Halloween Decorations

Total Time Needed: 1 Hour

When illuminated, these votive holders cast an eyeful of moody shadows on the walls.

Materials

  • Glass votive holders
  • Black construction paper
  • Hole punch
  • Mod Podge
  • Paintbrush
  • Black paint

Instructions

Tear a sheet of black construction paper into about a dozen small rectangles that measure roughly 1¼ inch by ½ inch. Use a hole punch to add two eyes to each piece.

CandleEyebra - Step 2

Brush a portion of a plain, glass votive holder with Mod Podge, affix a paper rectangle, then paint more Mod Podge over it. Add the other pieces the same way, making sure the edges overlap.

When the candleholder is dry, use a tiny paintbrush and black paint to add little round pupils inside the eyes.

Cake Decorating: Butterfly Cake

Butterfly Cake

This butterfly cake with candy-coated wings is a sure way to attract friends at any party. Let the kids wash it down with nectar (fruit juice). Tip: Hit the candy store with the birthday boy or girl to find candies in his or her favorite colors. Buy candy by the quarter-pound so you don't get more than you need.

Ingredients

  • 1 baked 8-or-9-inch round cake
  • 2 cups chocolate frosting
  • 1 cup yellow frosting
  • 1 Twinkie
  • Jelly fruit slices
  • Assorted candies
  • Red string licorice

Instructions

Cut the cake in half, then arrange and frost as shown.

Frost the Twinkie and place it between the wings for the butterfly's body. Decorate the wings with candies, adding licorice antennae.

Boardwalk Frame | Easy Crafts for Kids

Boardwalk Frame

Total Time Needed: 1-2 Hours

After a trip to the boardwalk or pier, this Popsicle stand makes a sweet display for photos and small souvenirs.

Materials

  • Glue (we like Beacon's Kids Choice glue for its extra-strong hold)
  • Sandpaper
  • Cardboard (ours measures 9 by 6 inches)
  • Blue card stock
  • 32 standard craft sticks
  • Craft knife
  • 2 corks
  • 6 (2-1/2 inch) craft sticks (available at craft stores)
  • Jute twine
  • Acrylic paint or markers
  • Small piece of wood or cardboard
  • Photographs

Instructions

Make the base. Glue the sandpaper to the cardboard and trim off any excess. Cut a wave design along one edge of the blue card stock. Glue the card stock to the sandpaper, folding the extra card stock under the front of the cardboard and gluing it.

To make the boardwalk, lay out 20 standard craft sticks, long sides touching. Glue on four sticks horizontally, as shown. Using the craft knife (a parent's job), cut the corks in half. Glue on four cork "feet" and let the glue dry.

To make the center frame, arrange eight standard craft sticks in a frame shape and glue them together at the corners. Let the glue dry.

To make each of the smaller frames, glue three 2-1/2 craft sticks together at the corners and let the glue dry. Cut a piece of jute twine (ours measures 17 inches) and wrap it around the middle stick, as shown, using a dab of glue at each end to secure it. Glue the small frames to the large one and let the glue dry.

Glue the cork feet to the sandpaper base, then glue the large frame to the boardwalk. (Tip: Cover a book with waxed paper and press it against the back of the frame to support it until the glue dries.) Use the paint or markers to decorate a small wood or cardboard sign, then glue it on. Trim each photograph to size and dab glue at the corners to attach it to the frame.

Jewelry Crafts: Beads of Paradise Bracelet

Beads of Paradise Bracelet

Total Time Needed: 1 Hour

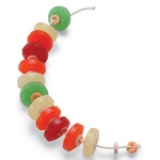
Make your jewelry and eat it too! All you'll need for this cute make-and-take party favor is some elastic cord and a rainbow of LifeSavers candy.

Materials

  • LifeSavers candy
  • Elastic cord

Instructions

Measure the elastic cord around your wrist, allowing an extra few inches for the knot.

Beads of Paradise - Step 2

Simply thread on the candy; we alternated between regular-size and mini LifeSavers.

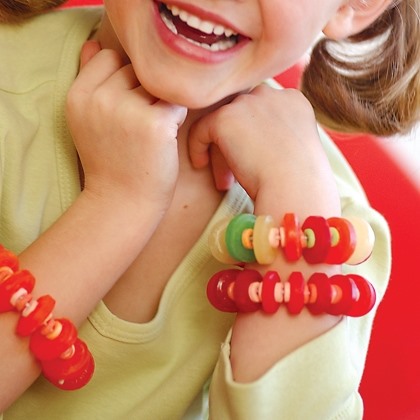
When you're finished, tie the two ends of the elastic with a double knot. And remember, no sampling your new bracelet before you try it on!

Basket Buddies | School Crafts

Basket Buddies

Total Time Needed: 2-3 Hours

This friendly mama owl and her baby bring a bit of cheer to your yard with their oversize basket bodies and bright faux-flower eyes.

Materials

  • 4 large artificial flowers
  • Floral wire
  • 2 large baskets (we used grapevine baskets, 4 by 11 inches and 4 1/2 by 9 inches)
  • Yellow craft foam
  • Stapler
  • Paintbrush
  • Yellow acrylic paint
  • 2 sturdy forked sticks (ours were about 15 inches long)
  • 2 whisk brooms
  • Wooden stake or another stick

Instructions

Remove the stems from the flowers. For each eye, loosely fold an 18-inch length of floral wire in half and twist the loop end tightly around the flower. Position the flower on the bottom of the basket, threading the ends of the wire through to the other side, then twist the ends to hold the eye in place.

Basket Buddies - Step 2To make each beak, cut a kite shape from the craft foam. Fold a 14-inch length of floral wire in half and twist it to form a small loop (a). Fold the foam over the loop and staple it as shown (b). Attach the beak as you did the eyes.

For the mama owl's feet, paint the sticks and allow them to dry. Place the sticks in the ground and set the larger basket on the legs, securing it with floral wire if necessary.

To make the owlet, place the smaller basket on the whisk-broom feet and prop up the basket with the wooden stake or stick.

Bandana Sit-Upon | Nature Crafts

Bandana Sit-Upon

Total Time Needed: 1 Hour

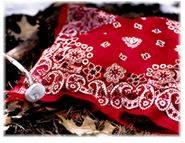
This sit-upon fits into a kid's pocket, ready to fill with grasses and leaves whenever a soft place to sit is needed.

Materials

  • Two large bandanas
  • Embroidery floss or yarn
  • Embroidery needle
  • Adhesive Velcro tab
  • Soft grasses, leaves or moss

Instructions

Place one bandana on top of the other and stitch them together on three sides. On the open side, attach a Velcro tab to make a simple closure (experienced sewers might like to make a basic button-and-hole closure instead).

To fill the pillow, gather the softest grasses, dead leaves and moss you can find, carefully broken into pieces small enough that they won't pierce the fabric. No woods nearby? Backyard grass clippings (preferably dried) work well.

At day's end, just shake out the filling and fold up the sit-upon for the next day's adventures.

Balancing Garden Buddies (Welcome Spring)

Balancing Garden Buddies

Add some character to your family's garden bed or front yard with these crafty critters that bob and sway in the spring breeze. The base is made from an easy-to-bend aluminum ruler.

Materials

  • 2 (2 1/2-inch) flat-bottomed wooden eggs (available at craft stores)
  • Paper towel
  • Egg carton
  • Drill and bits in sizes 3/32 inch and 1/8 inch
  • 36-inch (½-inch diameter) dowel
  • 3 (¾-inch) metal screws, size #4
  • Acrylic paints and brushes
  • 2 bamboo skewers
  • Permanent markers
  • Outdoor sealer (we used Delta Ceramcoat Exterior/Interior Varnish)
  • Scrap wood
  • 36-inch aluminum ruler (available at craft or home improvement stores)
  • Screwdriver

Instructions

Nest the eggs upside down, surrounded by a piece of a paper towel, in the egg carton (this will help keep the eggs stable while you work). Using the drill and the 3/32-inch bit, drill a ¾-inch-deep pilot hole in the bottom of each egg and in one end of the dowel. (Tip: To make it easier to attach the pieces later, run a screw into each of the pilot holes, then remove it.)

Decorate the dowel and the eggs using the acrylic paints. To paint the eggs, turn over the carton and poke two skewers through the bottom, then set the eggs on the skewers while you work. When the paint is dry, add fine details with permanent markers

Brush the birds and the dowel with three coats of the sealer, letting each coat dry completely (an adult's job).

To protect your work surface, place the scrap wood under the ruler, then use the drill and the V-inch bit to make two holes, about 2 inches apart, at one end of the ruler.

Bend the ruler into the shape shown and attach the birds using the screws and screwdriver.

Place the ruler on the dowel and adjust it until it balances. Mark the balance point on the ruler. Using the scrap wood to protect your work surface, drill a V-inch hole at the balance point. Attach the ruler to the dowel with a screw, leaving it slightly loose so that the ruler can move in the wind.

Sugar Cookie Puzzles

Sugar Cookie Puzzles

Assemble this edible jigsaw puzzle with two baking tricks. One, add flour to ready-made dough for durability, and two, partially bake the dough before using the cookie cutters, to help the pieces keep their shape. Choose any shapes and colors you like to celebrate a birthday, commemorate a holiday, or just sweeten up a long afternoon.

Ingredients

  • Flour
  • 16-1/2-ounce tube of sugar cookie dough (we used Pillsbury)
  • 1 cup white frosting
  • Food coloring (we used Betty Crocker Classic Gel Food Colors)

Instructions

Sugar Cookie Puzzles

To make the puzzle: Heat the oven to 350 degrees and line a rimless baking sheet with parchment paper. On a floured surface, knead 1/3 cup flour into a 16-1/2-ounce tube of sugar cookie dough (we used Pillsbury). Reserve half for later use. Roll the dough on a floured surface to a 1/4-inch thickness, then cut it into three 4-inch squares. Place the squares on the baking sheet and chill them in the refrigerator for 15 minutes. Bake the cookies for 10 minutes. Remove the sheet and immediately slide the parchment paper onto a counter or cutting board. Push the cookie cutters into the dough (warning: It will be hot!); be sure to cut all the way through. Slide the paper back onto the sheet and bake 2 more minutes. Let the cookies cool.

Sugar Cookie Puzzles

To frost: Thin a cup of white frosting with a small amount of water until it's the consistency of honey. Divide it into small bowls and stir in food coloring (we used Betty Crocker Classic Gel Food Colors) with a toothpick. Frost the cookies with a paintbrush.

,

Easter Eggs: Daddy Deggster Egg | All Easter Crafts

Easter Eggs: Daddy Deggster Egg

Total Time Needed:1 Hour

With his paper tube body and glued-on features, this egghead family member will crack your kids up.

Materials

  • brown and white hard-boiled eggs
  • toilet paper tubes
  • constraction paper
  • glue sticks
  • scissors
  • faux fur
  • 20-gauge wire
  • paper ears
  • markers

Instructions

Craft Cardboard Bodies: Collect toilet paper tubes, construction paper, glue sticks, and kids' scissors and arrange them on one end of the table. Invite your kids to make the bodies. First, help them cut the tubes to a desired height, then wrap a construction paper rectangle around the tube and glue in place. Next, cut and glue on paper arms, ears, and accessories.

Glue on Faces: Have kids pick and choose facial features from various craft supplies, such as colored paper cutouts, cotton balls, yarn, ribbon, pom-poms, googly eyes, and stickers (for easy access and simple sorting, we packed all the supplies in a large muffin tin). They can then use glue or double-sided tape to attach the features to the eggs. Style Daddy's do by gluing a strip of faux fur to the top of the egg. For spectacles, twist up 20-gauge wire. Don't forget the paper ears and bow tie.

Finishing Touches: To complete the egghead, place the egg on top of the tube body. Add any finishing touches with permanent marker, such as eyes, noses, rosy cheeks, and freckles.

Easter Eggs: Bee Egg

Easter Eggs: Bee Egg

Total Time Needed: 1 Hour

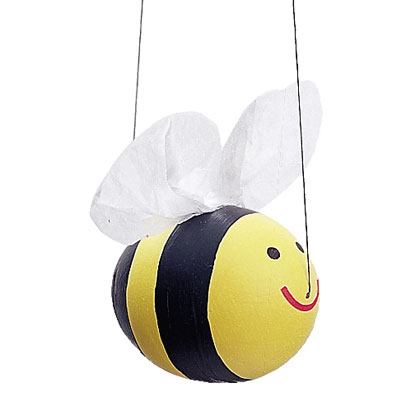
With this project, kids blow an egg, then turn it into a flying wonder. All you need is a raw egg, paint, craft supplies, and fishing line for hanging the egg. The best part? This blown-egg creature will keep indefinitely.

Materials

  • eggs
  • newsprint
  • egg dye
  • paper towels
  • birthday candles or crayons
  • red and black acrylic or tempera paint
  • brushes
  • white tissue
  • glue

Instructions

Easter Eggs: Bee Egg - Step 1

Blow the Egg: Wash and dry the raw egg. Cover your table with newsprint and set out bowls, pushpins, and paper towels. Shake the egg to break the yolk. Next, pierce the top and bottom with a pushpin, making the hole on the wider end a bit larger. Position the egg over the bowl and blow through the small hole, allowing the inside of the egg to seep into the bowl. Set the empty egg, with the large hole down, in an egg carton to dry. Be sure children wash their hands after handling raw egg.

Degg-orate the Egg: Let the kids paint half of the egg, stand it atop a bottle cap to dry (use a hair dryer to speed things up), then paint the other half. Centering the face on either hole, paint on features with contrasting colors. Paint your bee bright yellow, then paint on a red smile, black eyes, and black stripes. Glue on white tissue paper wings.

Take Flight: Tape a long length of fishing line to the end of an unfolded paper clip. Starting at the small hole, thread the line through the decorated egg and out the large hole. To keep your flying critter upright, tape the fishing line just above the hole in the critter's back. Hang it from the ceiling or an egg tree.

Stuffed Cucumber Cups Recipe

Stuffed Cucumber Cups

These veggie bites are an appetizing, eye-catching addition to any outdoor spread. Serve them as a side or prepare them as a quick make-and-take snack.

Ingredients

  • 2 English cucumbers, about 12 inches long, ends trimmed
  • 1 cup hummus
  • Finely chopped scallions, for garnish
  • Finely chopped red or orange bell pepper, for garnish

Instructions

Using a fork, score the sides of the cucumbers to create decorative stripes. Slice the cucumbers into 3/4-inch-thick rounds.

Using a teaspoon or melon baller, scoop a 1/3-inch-deep well in the center of each slice.

Spoon 1/2 tablespoon of hummus into each cucumber cup, mounding it slightly. Sprinkle the tops with the scallions and bell pepper. Makes 32 cups.

Nutritional Information

Per serving (4 pieces): Calories 64 ● Total Fat 3 g (5% DV) ● Saturated Fat 0 g (0% DV) ● Cholesterol 0 mg (0% DV) ● Sodium 162 mg (7% DV) ● Total Carbohydrate 8 g (3% DV) ● Fiber 1 g (4% DV) ● Sugars 2 g ● Protein 2 g (3% DV)

Percent daily values are based on a 2,000-calorie diet. Your daily values may be higher or lower depending on your calorie needs.

Tips:

Make-Ahead Tip: The unfilled cucumber cups can be made the day before, arranged on damp paper towels, covered tightly, and refrigerated.

,

Stuffed-Crust Veggie Pie Recipe

Stuffed-Crust Veggie Pie Recipe

Pizza is always a crowd-pleaser, and the cheese-filled crust of our veggie pie makes it all the more appetizing. The bulked-up edge allows you to pile the filling high, deep-dish style.

Ingredients

FOR THE DOUGH:

  • 1 1/3 cups lukewarm water
  • 1 (1/4-ounce) package active dry yeast
  • 1 teaspoon sugar
  • 1/4 cup rolled oats (quick or old-fashioned)
  • 1 1/2 tablespoons olive oil, plus more for coating the dough
  • 1 1/2 teaspoons salt
  • 3 1/2 cups flour, plus more for kneading

FOR THE TOPPING:

  • 3 tablespoons olive oil, plus more for the cookie sheet and crust
  • 1 large onion, halved and thinly sliced
  • 1 medium-size green bell pepper, halved, seeded, and thinly sliced
  • 2 garlic cloves, minced
  • 1 1/2 cups sliced mushrooms
  • 4 cups broccoli florets
  • Yellow cornmeal
  • 4 cups (about a pound) grated mozzarella
  • 1 (15-ounce) can tomato sauce
  • 1 medium-size tomato, halved, seeded, and diced

Instructions

First, make the dough. Pour the water into a large mixing bowl and sprinkle in the yeast. Stir in the sugar and oats, then set the mixture aside for 5 minutes. Stir in the oil and salt. Add 2 cups of the flour and beat the mixture with a wooden spoon for 100 strokes. Set the mixture aside for 5 minutes more.

Add the remaining flour, L cup at a time, and beat well after each addition. When the dough is firm and pliable, place it on a floured surface and knead it until it's smooth and somewhat springy, about 8 minutes. If the dough becomes sticky, add more flour as you knead.

Place the dough in a large, lightly oiled bowl and turn the dough to coat it with the oil. Cover the bowl with plastic wrap and set it aside in a warm spot until the dough has doubled in bulk, about 1 hour.

While the dough rises, prepare the topping. In a large skillet over medium heat, warm 2 tablespoons of the olive oil. Add the onion and bell pepper and sauté them, stirring often, until they are soft, about 4 minutes. Stir in the garlic and sauté for 1 minute more. Transfer the mixture to a plate.

In the same skillet over medium heat, warm the remaining olive oil. Add the mushrooms and broccoli and lightly sauté the vegetables for 4 minutes (they should still be crunchy). Transfer them to the plate with the other vegetables.

Heat the oven to 425º. Oil a large cookie sheet, dust it with the cornmeal, then set it aside. Punch down the dough and turn it out onto a lightly floured surface. Knead it briefly, then let it rest for 5 minutes.

Roll out the dough so that it's 1/4-inch thick and the size of the cookie sheet. Place it on the sheet. Sprinkle half of the mozzarella along the perimeter of the dough, about 1 inch in from the edges. Moisten the edges, fold them over the cheese, and press to seal them in place.

Spread the tomato sauce over the pie. Add the cooked vegetables and diced tomato. Lightly salt and pepper the vegetables and sprinkle on the rest of the cheese. Bake the pie on the center rack until the crust is golden brown, about 25 minutes.

Remove the pie from the oven and brush the crust with more olive oil. Slide the pie onto a cooling rack and allow it to cool briefly before serving. Makes 8 slices.

Nutritional Information:

Per serving (one slice):

Calories 443

Total Fat 16 g (24% DV)

Saturated Fat 8 g (38% DV)

Cholesterol 30 mg (10% DV)

Sodium 1,107 mg (46% DV)

Total Carbohydrate 55 g (18% DV)

Fiber 4 g (18% DV)

Sugars 5 g

Protein 23 g (46% DV)

Vitamin A (23% DV)

Vitamin C (83% DV)

Calcium (44% DV)

Percent daily values are based on a 2,000-calorie diet. Your daily values may be higher or lower depending on your calorie needs.

,

Easter Eggs: Baby Megg Egg

Easter Eggs: Baby Megg Egg

Total Time Needed: 1 Hour

With her paper tube body and glued-on features, this egghead family member will crack your kids up.

Materials

  • brown and white hard-boiled eggs
  • toilet paper tubes
  • construction paper
  • glue sticks
  • scissors
  • yarn
  • paper
  • markers

Instructions

Easter Eggs: Baby Megg Egg - Step 1

Craft Cardboard Body: Collect toilet paper tubes, construction paper, glue sticks, and kids' scissors, and arrange them on one end of the table. Invite your kids to make the bodies. First, help them cut the tubes to a desired height, then wrap a construction paper rectangle around the tube and glue it in place. Next, cut and glue on paper arms, ears, and accessories.

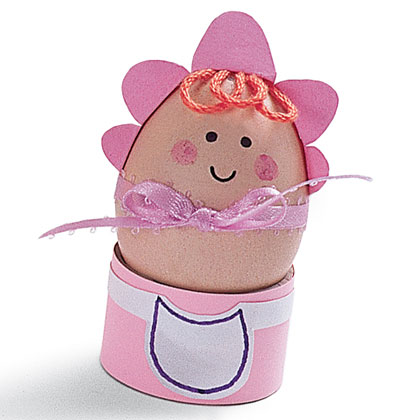
Glue on Face: Have kids pick and choose facial features from various craft supplies, such as colored paper cutouts, cotton balls, yarn, ribbon, pom-poms, googly eyes, and stickers (for easy access and simple sorting, we packed all the supplies in a large muffin tin). They can then use glue or double-sided tape to attach the features to the eggs. To make an egg-spressive baby, add a paper bib to her pink outfit and glue a paper bonnet and a few strands or tufts of yarn hair to her head.

Finishing Touches: To complete the egghead, place the egg on top of the tube body. Add any finishing touches with permanent marker, such as eyes, noses, rosy cheeks, and freckles.

//