Latest news, food, business, travel, sport, Tips and Tricks...

Whole Wheat & Olive Oil Berry Biscuits

Whole Wheat & Olive Oil Berry Biscuits

I do love me a good biscuit.

Fortunately, they can be made healthier by using whole wheat flour and olive oil in place of some of the white flour and butter, and you’ll never notice the difference as they come out of the oven. When berries are in season I like to toss handfuls into my biscuit dough as I mix it together. When they’re not in season, I shake them straight out of their freezer bag into the dough anyway. Berry biscuits are beautiful for weekend breakfast, with or without chunks of white chocolate.

Once you get the hang of biscuits, you can mix them up in no time. I like blitzing the dry ingredients with the butter and oil, then dumping it into a bowl to add the liquid and any additions I like. These would do well with some grated lemon or orange zest, or leave out the sugar and add 1/4 cup grated Parmesan cheese or a bigger handful of grated old cheddar to turn them into cheese scones.

Patting the dough into a circle and then cutting it into wedges right on the baking sheet saves the mess of rolling and cutting them out on the countertop, but feel free to do that instead if you wish. These would be equally stunning round, or square.

JulieVR

Ingredients

  • 1 cup all-purpose flour
  • 1 cup whole wheat flour
  • 1 Tbsp.  sugar (optional)
  • 1 Tbsp. baking powder
  • 1/4 tsp.  baking soda
  • 1/4 tsp. salt
  • 1/4 cup  butter, chilled and cut into pieces
  • 1/4 cup olive or canola oil
  • 3/4 cup milk or buttermilk
  • 1 cup fresh or frozen berries (don’t thaw them)

Directions

  1. Preheat oven to 400°F. Spray a baking sheet with nonstick spray or line it with parchment.
  2. Put the flours, sugar, baking powder, baking soda and salt in the bowl of a food processor or into a medium mixing bowl and pulse or stir until well blended. Add the butter and oil and pulse or stir with a wire whisk or fork until crumbly. If you’re using a food processor, transfer the mixture to a medium bowl. Add the milk and berries and stir gently just until the dough is combined.
  3. Pat the dough into a circle that is about 1″ thick and 8″-9″ in diameter on the cookie sheet. (If they are sweet and you want a brown, crunchy top, brush them with a little milk and sprinkle with sugar.) Cut the circle into 8 wedges with a knife or pastry cutter and separate them on the sheet so that they are at least an inch apart.
  4. Bake for about 20 minutes, until golden. Serve warm. Wrap well and freeze any you don’t eat the same day. Makes 8 biscuits.


,

Real Food Fast: Macaroni Carbonara

Real Food Fast: Macaroni Carbonara

Cold fall days make me crave pasta, and warm mac & cheese and bacon carbonara are two creamy, hearty favourites. It occurred to me recently I could meld the two into one bacony, cheesy, creamy bowl of deliciousness. Macaroni carbonara is easier to make than mac & cheese – simply cook and crumble bacon, and stir eggs and Parmesan together with a fork, then toss with the warm pasta and the eggs will cook with its residual heat. Start to finish, this meal comes together in less than 15 minutes. It’s real food fast.

JulieVR

Ingredients:

  • half a 1 lb pkg. dry macaroni
  • 4-8 slices bacon, chopped
  • canola oil (optional)
  • 3 large eggs
  • 1/2-1 cup grated Parmesan cheese
  • freshly ground black pepper lots

Directions:

  1. In a large pot, boil the macaroni until tender. Drain well, reserving a bit of the cooking water.
  2. Meanwhile, cook the bacon until crisp; set aside. In a small bowl, stir the eggs and Parmesan together with a fork.
  3. As soon as the pasta is done, drain it and return it to the warm pot. Pour the eggs overtop, and add the egg mixture and bacon. Toss with tongs, adding a little reserved pasta water if you like, until the eggs are cooked (they will be after a minute as long as the pasta is still steaming) and the sauce is as saucy as you like it. Season with pepper (the cheese is probably salty enough). Do all this over the warm stove if you need to.
  4. Serve immediately. Serves 4.

,

White Chocolate Cranberry Cashew Popcorn

White Chocolate Cranberry Cashew Popcorn

At the same baby shower where we served the amazing Strawberry Cream Cake, we also handed out little bags of popcorn mixed with mini marshmallows and drizzled with white chocolate and pink tinted white chocolate.  I’ve been thinking about it every since, and finally made my own version this afternoon.  I made a healthier version so that I didn’t feel as guilty munching on a bowl of it, and it was just as good as the original, if not better, because it played up the salty and sweet combination even more. I simply popped a bag of microwave popcorn, which I then tossed in a big bowl with some mini marshmallows, roasted salted cashew pieces, and dried cranberries.  Then I drizzled the mixture with melted white chocolate, tossed it to coat, then spread it out to cool and set.  So quick and easy and so pretty - the perfect sweet and salty combination!

fujimama

Makes about 8 cups

Ingredients

  • 1 bag (2.9 ounce) microwaveable butter flavor popcorn (I use a reduced fat version)
  • 2 cups mini marshmallows
  • 1/2 cup roasted salted cashew pieces
  • 1/2 cup dried cranberries
  • 6 ounces white chocolate, chopped into small pieces (or 1 cup white chocolate chips)

Directions

1. Line a jelly roll pan with waxed paper and set aside.

2. Pop the bag of popcorn and pour half of the hot popcorn into a large microwave-safe bowl. Top it with the marshmallows, cashews, and dried cranberries. Then top it with the rest of the hot popcorn and toss everything together.

3. Melt the white chocolate, drizzle it over the popcorn mixture, and toss to coat. If the chocolate is too thick, put the bowl in the microwave for 10 second increments until you are able to toss the mixture together and coat everything with the white chocolate.

4. Then spread the popcorn out on the prepared jelly roll pan. Cool completely, then gently break up the popcorn and eat!

,

Lunchtime Smashers: Peanut Mandarin Rice Bowl

Lunchtime Smashers: Peanut Mandarin Rice Bowl

This is one of my favorite fast ideas for lunchtime. A “smasher bowl.” The idea is simple. You grab some pre-made ingredients (which is why this is so fast + easy) and toss them in a bowl. Then you grab a fork and start smashing in the flavor – meshing the ingredients together. You can quickly infuse some serious yum-appeal into a wide variety of healthy go-to ingredients – and be feasting in minutes! Fast, delicious and healthy. Plus you can get as creative with ingredients as you’d like. Here is a starter smasher recipe for my Peanut Mandarin Rice Bowl! Get smashing.

kathypatalsky

vegan, serves 1

Ingredients:

  • 3/4 cup cooked brown rice (chilled)
  • 1 Tbsp chunky peanut butter
  • 1/2 cup cooked shelled edamame (chilled)
  • 2 tsp apple cider vinegar
  • 1/4 cup mandarin oranges
  • 1/2 cup kale leaves, shredded
  • salt + pepper to taste
  • optional: handful of rice crisps, crushed or whole

Directions:

1. Cook / heat the rice and edamame ahead of time and store in the fridge.

2. Pull your ingredients and add to a medium sized serving bowl.

3. Start smashing! Grab your fork and toss the ingredients well letting the vinegar and mandarins soften the kale and smooth out the peanut butter into a sauce like texture. Keep folding and smashing until the kale is marinated in sauce as well as the rice and beans. Add salt and pepper to taste. You can fold in some rice crackers to absorb any excess liquid. Or eat them alongside your bowl.

Enjoy! You can serve this bowl chilled or heat to serve warm.

,

White Bean Nacho Dip

White Bean Nacho Dip

Full of flavor, this simple, comforting white bean dip is topped with a mound of cheese for an extra gooey mix of goodness. The perfect afternoon snack for a rainy afternoon, Friday night game treat, or dinner side dish, you’ll love how fresh, simple, and delicious this recipe is to make (and eat!).

Brooke McLay

Ingredients

  • 2 (15 ounce) cans cannellini beans, rinsed and drained
  • 1/3 cup chopped fresh cilantro
  • 3 cloves garlic, crushed or to taste
  • 1/3 cup olive oil
  • 1 1/2 lemons, juiced
  • salt and pepper to taste
  • 1 1/2 cups monterey jack cheese, grated

Directions

  1. Place the cannellini beans, cilantro, garlic, olive oil and lemon juice in a food processor, pulse until smooth. Salt and pepper to taste. Transfer to a shallow 9×9 baking dish, sprinkle with cheese and a bit of chopped cilantro. Bake in an oven preheated to 400 degrees for 15-20 minutes, or until the cheese melts and becomes bubbly. Serve with tortilla chips.

,

White Chocolate Lemon Truffles

White Chocolate Lemon Truffles

Truffles are the ultimate rich chocolate treat. They melt in your mouth the moment they hit your tongue. And though simple to make, these bite-size indulgences always impress. I decided to adapt my dark chocolate truffle recipe for white chocolate… I added a little lemon zest and a drop of lemon extract, and a light, springtime dessert was born!

To decorate these pretty sweets, I rolled them in sanding sugar and pastel sprinkles to give them Easter egg-like colors. And they’re ready for my next spring feast, or gifting needs.

The most wonderful thing about these delectable bites? You’re kids will go nuts over them, but they’ll only need to eat two of these rich treats to satisfy their sweets craving!

Kelsey Banfield

Makes: 40

Ingredients:

  • 1/2 cup heavy cream
  • 16 ounces white chocolate (avoid chips as they won’t easily melt), finely chopped
  • 1/2 teaspoon pure vanilla extract
  • 1/8 teaspoon lemon extract
  • 2 teaspoons lemon zest, finely grated
  • sanding sugar and sprinkles (optional)

Directions:

1. Add heavy cream and white chocolate to a microwave-proof bowl. Melt in the microwave in 30-second bursts, stirring between each heating, until completely smooth.

2. Stir in the vanilla extract, lemon extract, and lemon zest until smooth. Cover the bowl with plastic wrap and chill in the fridge until it’s cool but still pliable, about 1 hour.

3. Line a baking sheet with parchment paper. Use a teaspoon, or 1-inch ice cream scoop, to scoop chocolate onto lined baking sheet. Once all of the chocolate is scooped there will be about 40 dollops. Slide the sheet into the fridge to chill for 15 minutes. This will help harden them so they are easier to roll. Then remove and use clean hands to roll the chocolate into balls with the palms of your hands.

4. Working quickly, roll the truffles in the sanding sugar so they are completely coated. If the sugar doesn’t seem to stick well, moisten your fingers with water and gently rub it on the chocolate and then re-roll the truffles. This will not harm the chocolate at all. Place the truffles back on the lined baking sheet and chill them again in the fridge for at least 1 hour before eating.

Storage Note: The truffles can be packaged or served once the decorations have hardened. It is best not to leave them in a warm or sunny spot because they are prone to melting. If saving to serve later it is easiest to store them in a bag in the refrigerator.

,

Grilled Sweet Potato Salad

Grilled Sweet Potato Salad

I’m convinced you can grill pretty much any vegetable and make it taste good, or even better than good. Sweet potatoes are one of my favorite veggies and I got it in my head one day that I wanted to make salad out of them. When I went searching for a sweet potato salad recipe I was so pleased to come across this grilled version from Epicurous. Grilled sweet potato salad…why not?

I first made this salad a couple of summers ago and it has since then made an appearance on my table quite a few times. I’ve served it alongside spicy jerk chicken wings, one of husband’s favorites. It’s a nice way to change things up in the side dish department and its unique and pretty presentation makes it a great addition to any cookout. The way it’s prepared is so fresh and healthy and the naturally sweet flavor of the potatoes really shines alongside the lime, cumin and green onions.

by aggieskitchen

Recipe from epicurious.com

Ingredients

  • 2 1/2 pounds sweet potatoes, peeled
  • 1/4 cup olive oil
  • 1 teaspoon salt
  • 1 teaspoon ground cumin
  • 2-3 scallions, sliced diagonally
  • 2 teaspoons fresh lime juice
  • lime wedges
  • handful chopped cilantro

Directions

  1. Add your sweet potatoes into a large saucepan and cover with cold salted water by 1 inch. Bring to a simmer, covered, and cook until just tender, about 15 to 30 minutes, depending on size of potatoes. Place potatoes in a a colander and run under cold water to cool. With a sharp knife peel potatoes and cut crosswise into 1/2-inch-thick slices.
  2. In a small bowl whisk together oil, salt, and cumin and brush some onto both sides of potato slices, reserving remaining cumin oil.
  3. Preheat your grill. Grill potato slices on an oiled rack set 5 to 6 inches over glowing coals until golden brown, about 1 minute on each side, and transfer with tongs to a platter. Sprinkle green onion over grilled potatoes. Whisk lime juice into remaining cumin oil with salt and pepper to taste and drizzle over potatoes. Serve potato salad with additional lime wedges and chopped cilantro if desired.
  4. Updated: I just wanted to note to keep an eye on your potatoes as they are boiling, you want them firm and not too soft. But you want to parboil them enough to take the bite out of them so they aren’t completely raw on the grill.
  5. Also, according to one of the reviews on epicurious, the potatoes can be boiled and sliced ahead of time and grilled later.

,

Grilled Peach Ice Cream

Grilled Peach Ice Cream

National Ice Cream Month {July} might be over but the ice cream enjoyment isn’t ; ) It’s still sweltering hot here in the South East and we can’t get enough ice cream. Period. Being originally from Georgia I adore peaches in all forms. When they’re sweet and ripe there is nothing better. For this recipe we’ve drizzled them with extra virgin olive oil, topped them with a tad of turbinado sugar and then grilled them to an even sweeter perfection before pairing them with a homemade ice cream!

by bellalimento

What you’ll need:

  • 3 ripe peaches – halved, pits removed
  • extra virgin olive oil
  • 1 tablespoon turbinado sugar
  • 3 cups skim milk
  • 1/2 cup heavy whipping cream
  • 1 teaspoon pure vanilla extract
  • 6 egg yolks
  • 1 cup sugar

What to do:

1. Drizzle peaches with olive oil. Sprinkle turbinado sugar onto cut side of peaches. Place peaches onto a hot grill pan and grill for approximately 2-3 minutes each side. Set aside to cool.

2. Into a large sauce pan add: milk, heavy whipping cream. Once mixture begins to boil remove from heat. Add vanilla extract. Stir to combine.

3. Into your mixer’s bowl add: egg yolks, sugar. Mix until mixture is light and fluffy.

4. SLOWLY add egg mixture to warm milk mixture. Whisk together to combine as you’re adding egg mixture. Allow to cool slightly. Transfer to refrigerator to cool completely.

5. WHILE ice cream base is cooling, remove skins from peaches and discard. Using a blender, immersion blender or food processor, pulse until mixture is pureed. Place mixture into refrigerator to chill.

6. Add 1/2 cup to 3/4 cup of the grilled peach puree to your ice cream base. Stir to combine. Transfer mixture to your ice cream maker and make according to machine directions.

,

Tomato Bruschetta with Sweet Cherries

Tomato Bruschetta with Sweet Cherries

Sometimes a small change can liven up an old standby–for instance, this tomato bruschetta with sweet cherries. While I love (LOVE!) fresh summer tomatoes, the typical tomato/garlic/basil thing is a little played out for me. But add some sweet cherries and voilà!–classic bruschetta is remade into a surprising and delicious appetizer. Plus the sweet cherry flavor just might mean that your kids dare to try some.

I love the clean flavor of fresh parsley in this recipe. Of course basil, oregano, or tarragon would all be terrific. Just use what you have on hand and make the recipe yours. For a more filling snack or light meal, top your bread with a bit of melted cheese or prosciutto.

serves 4

Ingredients:

  • 1/2 loaf good, crusty bread
  • 1 1/2 cup tomatoes, diced to 1/4” chunks
  • 1 cup bing cherries, quartered
  • 1/4 cup parsley, minced
  • 2 cloves garlic, smashed and minced, plus one whole clove for bread
  • 2 tablespoons yellow onion, minced
  • 2 tablespoons olive oil plus more for bread
  • 1 tablespoon balsamic vinegar
  • 1/2 teaspoon salt plus more to taste
  • 1/2 teaspoon fresh ground white pepper

Directions:

  1. Place the diced tomatoes in a colander, sprinkle with 1/2 teaspoon salt, and set aside to drain for 20 minutes. Pit and quarter the cherries. In a medium bowl, combine the tomatoes, cherries, parsley, garlic, and onion. In a small bowl, whisk the vinegar into the olive oil.
  2. Meanwhile, slice the bread to 1/2″ thick, rub with the whole clove of garlic, and toast in a toaster or regular size oven until golden and crisp. Drizzle each slice with a 1/2 teaspoon of olive oil, and then carefully spoon on the bruschetta. Garnish with a few parsley leaves and serve.

,

Eggnog Doughnut Muffins

Eggnog Doughnut Muffins

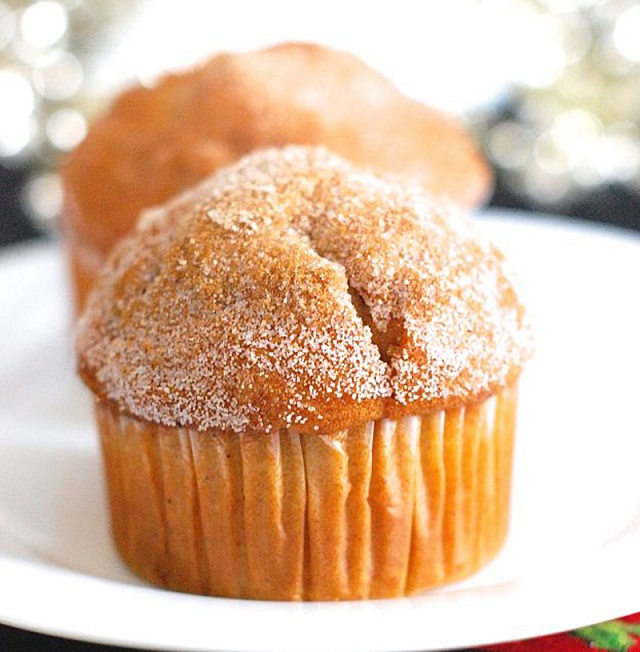
Doughnuts - love ’em. Muffins - love ’em. So what happens when they meet up and become one? A doughnut-muffin, or “duffin,” is born! Whether you’re a huge proponent of dessert hybrids (like “cronuts”) or just discovering their existence, I’m confident you will be a fan of these.

Doughnut muffins are dense, richly flavored, and rolled in sugar like real doughnuts. I am obsessed with making them eggnog flavored for the holidays. They are incredible when served warm with coffee, or with a little hot fudge and ice cream for dessert. You’ll immediately be converted once you give these a try - you’ll never settle for just a doughnut, or just a muffin, again!

Kelsey Banfield

Makes: 12 muffins

Ingredients:

  • 1/2 stick unsalted butter, room temperature
  • 1/4 cup vegetable oil
  • 1/2 cup granulated sugar
  • 1/3 cup packed light brown sugar
  • 2 large eggs
  • 1 1/2 teaspoons baking powder
  • 1/4 teaspoon baking soda
  • 1 teaspoon freshly ground nutmeg
  • 1/2 teaspoon ground cinnamon
  • 1 teaspoon kosher salt
  • 1 teaspoon eggnog flavored extract
  • 2 2/3 cups all-purpose flour
  • 1 cup regular eggnog (not skim) made with whole milk
  • 4 tablespoons melted butter (topping)
  • 2 tablespoons granulated sugar mixed with 1 tablespoon ground cinnamon (topping)

Directions:

1. Preheat the oven to 425 degrees. Line a 12-cup muffin tin with paper cups and set aside. Mix the cinnamon sugar for the topping and set aside.

2. In the bowl of an electric stand mixer beat the butter, oil, and sugars until smooth. Then beat in the eggs one at a time.

3. In a small bowl stir together the baking powder, baking soda, nutmeg, cinnamon, salt, extract, and flour. Beat carefully into the wet ingredients until just incorporated, alternating with the eggnog.

4. Distribute the batter evenly amongst the muffin tins. Bake them for 15-17 minutes or until the tops of the muffins spring back when touched and are a pale golden brown. Allow them to cool until they’re comfortable to touch.

5. Melt the butter for the topping in a small bowl and dip the top of each muffin in it. Then, dip the tops in the bowl of cinnamon sugar, and serve.

,

Eggnog Cookies with Eggnog Icing

Eggnog Cookies with Eggnog Icing

I am writing this post today in honor of my brother. He loves these eggnog cookies so much and requests that I make him a batch every year. There were several Christmases when I didn’t see him because he was serving in the Coast Guard. Those years I froze some extra eggnog and made them for him when he came home. These beautiful cakey cookies shine with the rich creamy taste of eggnog. Everyone loves the amazing flavor and sweet eggnog icing on top, it elevates the cookie from simple to super. I am looking forward to sharing these with my brother this year, I bet there won’t be any left for Santa.

Kelsey Banfield

adapted from the back of a random eggnog container many, many years ago!

Ingredients

  • 2 sticks unsalted butter, softened
  • 1 cup granulated sugar
  • 1 large egg, room temperature
  • 1 cup eggnog
  • 3 cups all-purpose flour
  • 1 teaspoon baking powder
  • 1 teaspoon baking soda
  • 1/2 teaspoon Kosher salt
  • 3/4 teaspoon ground nutmeg

Icing:

  • 2 cups confectioners’ sugar
  • 5 Tablespoons eggnog
  • 1/2 teaspoon ground nutmeg

Instructions

1. In a mixer fitted with a paddle attachment beat the butter and sugar until light and fluffy. Add the egg and beat well. Then add the eggnog and mix again.

2. Sift together the flour, baking soda, baking powder and nutmeg. Then turn the mixer on low and slowly add the flour mixture to the wet ingredients until everything is just combined. Cover the dough and chill it for at least two hours.

3. Preheat the oven to 350ºF. Drop dough by the round teaspoonful onto lined cookie sheets. Bake one sheet at a time for 10 to 12 minutes, or until the tops are lightly golden. Cool cookies on a wire rack.

4. To make the icing stir together the confectioners’ sugar, eggnog and nutmeg. Icing the cookies when cooled.

,

Slow Cooker Spicy Peanut Chicken Curry

Slow Cooker Spicy Peanut Chicken Curry

With these crazy busy fall days, I’m all over slow cooker recipes – toss everything into the CrockPot in the morning as I assemble school lunches, and dinner is already done before I’m out the door. Curries are some of my favorites – especially those enriched with peanut butter. Made with skinless chicken thighs, this dish is quick and flavorful, takes under 5 minutes to throw together, and makes a delicious meal served over rice. It also freezes well – if you have a large slow cooker, double the recipe and freeze leftovers for an emergency meal on a cold day down the road.

If you’re going wheat or gluten-free, use rice flour – it simply thickens the sauce as it cooks.

Slow Cooker Spicy Peanut Chicken Curry

Adapted from Crock-Pot.ca

Ingredients

  • 8 skinless, boneless chicken thighs
  • 1 large thin-skinned potato, cut into chunks
  • 1 onion, chopped
  • 1 Tbsp. flour
  • 1 19 oz (540 mL) can diced tomatoes, with their juices
  • 1/3 cup peanut butter, smooth or crunchy
  • a squirt of sriracha or chili sauce (optional)
  • 1 clove garlic, crushed
  • 1 Tbsp. soy sauce
  • 1/2 tsp ground cumin
  • 1 tsp chili powder
  • 1 tsp brown sugar
  • 1 tsp turmeric (optional)

Instructions

  1. Chopped fresh cilantro and/or salted peanuts, for garnish
  2. Place the chicken in your CrockPot and arrange the diced potatoes and onion around the edge. Sprinkle with flour.
  3. Add the tomatoes, peanut butter, sriracha, garlic, soy sauce, cumin, chili powder, brown sugar, turmeric (if you have it), cover and cook on low for 6 hours.
  4. Sprinkle with chopped cilantro and/or peanuts and serve over steamed rice. Serves 4-6.

,

Slow Cooker Beef Bourguignon

Slow Cooker Beef Bourguignon

I know once fall approaches, everyone starts to talk about their slow cookers. I love the convenience of a slow cooker meal pretty much any time of year but I know once the temps start to cool down and the days seem to get shorter, most of us would love to come home to the warm smell of comfort food already in our kitchens. Fall is the time of year that slow cookers start to get busy again.

The smell that develops from this Slow Cooker Beef Bourguignon is intoxicating… the red wine combined with beef and vegetables just works its magic and can turn any busy evening into a gourmet meal.

I like to serve this Slow Cooker Beef Bourguignon with creamy mashed potatoes made from Yukon Gold potatoes and simply seasoned with a little butter, sour cream, chives, salt and pepper.

Ingredients

  • 2 pounds beef chuck shoulder pot roast, cut into 1-inch pieces
  • 1/4 cup all-purpose flour
  • olive oil
  • 1 teaspoon salt
  • 1/4 teaspoon pepper
  • 1/2 cup water or beef broth
  • 2 cups Burgundy or other dry red wine
  • 2 tablespoons tomato paste
  • 4 crushed garlic cloves
  • 2 teaspoons dried marjoram leaves, crushed
  • 8 ounces baby carrots (about 1-3/4 cups)
  • 8 ounces fresh pearl onions, peeled or frozen pearl onions
  • 8 ounces mushrooms, cut in half if large
  • Chopped fresh parsley (optional)

Instructions

  1. Lightly coat beef with flour. Heat 2 tablespoons olive oil in stockpot over medium heat until hot. Brown 1/2 of beef; remove from stockpot. Repeat with remaining beef, adding oil as needed. Remove beef from stockpot and into slow cooker; season with salt and pepper. Add 1/2 cup water to stockpot and de-glaze beef drippings.  Add this broth to slow cooker.
  2. Stir in wine, tomato paste, garlic and marjoram. Add carrots, onions and mushrooms.
  3. Cook on low heat for 8-10 hours.

,

Basic Vegan Cinnamon Rolls

vegan cinnamon rolls

I really hesitated to call these “basic” vegan cinnamon rolls. But I guess if you are looking for that classic cinnamon roll flavor in a vegan dish – here it is. Gooey cream cheese frosting, accented with orange. Sticky brown sugar and cinnamon filling - studded with a few optional raisins. Buttery moist roll that is soft and melty on the inside - toasty and browned on the puffy edges. Make cinnamon rolls this week – and this time , try them vegan!..

cinnamon rolls with orange frosting

Cinnamon Rolls, Orange Frosting

vegan, makes 7-8 rolls

Ingredients

Dough:

  • 3 1/2 – 4 cups white flour (or use your favorite flour)
  • 1 Tbsp baking powder
  • 3 tsp baking soda
  • 1 tsp salt
  • 1 stick vegan butter, melted (8 tablespoons)
  • 1 cup soy or almond milk
  • 1/3 cup fresh squeezed lemon or orange or tangerine juice
  • 1 tsp vanilla extract
  • plenty of flour for kneading/surface

Filling:

  • 1 cup brown sugar
  • 3 Tbsp vegan butter, melted
  • 1/2 tsp cinnamon
  • a few drops of vanilla extract
  • 2 Tbsp organic raisins, optional

Topping:

  • 3 Tbsp vegan butter, melted
  • 3 Tbsp brown sugar

Instructions

1. Preheat oven to 375 degrees.

2. Combine dry ingredients from dough. Add in wet liquid and work into a ball. Knead until a dough ball forms. Add a splash more soy milk or a few dashes more flour to even the consistency out if needed. Dough should be soft – not tough – yet thick enough to roll out into a one inch thick piece.

3. On a floured surface, roll out dough to a loose rectangle shape. About 3/4″ – 1″ thick.

4. Brush or drizzle the melted butter over top dough. And a few drops of vanilla.

5. Over top the vegan butter layer, sprinkle the cinnamon – generously. Add raisins.

6. Evenly distribute brown sugar over top!

7. Carefully roll your dough up from one end until a tight spiral inside a long tube is reached.

8. Slice your rolls. About 1 1/2″ thick.

9. Tightly place the rounds in a vegan butter greased dish – I used a 9″ round baking dish.

10. Add the topping layer over top the rolls.

11. Bake at 375 for 30 minutes.

Cool a few minutes and serve warm with orange cream frosting over top (recipe below)

Orange Cream Frosting

  • 8 ounce vegan cream cheese
  • 1 1/2 cups powdered sugar
  • 1/3 cup orange juice (fresh)
  • 1/2 tsp orange zest
  • 1 dash cayenne
  • 1-2 Tbsp vegan butter, softened

Blend with hand mixer. Chill until ready to serve.

,

Pizza Rice Balls Recipe

Pizza Rice Balls Recipe

Prep Time 30min

Your whole family will love this recipe! Using Uncle Ben's Rice, you can create a delicious and fun pizza rice ball meal.

by The Sneaky Chef

What you'll need

  • 1 box Uncle Ben's® Whole Grain White Sweet Tomato
  • 1 whole medium sweet potato or yam, peeled and coarsely chopped
  • 1 large egg
  • 3 whole medium carrots, peeled and sliced into thick chunks
  • 2 tablespoons water
  • 1/2 cup grated Parmesan cheese, divided
  • 1 teaspoon dried oregano and/or basil
  • 1 tablespoon tomato paste
  • 1/4 cup wheat germ or oat bran divided

Notes:

Yields 8 servings

How to make it

  1. Prepare the Uncle Ben's® Whole Grain White Rice Sweet Tomato as instructed on the box.
  2. Preheat oven to 450 F degrees and generously spray a baking sheet with cooking spray.
  3. To make the Sneaky Chef Orange Puree, peel, chop and boil sweet potato and carrots for about 20 minutes until tender. Drain the carrots and sweet potatoes and put them in a food processor with two tablespoons of water. Puree on high until smooth – no pieces of vegetables showing. Stop occasionally to push the contents to the bottom. If necessary, use another tablespoon of water to smooth out the puree, but the less water, the better. (Makes about 2 cups of puree. Leftovers can be kept in refrigerator for up to three days, or frozen for up to three months.)
  4. Whisk together the egg, 1/4 cup of the Parmesan cheese, the spices, tomato paste, 2 tablespoons Orange Puree, and 2 tablespoons of the oat bran or wheat germ.
  5. Add cooked rice and mix well.
  6. Pour remaining Parmesan and oat bran/wheat germ onto a plate and set aside.
  7. Using damp hands, pinch off about 1 tablespoon of the rice mixture and shape into small balls. Roll each ball in the oat bran or wheat germ and Parmesan mixture, coating fully.
  8. Gently place the rice balls on the prepared sheet; generously spray the tops of the balls with more cooking spray, and bake for 5 minutes.
  9. Using a spatula to loosen, turn the rice balls over, and then return them to the oven for another 5 minutes to brown on the other side.
  10. Serve with salt and pepper as a handheld side dish or dip in marinara sauce.

,
//