Latest news, food, business, travel, sport, Tips and Tricks...

For Valentine's Day: Lollipop Mice

Lollipop Mice

Total Time Needed: 1 Hour

A parade of these valentines comes equipped to treat a whole group of classmates -- just pull a tail, and you'll have a sweet lollipop in hand.

Materials

  • Red construction paper
  • Pink construction paper
  • Scissors
  • Glue
  • Marker
  • Lollipops

Instructions

  1. Cut a heart shape from red construction paper (it should measure about five inches at the widest point).
  2. Fold the heart in half to form the mouse's body, then glue together the edges from the tip of the nose to the top of the back, but leave the tail end open.
  3. For ears, cut out a pair of small pink paper hearts, fold them in half, and then glue them onto the body. Draw on eyes with a colored marker.
  4. Lastly, tuck a lollipop into the body, so that the stick becomes the mouse's tail.

Festive Fudge Recipe

Festive Fudge

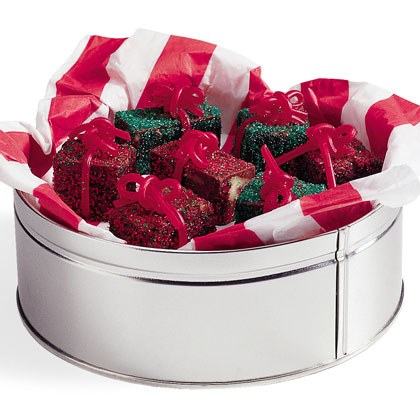
Coated with sparkly colored sugar and tied up with licorice ribbon, these creamy fudge squares resemble a stash of mini gift boxes. Your child can even make a batch with a handful of red and green spice drops, if she likes.

Ingredients

  • 2 tablespoons butter
  • 1 (14-ounce) can sweetened condensed milk
  • 3 cups semisweet chocolate morsels
  • 1/2 cup chopped walnuts (optional)
  • 1/3 cup each red and green spice drops, halved (optional)
  • 1 teaspoon vanilla extract
  • Pinch of salt
  • Red and green decorative sugar
  • Red Twizzlers Pull-n-Peel cherry licorice

Instructions

Festive Fudge step 1

1. Have your child lightly coat an 8-inch square pan with cooking spray or oil. Line the pan with waxed paper, letting it hang several inches over opposite sides.

2. Tip: Lining the oiled pan with waxed paper makes for easy cleanup. Once the fudge is set, your child can simply grasp the ends of the paper to transfer the fudge to a cutting board. Then she can peel away the paper before cutting the fudge.

3. Melt the butter in a large, heavy saucepan over low heat. Stir in the condensed milk and heat briefly. Add the chocolate morsels. Let the mixture stand over very low heat for several minutes, until the morsels are melted, stirring only 2 or 3 times.

4. Remove the fudge from the heat and add the walnuts and spice drops (if desired), vanilla extract, and salt. Stir briefly to blend. Scrape the mixture into the prepared pan, then have your child spread it evenly with a spoon, smoothing the top.

5. Cool the fudge on a wire rack for about 30 minutes, then transfer the pan to the refrigerator. Chill the fudge uncovered until it is firm, at least 3 hours or overnight.

Festive Fudge step 5

6. When you're ready to decorate the fudge, remove it from the pan and peel off the waxed paper. Cut the fudge into little squares (a couple of bites each). Cut a thin, flat channel across the bottom of each square -- this will help hold the licorice ribbon in place later.

7. Tip: To ensure that the squares lie flat once you tie on the candy ribbons, use a butter kinfe to carve a channel for the string licorice in the bottom of each.

8. Put enough colored sugar in a cereal bowl to cover the bottom. Press all sides of each fudge square into the sugar. Then cut a long piece of red string licorice and wrap it around the square. Tie the licorice ends in a simple bow on top. Transfer the mini gift boxes to a tin (or another container with a lid) and keep them chilled until serving or transporting. Makes about 2 dozen pieces.

,

Lego Man Costume for Halloween

Lego Man Costume for Halloween

Total Time Needed: 1 Hour

Boys love Lego! This ingenious costume turns two plain old cardboard boxes into a real "toy story." Find more ideas in our Halloween costume gallery.

Materials

  • Measuring tape
  • Utility knife
  • Large cardboard box (child's shoulder width)
  • Margarine containers or plastic cups
  • Pencil
  • Hot glue gun
  • Small shallow box (that fits your child's head)
  • Spray paint
  • Baseball cap
  • Double-sided tape
  • Gloves
  • Sweatsuit
  • Sneakers

Instructions

Lego Man - Step 1

1. To make the body: Measure the circumference of your child's head, then, using a untility knife, cut a head opening in the top of the box approximately 2 inches from the front edge. Cut an armhole on each side of the box near the top front corner. Have your child try the box on so you can make any adjustments.

Lego Man - Step 2

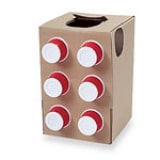
2. Now lay the box flat, front-side up, and arrange the margarine containers. Using the pencil, trace around each one. Using the hot glue gun, apply glue around the lip of the container, then press it in place. Repeat for the five other containers.

Lego Man - Step 3

3. Glue an additional container upside down on top of the smaller box. In a well-ventilated area, spray-paint both boxes.

4. To make the hat: Have your child put a baseball cap on backward, then apply double-sided tape to the top of the cap. Fit the box on top of the cap so that the box just covers the bottom edge of the back of the hat.

Tips:

Make sure the box is narrow enough to let your child's arms hang down -- or they will get tired from carrying the weight of all that sugary loot.

Variations:

Like real LEGOs, this costume can be made in different configurations, depending on the size of the boxes and the cups you use. Here, we've shown the costume created with margarine tubs so it looks like one king-size LEGO piece. In another original version, you might glue on 35 small drinking cups, then delineate eight "bricks" using a black marker.

Family Fingerprints Recipe

Family Fingerprints Recipe

The Rocheleaus of Surprise, Arizona, came up with this kid-friendly twist on the classic fingerprint cookie: as well as jelly, they fill their cookies with Nutella, honey, mini chocolate chips, and any other tasty toppings they have on hand. "One of my daughters loves lemon curd, the other, peanut butter and grape jelly," says mom Renee. "I like peanut butter and marshmallow cream."

Ingredients

  • 2/3 cup butter, softened
  • 1/2 cup sugar
  • 1 egg
  • 1 teaspoon vanilla extract
  • 1/4 teaspoon salt
  • 1 2/3 cup flour
  • Assorted toppings, such as: jelly or jam, mini chocolate chips (or any other kind of mini chip), peanut butter, honey, lemon curd, finely chopped nuts, marshmallow cream (or miniature marshmallows), Nutella

Instructions

  1. Using an electric mixer on medium speed, cream the butter in a large bowl, gradually adding the sugar. Add the egg and vanilla, mixing well after each addition.
  2. Add the salt and the flour. Using a wooden spoon, stir the mixture just enough to form the dough; do not overmix. Cover the bowl with plastic wrap and chill the dough for at least one hour or overnight.
  3. Preheat the oven to 375º. Form the chilled dough into tablespoon-sized balls and set them on a lightly greased baking sheet. With your thumb or finger, gently make an indent in the center of each ball. Bake the cookies on the center oven rack until the edges are golden brown, about 8 to 10 minutes.
  4. When the cookies have cooled completely, decorate them with assorted toppings. (Test kitchen tip: If the indents in the cookies need to be deeper, use the back of a spoon as soon as they come out of the oven.) When using mini chocolate chips, add them in the final 30 seconds of baking so they just start to melt. Makes approximately 24 cookies.

,

Leaf Tokens | Nature Crafts

Leaf Tokens

Total Time Needed: 2-3 Hours

These clay coins are lovely springtime keepsakes. As a bonus, in making them, your kids can learn the names of all the trees in your backyard or local park.

Materials

  • Leaf samples
  • Polymer clay (we used Sculpey)
  • Waxed paper
  • Bowl, lid, or glass with a wide base
  • Toothpick
  • Tweezers

Instructions

  1. Collect leaf samples from the trees and large bushes in your yard or on a walk. Use a guide to identify each one.
  2. At home, form clay into balls. Sandwich one between two sheets of waxed paper, then use the bottom of the bowl to press the clay into a disk. Peel back the top sheet, place a leaf on the disk, replace the paper, and flatten the clay with the bowl to a 1/4-inch thickness. Flip the clay over.
  3. Use a toothpick to carve the tree's name into the clay. Flip the clay over again and remove the leaf with tweezers.
  4. Bake the tokens leaf-impression side up according to the package instructions.

Fun Tree Facts

There are more than 865 species of trees in the United States.

New York City has 5.2 million trees. Every year, they remove 2,202 tons of pollution in the form of ozone, sulphur dioxide, and other gases.

Oak trees don't start producing acorns until they are about 25 years old.

Falafel Recipe | Sandwiches, Burgers & Wraps

Falafel Recipe

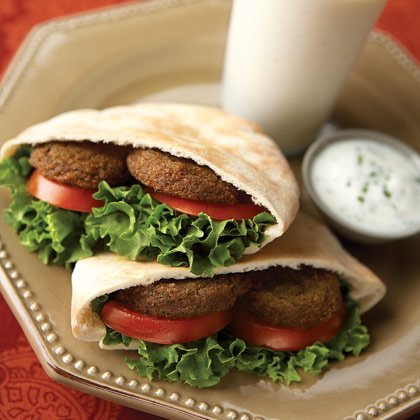
These spicy chickpea fritters are finger-friendly, and the yogurt dipping sauce makes them fun to eat. The Middle Eastern treats are delicious warm from the pan, but they can also be served in pita bread with lettuce and tomato for a wholesome lunch box sandwich.

Ingredients

  • 1 cup dried chickpeas
  • 1 tablespoon lemon juice
  • 3 cloves garlic, minced
  • 1 small onion, coarsely chopped
  • 1/4 cup fresh curly parsley, stems removed, tightly packed
  • 1 teaspoon cumin
  • 1/2 teaspoon coriander
  • 1/2 teaspoon baking soda dissolved in 1/4 cup water
  • 1/2 teaspoon salt
  • 1/2 teaspoon pepper
  • Pinch of cayenne
  • Vegetable oil for frying

YOGURT DIPPING SAUCE:

  • 6-ounce container of plain yogurt
  • 3 tablespoons water
  • 1 tablespoon finely chopped fresh curly parsley
  • 1 teaspoon lemon juice
  • 1/4 teaspoon garlic powder

Instructions

  1. Rinse the chickpeas, then soak them in a medium-size bowl in several inches of water overnight in the refrigerator. (we've found the patties won't hold together as well if you use canned chickpeas.)
  2. To make the sauce, whisk together the yogurt and water in a small bowl. Add the remaining ingredients and stir until thoroughly combined. Makes 1 cup.
  3. Drain the soaked chickpeas and place them in a food processor. Add all the remaining ingredients and blend, scraping the sides if necessary, until the mixture is creamy, about 1 minute total.
  4. Heat an inch of oil in a large, heavy frying pan to 375 degrees (a spoonful of the mixture should sizzle as soon as it's immersed). Scoop up a heaping dinner tablespoon of the falafel mixture and gently place it in the heated oil. Place 4 or 5 more spoonfuls in the pan. Fry the patties until they're thoroughly brown on one side, about 2 to 3 minutes, then flip them to brown the other side.
  5. Drain the patties on a plate covered with a paper towel and sprinkle with additional salt, if desired. Serve with yogurt dipping sauce. Makes 16 to 20 patties.

,

Kid-Size Kitchen | Kids' Woodworking Projects

Kid-Size Kitchen

Total Time Needed: Afternoon Or Evening

Kids love to keep you company in the kitchen, and a set of toy pots, dishes, and food will keep them busy pretend-cooking while you get to the real thing. Jean Williamson from San Marcos, California, came up with the perfect solution for her two little wanna-be gourmets: an easily and inexpensively constructed play kitchen that houses all the paraphernalia of her budding chefs.

Materials

  • 2 pairs of stacking shelves
  • Scrap of plywood (at least 2' x 4')
  • Assorted self-tapping screws
  • Latex paint
  • Assorted design elements: a spout fashioned from the scrap wood from the sink hole, hooks to hang pot holders, junk mail CD-ROMs for the range burners, and wooden sink and stove knobs painted with acrylics
  • Jig saw
  • Drill
  • Paintbrush
  • Screwdriver

Instructions

Kid-Size Kitchen - Step 1

1. The kitchen's base is stacking shelves intended for closet organization. Stack a pair on each side (you may need to cut the shelves down to size with a jigsaw.) Set the shelves about a foot apart, then measure and cut a countertop and backsplash from the plywood.

2. Drill a starter hole, then use a jigsaw to cut a hole in the countertop just large enough to hold a rimmed metal bowl.

3. Screw the backsplash to the counter and give the unit a coat of latex paint.

4. Fun details really seal the deal: painted flowers on the backsplash, a spout fashioned from the scrap wood from the sink hole, hooks to hang pot holders, junk mail CD-ROMs for the range burners, and wooden sink and stove knobs painted with acrylics (drill a pilot hole, then screw them in place). For the elegant finale, a cafe rod and clip-on hooks hold a fabric-scrap curtain.

Halloween Costumes: Jumbo Elephant Costume

Jumbo Elephant Costume

Total Time Needed: 1 Hour

What do you get when you take an old gray sweat suit and add a few snips and tucks? A costume that will let your little one make a big impression trekking for treats as a floppy-eared elephant.

Materials

  • Oversize gray hooded sweatshirt and sweatpants (a set that's a couple sizes larger than your child's should do)
  • Scissors
  • 2 large cylindrical containers, such as 18-ounce oatmeal canisters
  • Tacky glue
  • 2 sheets of white craft foam, 12 by 18 inches
  • 2 sheets of gray stiff felt, 12 by 18 inches
  • A few pinch-style clothespins
  • Duct tape (we used transparent)
  • A piece of poster board at least 14 by 9 inches
  • 3-inch adhesive-backed Velcro strip

Instructions

1. Cut off the bottoms of the sweat suit sleeves and legs so that everything is about an inch too long for your child. Save the cut-off leg pieces for step 5 (ours were 16 inches long).

Jumbo Elephant - Step 2

2. Remove the lids from both cylindrical containers. Then cut off and discard the bottoms. Cut each cylinder in half so that you end up with 4 equal-size rings. Place 1 ring inside each arm. Fold the material over the lower edge of the ring and glue it to the ring. Next, slit the remaining 2 rings, as shown, and attach them to the leg bottoms as you did the arms.

Jumbo Elephant - Step 3

3. Cut 4 rows of toe shapes, as shown, from one sheet of white craft foam and glue them to the arm and leg hems.

Jumbo Elephant - Step 4

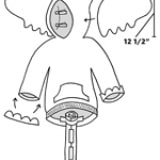
4. Cut a pair of large gray felt elephant ears like the ones shown here (don't worry; they don't have to be exact). Then attach each ear to the hood by applying glue to both sides of the felt along the edge that goes closest to the head. Pinch the glued edge from inside the hood, sandwiching the ear between the fabric and using clothespins to hold it in place until the glue dries.

5. Cut both of the leg pieces (left over from step 1) vertically along the seams. Trim the elastic cuff off one and then fringe the bottom. Roll the material vertically to create a tail and tape it closed. Then tape the tail inside the sweatshirt, as shown.

Jumbo Elephant - Step 6

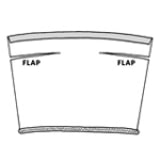
6. For a trunk, spread the other leg piece right side down on a table. Fold down the material a half inch from the top and glue it in place. Make 2 horizontal cuts a few inches below the fold, as indicated. Then tape together the flaps below the cuts.

Jumbo Elephant - Step 7

7. Cut the other sheet of white foam in half lengthwise. Roll each half into a tusk and tape it closed. Tape the tusks to the material on each side of the trunk.

8. Next, trim the piece of poster board to the same length as the trunk, roll it up, and insert it into the trunk (it will uncoil and fill out the trunk when you let go). Finally, loosely wrap the 2 open flaps around your child's head and use a strip of Velcro to keep them in place.

Tips:

Wrinkles and sound effects

You can simulate an elephant's wrinkly hide by mixing 2 teaspoons of gray acrylic paint and ½ cup of water in a small spray bottle. Then, before starting step 1, bunch up the sweatshirt and sweatpants accordion style and spray on the mixture. Lay the garments flat until dry, then flip them over and repeat the process on the other side. Spray-paint both sides of the gray felt as well.

If your child wants to trumpet like a real elephant, simply duct-tape a small party horn to the inner trunk near your child's mouth.

Edible Napkin Rings Recipe

Edible Napkin Rings Recipe

These glittery napkin rings add a festive touch to Easter dinner -- and double as the bread course!

Ingredients

  • Refrigerated bread stick dough
  • Edible glitter (we used Wilton brand)
  • Cooking spray

Instructions

  1. Mold several pieces of aluminum foil into long sticks about the size of a paper towel tube. Coat them with cooking spray.
  2. Shape refrigerated bread stick dough into rings, molding them around the foil.
  3. Dip the rings in edible glitter and bake for 10 to 13 minutes at 375°. Let them cool and slide them off the foil.

,

Edible Flag for Cinco de Mayo Recipe

Edible Flag for Cinco de Mayo Recipe

Celebrate Cinco de Mayo and get your kids to eat their veggies with healthy crudités in the colors of the Mexican bandera nacional, or national flag.

Ingredients

  • Pea pods
  • Jicama, cut into strips
  • Red pepper
  • Green pepper
  • Orange pepper

Instructions

  1. Arrange pea pods, jicama sticks, and red pepper strips on a platter as shown, then center a green pepper ring and the bottom of an orange pepper on top.
  2. Set out your snack with dips in the same festive colors: green guacamole, white ranch dressing, and red salsa.

,

For Valentine's Day: Jolly Lollies

Jolly Lollies

Total Time Needed: 30 Minutes or less

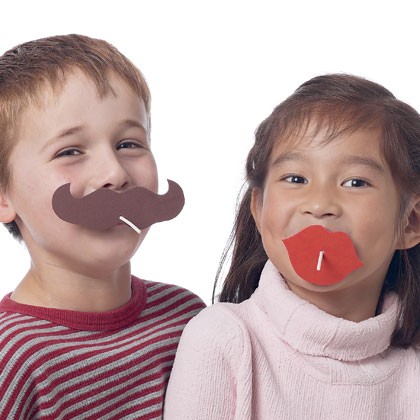
Our silly suckers are part treat, part toy. And whether your child chooses the hilarious mustachioed pop Valentine or the lolly-puckered mouth, he'll have found a witty way to say: "Read my lips: I like you!"

Materials

  • Red or brown permanent marker
  • Red, pink, or brown craft foam
  • Scissors
  • Craft knife or small hole punch to match the size of your lollipop stick (we used a 1/8-inch punch; punches available at many craft stores)
  • Wrapped lollipop
  • Pen
  • White office label

Instructions

Jolly Lollies - Step 1

1. Use a marker to draw a mustache or lips onto craft foam. Cut out the shape with scissors.

Jolly Lollies - Step 2

2. To slide the lollipop through the foam, make a hole using a small punch as shown or make a tiny slit with a craft knife (a parent's job). Slip the lollipop through the hole. Next, cut the label in half if necessary, write a message on it, and fold it around the stick.

Edible Excavator Cake Recipe

Edible Excavator Cake Recipe

Assembled from a pound cake and Twinkies, this no-bake treat will please the crew at a celebration with a truck or vehicle theme.

Ingredients

  • 9 1/2-by 4-inch pound cake
  • 1 1/2 cups yellow frosting
  • 1/2 cup light-brown frosting (white and chocolate mixed together)
  • Chocolate decorators' frosting
  • 4 mini chocolate-covered doughnuts
  • Blue and green M&M's candies
  • Red and yellow gumdrops
  • 4 Twix
  • 2 Twinkies
  • 4 (8-inch) wooden skewers, trimmed into two 4 1/2-inch and
  • two 6-inch pieces
  • 4 yellow Twizzlers Rainbow Twists, cut to the same size as the skewers
  • 12 chocolate cookies (we used Oreo cookies)

Instructions

Edible Excavator Cake - Step 1

1. Cut a 2 1/2-inch-long section from one end of the cake. Frost the section's cut end and place it on top of the cake for the cab, as shown. Cover the entire cake with yellow frosting, saving about 1/3 cup for the loader and bucket.

2. Spoon the light-brown frosting into a resealable sandwich bag, snip off a corner, and pipe a window onto each side of the cab. Outline the windows with chocolate decorators' frosting, then press the doughnut tires in place. Add M&M's and gumdrops for lights and hubcaps.

3. Use Twix to add a smokestack and loader arms. Frost one of the Twinkies yellow, set it on the loader arms, and add chocolate decorators' frosting details. Cut a 2-inch section from the other Twinkie, place it behind the truck for the bucket, and frost it yellow. Add pieces of yellow gumdrop for teeth.

4. Slide the skewers inside the Twizzlers. Press them into the cake and bucket as shown, using dabs of chocolate decorators' frosting to join them. With a rolling pin or food processor, crush the chocolate cookies into "dirt" and sprinkle it around the cake. Serves 8.

,

Jewelry Box | All Jewelry

Jewelry Box

Here's a fun and practical dresser-top organizer your child can make with just a few materials and a little assistance from you.

Materials

  • Freestanding box-style picture frame (the kind with removable glass panes, available at discount and craft stores for around $10; we found our frame, made by Umbra, at Target)
  • Acrylic paints
  • Glue
  • Fake jewels, fabric, or silk flowers (optional)
  • Pencil
  • Sheet of plastic mesh canvas
  • Scissors

Instructions

1. First help your child remove the glass from a freestanding box-style picture frame. If she likes, she can coat the frame with acrylic paints and glue on fake jewels, fabric, or silk flowers once it is dry.

Jewelry Box - Step 1

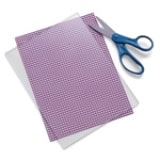
2. Trace one of the picture frame's glass panes onto the plastic mesh canvas, then cut the plastic to fit. Slide the mesh sheet back into the frame and replace the frame's top if it has one.

3. To use the holder, simply hook earrings through the holes, attaching earring backings at the rear of the frame.

Eat Your Heart Out Recipe

Eat Your Heart Out

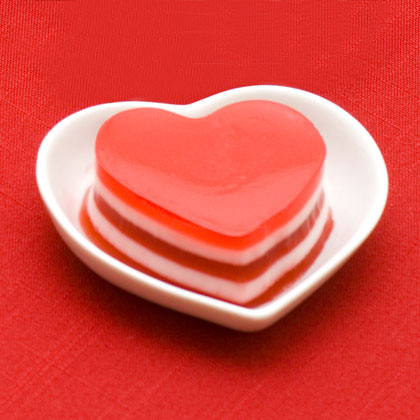
This lovely dessert is easily assembled by chilling layers of gelatin and condensed milk. Even sweeter, it's low-fat.

Ingredients

  • 1 (14-ounce) can of sweetened condensed milk
  • 3 (3-ounce) packages of red flavored gelatin
  • 2 (1/4-ounce) envelopes of unflavored gelatin

Instructions

  1. Dissolve one package of flavored gelatin in 3/4 cup boiling water. Add 3/4 cup cold water, then pour the mixture into a 9- by 13-inch glass pan and refrigerate for 1 hour.
  2. Stir together 1/2 cup boiling water and the condensed milk. In a separate bowl, dissolve all the unflavored gelatin in ½ cup cold water for 1 to 2 minutes. Thoroughly mix in 3/4 cup boiling water, then combine this mixture with the milk and let it cool. Add half the mixture to the pan of red gelatin, pouring it over a spatula to slow the stream, and refrigerate for 20 minutes.
  3. Continue alternating layers - gelatin mix, the remaining milk mix, the final gelatin mix - chilling each for 20 to 30 minutes to set it. Create individual servings with a heart-shaped biscuit or cookie cutter.

,

I'm All Ears | All Homemade Halloween Costumes

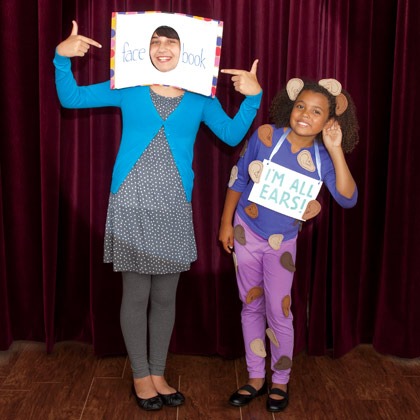
I'm All Ears

Your child will hear all the Halloween action in this quick, creative costume.

Materials

  • template
  • craft foam
  • marker
  • duct tape
  • headband
  • hot glue (an adult's job)
  • poster board
  • ribbon

Instructions

  1. Cut out ear shapes from craft foam using our free template and detail them with a marker. Stick them to the clothes with duct tape, and use hot glue to attach them to a headband (an adult's job).
  2. Write "I'm All Ears!" on a poster board, tape some ears to the sign, and hang it around your child's neck with ribbon.

D is for Desert Island Cupcake Recipe

D is for Desert Island Cupcake Recipe

Make a cupcake shaped like a desert island.

Ingredients

  • 1 large cupcake
  • Blue frosting
  • White frosting
  • Assorted gummy fish and sharks
  • Ground nuts
  • Green craft paper
  • 1 pretzel rod
  • Candy seashells

Instructions

  1. Unwrap the cupcake and turn it upside down. Frost the bottom two thirds with blue icing, swirling it to give the appearance of waves, and the top third with white icing.
  2. Place the gummy fish and sharks in the "sea." Sprinkle the ground nuts onto the white icing for a sandy beach.
  3. Make a palm tree by cutting fronds out of the green paper and fastening them with icing to the top of the pretzel rod. Plant the palm on the island and have a few candy shells wash up on the beach. Now, this is a desert island.

,

Dinosaur Dig Site Cake Recipe

Dinosaur Dig Site Cake Recipe

The perfect choice for a kid obsessed with all things Jurassic, this dino-mite cake features chocolate graham cracker dirt and sugar cookie bones. This recipe was inspired by a Great Cake Contest entry from Pamela M. Of Cumberland, RI.

Ingredients

  • 1/3 cup flour
  • 1/2 roll refrigerated sugar cookie dough (from a 16.5-ounce package)
  • Bones template
  • Parchment paper
  • 16 chocolate graham crackers (2 sleeves)
  • 1 large ziplock bag
  • 1 1/2 cups chocolate frosting
  • 1 9- by 13-inch cake

Instructions

  1. First make the dinosaur bones. Heat the oven to 350º, then knead the flour into the cookie dough until the dough is smooth. Roll it out to a 1/4-inch thickness. Use a small paring knife and our template pieces to cut bone shapes out of the dough. Transfer the shapes to a parchment-lined cookie sheet. Bake until the cookies are golden brown around the edges, about 10 to 12 minutes. Transfer the cookies to a wire rack and allow them to cool completely.
  2. Using a rolling pin, crush eight of the graham crackers in the ziplock bag. Snap the remaining eight graham crackers into pieces that are about 1-inch square.
  3. Frost the cake. Arrange the graham cracker pieces around the top edge. Reserve 1 tablespoon of the crumbs and sprinkle the rest on the top and sides of the cake. Pat crumbs onto the sides to cover any bare spots.
  4. Arrange the bones on the cake as shown. Sprinkle the remaining crumbs lightly over the top. Serves 12 to 14.

,

T-Shirt Craft: Identi-tee

T-Shirt Craft: Identi-tee

Total Time Needed: 2-3 Hours

Let your kids turn fabric scraps, ribbon, and patches of material into personalized fashion statements.

Materials

  • Materials such as quilting squares, bandannas, fake fur, iron-on patches and appliques, ribbon, zippers, and fabric trim
  • Scissors
  • Fusible bonding web (we used Steam-a-Seam 2 Double Stick; Lite Steam-a-Seam 2 is better for sheer and lightweight fabric scraps)
  • Iron and ironing board
  • T-shirt, washed
  • Piece of cardboard
  • Pillowcase or press cloth

Instructions

  1. Have your child cut the letters of her name from the materials. Peel one side of the backing from a sheet of fusible bonding web and arrange the letters on the adhesive surface. Press down on the material to be sure it all sticks, then cut out each letter.
  2. Set the iron to the manufacturer's recommended setting (a parent's job). Lay the shirt on the ironing board and slide the cardboard between the shirt's layers. Remove the remaining backing from the letters, then arrange them on the shirt and press them into place.
  3. Lay the pillowcase or press cloth on top of the shirt and iron over the letters (a parent's job) to secure them, pressing for 10 to 15 seconds on cotton, less on more delicate fabrics. Allow the shirt to cool thoroughly before your child wears it. To preserve her creation, wash the shirt on a gentle cycle at a mild temperature and hang it to dry.

Make an Ice Skate Stocking | Handmade Christmas Stockings

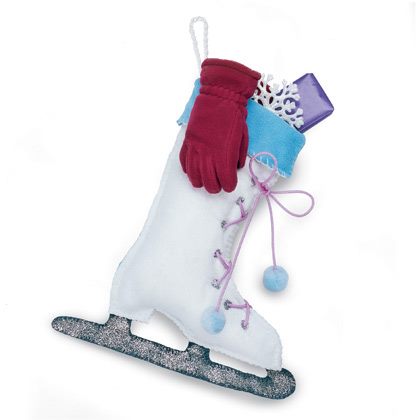
Ice Skate Stocking

Total Time Needed: 2-3 Hours

The blade's not real, but this stocking still looks awfully sharp hanging from the mantel.

Materials

  • Scissors
  • 2 pieces of light blue fleece, each 22 by 15 inches
  • 2 pieces of white felt, each 22 by 15 inches
  • Piece of dark gray felt, 10 by 19 inches
  • Long sewing pins
  • Large-eye sewing needle
  • Dark gray embroidery floss
  • White embroidery floss
  • Tacky glue
  • Silver glitter
  • 1 ½ yards of colored cord
  • 2 medium pom-poms
  • Clear tape
  • 9 inches of white twist cord

Instructions

1. The Basic Stocking: Click here to download the ice skate stocking pattern.

2. Cut 1 boot shape from each piece of the light blue fleece and 1 from each piece of the white felt, and cut 2 skate blades from the gray felt.

3. Pin together the blades and use the gray floss to whipstitch (see diagram) around the edges, sewing them together.

4. Pin together all 4 boot shapes, blue boots on the inside, white boots on the outside, and the skate blades at the bottom with the tabs between the blue boots.

Ice Skate Stocking - Step 5

5. Using the white floss, whipstitch around the edges, sewing the boots together and the blade in place. Leave the top edges unsewn.

Ice Skate Stocking - Step 6

6. At the top, sew together the front 2 edges, then the back 2.

7. Fold down the top to make a cuff.

8. The Trimmings: Spread glue over the front of the skate blade and make small circles along the front of the stocking.

9. Sprinkle silver glitter over the glue.

10. Let it dry, then cut slits through the centers of the glitter circles, piercing through all 4 layers of fabric.

11. Lace the colored cord through the slits, tie it at the top, and glue a pom-pom to each end.

12. Tape the ends of the white cord to keep them from fraying, then sew the cord to the stocking for hanging.

Tips:

A Stitch for All Stockings

Thread your needle with a length of floss and knot one end. Begin sewing by pushing the needle up through the underside of the fabric and then out the top. Loop the needle back under the fabric and repeat the stitch.

Edible Easter Basket Recipe

Edible Easter Basket Recipe

This Easter, decorate this cute little cupcake basket with jelly beans.

Ingredients

  • 1 dozen cupcakes
  • 1 bag jelly beans
  • 2 cups white icing
  • Sweetened coconut, colored with green food coloring

Instructions

  1. First, frost the cupcakes with white icing. Bend a pipe cleaner or a piece of red licorice into an arch and push the ends into the sides of each cupcake.
  2. Shake the shredded coconut in a stainless steel bowl. Sprinkle on food coloring bit by bit, mixing vigorously to distribute the color
  3. Place a pinch of shredded coconut on each iced cupcake. Now place three jelly beans on the "nest" of coconut.
  4. Tie a small ribbon bow on the pipe cleaner or licorice handle at a jaunty angle.
  5. Put one cupcake basket by each place setting at Easter brunch or give them as gifts.

,

Hula Hoop Rug Craft

Hula Hoop Rug

Total Time Needed: 2-3 Hours

What does it take to transform a pile of old T-shirts into spectacular works of woven art? Just a spare hula hoop or embroidery hoop and the techniques we'll show you here. The oversize looms and easy-to-use loops of T-shirt fabric make these projects particularly appealing to beginning weavers. Learn the basic hoop weaving technique by crafting a colorful accent rug to brighten up a room.

Before you begin, some terms you need to know: the warp is the material you string on the hoop, the weft is the material you weave with.

Materials

  • Scissors
  • About a dozen T-shirts
  • 33-inch hula hoop

Instructions

Hula Hoop Rug step 1

1. For the warp, cut 1-inch-wide loops from the bodies of one or two tees (we found a boy's large worked best on our 33-inch hoop), removing the hem and stopping at the sleeves. Ideally these loops should all be the same color; we used two colors for clarity in our photographs. You'll need a total of 11 loops. For the weft, cut at least 50 loops from the remaining shirts. Save the unused sleeves for the basket project.

Hula Hoop Rug step 2

2. Stretch one warp loop over the hula hoop, as shown.

Hula Hoop Rug step 3

3. Add and secure a second loop, perpendicular to the first.

Hula Hoop Rug step 4

4. Repeat, filling in the spaces, until all 11 loops are in place.

Hula Hoop Rug step 5

5. Push together two warp loops at the top of the hula hoop, as shown. This creates an odd number of warp spokes in your wheel, which allows the overunder pattern of the weft to alternate with each new row.

Hula Hoop Rug step 6

6. Secure the first weft loop to the center of one of the warp spokes (we chose the doubled spoke from step 5) by wrapping it around the warp and then looping it back through itself.

Hula Hoop Rug step 7

7. Begin weaving the weft over and under the warp spokes, forming a tight spiral. For now, treat both parts of each warp spoke as a single unit, weaving over or under the two together. As you work, push the weft material toward the center of the hoop and keep it just snug. If you pull the weft tight, the rug will develop lumps or bends. When you reach the end of the piece of weft, add a new loop by threading it through the end of the first and back through itself.

Hula Hoop Rug step 8

8. When your rug is about 8 inches across, begin treating each warp spoke as two individual strips instead of a single unit, weaving over or under each strand instead of going over or under the doubled spoke. This increases the number of warp spokes, improving the structure of the project. When you get to the two warp spokes that you pushed together at the top of the loom, separate them. Treat one of the spokes as two individual strips, but continue to treat the other as a single spoke. This maintains the odd number of warp spokes.

Hula Hoop Rug step 9

9. When the rug is the size you want, but no closer than 8 inches from the edge of the hula hoop, snip open your weft loop.

10. Tie the ends around a warp spoke, and tuck the ends into the rug.

Hula Hoop Rug step 11

11. Cut the warp spokes off the hoop one at a time.

Hula Hoop Rug step 12

12. Tie the ends in pairs, then trim them to make a fringe or tuck them back into the rug.

Cupcake Cakes: Night Owls

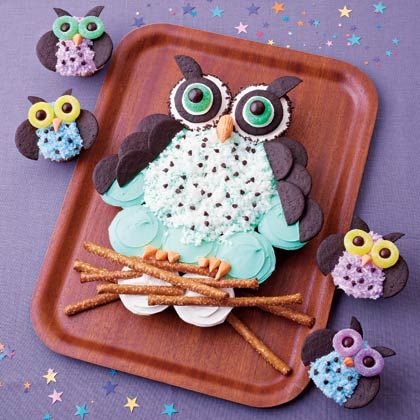
Night Owls

Celebrate birthdays and other fun gatherings with these clever party treats. Tinted, shredded coconut gives this twilight-hued Night Owls cupcake its fine, feathery look.

Ingredients

  • cupcakes
  • 16-ounce can plus ½ cup of vanilla frosting
  • green food coloring
  • blue food coloring
  • purple food coloring
  • finely chopped sweetened coconut
  • chocolate sprinkles
  • chocolate wafer cookies
  • jellyrings
  • Junior Mints
  • mini chocolate chips
  • circus peanuts
  • M&M's
  • pretzel rods

Instructions

  1. You'll need a 16-ounce can plus ½ cup of vanilla frosting. Spoon ½ cup into a ziplock bag (snip off a corner for piping), tint 1 cup with green food coloring, and reserve the rest.
  2. From 2 cups fi nely chopped sweetened coconut, tint ½ cup blue, ½ cup purple, and reserve the rest.
  3. Frost 10 cupcakes green and 8 white. Roll the edges of two of the white cupcakes in chocolate sprinkles.
  4. Arrange the Mama Owl as shown at right. Use a serrated knife to halve 5 chocolate wafer cookies (we used Famous Chocolate Wafers) for the wings and trim the sides from another cookie for the brows. Make each eye from a whole cookie, piped-on frosting, a jelly ring and a Junior Mint. Sprinkle the white coconut over the chest and scatter with mini chocolate chips. Add pretzel-rod branches and trimmed circus peanuts for the beak and talons, as shown above.
  5. Make each owlet's wings and beak with the same ingredients used for the Mama Owl. Add colored coconut and chocolate chips for the chest, smaller cookie pieces for the brows. Use jelly rings and brown M&M's for the eyes.

,
//