Latest news, food, business, travel, sport, Tips and Tricks...

Swirly Stones Craft

Swirly Stones Craft

Total Time 1 hour Ages school-age

This simple project, adapted from "Summer Crafts" by Marjorie Galen (Hylas, 2005), transforms rocks into giant waxy jewels. The secret ingredients? Crayons and heat!

What you'll need

  • Smooth, flat rocks
  • Aluminum foil
  • Oven mitt
  • Newspapers
  • Old crayons

How to make it

  1. After you've gathered some smooth, flat rocks, clean them off, and bake them for 15 minutes on a foil-lined cookie sheet in a 225ยบ oven.
  2. Using an oven mitt, remove the rocks from the stove and set them on a pad of newspapers (note: the rocks will be very hot to the touch).
  3. Remove the wrappers from some old crayons and draw on the stones -- the heat will melt the crayons into vibrant liquid wax. For the swirly effect shown here, hold each crayon against the rock in one place to create a puddle of color and use the end of the crayon to swirl it around.

Tissue Paper Flowers Craft

Tissue Paper Flowers Craft

These flowers are quick to make and the children enjoy making them. Younger children may need some help with accordion-pleating the tissue paper.

What you'll need

  • Pastel colored tissue paper
  • Chenille stem
  • Scissors
  • Ruler

How to make it

Tissue Paper Flowers step 1

1. Cut tissue paper into rectangles of desired size (5"x7" is the size pictured - see photo).  

2. Stack around 15 pieces of tissue paper. Use the same color or different colors. If you want to use a smaller number of pieces of tissue paper, flower will not be as full.  

3. Accordion pleat the tissue paper working from the long side.  


Tissue Paper Flowers step 4

4. Wind one end of the chenille stem around the middle of the accordion pleated tissue paper.

5. Trim the ends of each side to give the pedals a unique look. Trimming the ends into a point (like a triangle), or a bump (like a half circle) will look very pretty.  

Tissue Paper Flowers step 6

6. Gently separate each layer pulling upwards toward the middle of the flower.

Tissue Paper Flowers step 7

7. Do the second side. 

8. Let the children make a couple of flowers and put them in a May Basket. Early on the morning of May 1st hang on your mother's door, a neighbor's door, a friend's, or anyone special to you. Remember, it's supposed to be a surprise!

Toddler-Friendly Homemade Bath Paint Craft

Toddler-Friendly Homemade Bath Paint Craft

Total Time 30 minutes or less Ages all-ages

Most kids love finger paints and my kids are no exception. I, however, dread the clean up. So we decided to take it inside the tub and it has been a success! Great fun for rainy days or for when the kids are reluctant to take a bath, this activity also helps them learn about color combinations and express their creativity. 

And I love it because clean up is very easy and the ingredients are gentle on my toddler's skin as well.

by Denisse Icaza

What you'll need

  • 1/2 cup baby wash
  • 1/4 cup cornstarch (or tapioca starch)
  • Drops of food coloring
  • Muffin pan or plastic egg container

How to make it

Add cornstarch to baby wash

1. In a small container, add baby wash and cornstarch and mix well.

Baby bath paint before color

2. In a separate and smaller container, take a portion of the mixture and add the desired amount of food coloring (I recommend starting with less than a drop). 

How to make bath paint

3. Put the colored mixture in the muffin pan and repeat the previous step with another color until all the colors are used. Feel free to mix colors to come up with new ones and have fun together!

Python Party Favor Craft

Python Party Favor Craft

Total Time 1 hour Ages school-age

Here's a party activity Jungle Book fans will be entranced by - crafting paper pythons that look just like Kaa, hypnotic eyes and all. Before the party, cut out all the pieces and they'll be ready for the kids to assemble when the party is underway.

Download Python Party Favor Template

by Cindy Littlefield

What you'll need

  • Template
  • Scissors
  • Craft paper (tan, green, brown, and light blue)
  • Glue stick
  • Colored pencils or markers

How to make it

1. Print the template and cut out the pieces.

Python Party Favor step 2

2. Glue a sheet of tan craft paper on top of a green sheet. Then use the spiral template piece to cut out the snake's body.

Python Party Favor step 3

3. First cut around the perimeter of the circle and then follow the line all the way to the center. Discard the center portion.

Python Party Favor step 4

4. Cut out two matching head pieces, one from brown paper and the other from green. Glue the brown piece atop the green one, matching up the edges. Next, cut the mouth from tan paper, the nose from brown paper, and a pair of eyes from green and blue paper.

Python Party Favor step 5

5. Glue the mouth onto the head.

Python Party Favor step 6

6. Color the centers of the eyes, as shown, and glue them in place.

Python Party Favor step 7

7. Glue the nose in place.

Python Party Favor step 8

8. Draw on a mouth and tongue.

Python Party Favor step 9

9. Cut out a bunch of spots. This goes fairly quickly is you stack several squares of paper.

Python Party Favor step 10

10. Glue the spots onto the body.

11. When you're done, lift the snake by its head and the body will dangle below it.

Queen Clarion's Crown Craft

Queen Clarion's Crown Craft

Total Time 1 to 2 hours Ages school-age

As the monarch of Pixie Hollow, Queen Clarion's knowledge of fairy magic surpasses everybody else's. And, when she arrives at special fairy gatherings, she often materializes out of a cloud of pure pixie dust wearing a beautiful crown designed especially for the occasion. To usher in spring for instance, she dons a ring of delicate white blossoms, among them her favorite flower, the Calla Lily. Here's a fun way for your child to turn her favorite flower picks into a pretty spring crown of her own.

by Cindy Littlefield

What you'll need

  • Assorted white silk flowers
  • Scissors
  • Wreath-shaped white headband (sold in the bridal aisle at large craft and fabric stores)
  • Twist ties (optional)
  • Hot glue gun
  • White ribbon

How to make it

  1. Have your child choose several white flowers to adorn the headband. Cut the stems short (a couple of inches or so from the blossom). Together, try out a few different arrangements by attaching the blossoms to the band with twist ties.
  2. Once you've settled on a favorite arrangement, remove the flowers one at a time and hot glue them back in place.
  3. When all the flowers are attached, wind ribbon around the band, going between the blossoms to cover and better secure the stems.
  4. Glue the ends of the ribbon to the band, overlapping them an inch or so, and the crown is ready to wear.

Rain Gutter Bookshelves Craft

Rain Gutter Bookshelves Craft

Total Time afternoon or evening Ages all-ages

Display your favorite stories with this clever holder made of rain gutters.

What you'll need

  • 10-foot piece of standard vinyl rain gutter
  • Hacksaw
  • Brackets
  • Hammer

Helpful Tip:

The hanging brackets for vinyl rain gutters come in a number of styles in addition to what we show here. Those looking for a more ornate look might also consider affixing vinyl end caps, available from gutter suppliers, to the ends of the gutter.

How to make it

  1. Cut the 10-foot piece of standard vinyl rain gutter with a hacksaw, or you can have them cut it at the hardware store.
  2. Use brackets to install a 5-foot length in each kid´s room- high enough or low enough for the kids to reach the books or toys.
  3. Place books and toys on the shelves.

Rapunzel's Crown Craft

Rapunzel's Crown Craft

On October 2, the super-tressed star of Tangled officially joined the Disney Princess pantheon, bringing the royal court's population to an even ten. For her coronation at London's Kensington Palace, we present a paper copy of her tiara - stolen by Flynn Rider in the film - to wear in tribute.

Download Rapunzel's Crown Template

by  Photograph by Mark Mantegna

What you'll need

  • template
  • white, silver, or gray paper
  • tacky glue
  • plastic gems
  • glue dots

How to make it

  1. To make a crown, first download the free template. Using the template, cut the shapes from white and silver or gray paper.
  2. Use tacky glue to adhere the crown and ornament pieces to their bases, then glue the ornament shapes to the crown.
  3. To embellish the tiara, attach plastic gems with glue dots. Add a band to the crown by gluing a 1 1/4-inch-wide strip of white paper atop a 1 1/2-inch-wide strip of silver or gray paper.
  4. Use glue dots to attach the ends of the headband to the sides of the decorated crown, adjusting the length to fit the wearer's head.

Waterproof Puppet Theater Craft

Waterproof Puppet Theater Craft

Ages toddler

All the world's a stage, but the tub rim makes an especially good one when you pull the shower curtain aside for an impromptu performance. To create a handful of bath-friendly finger puppets, wash a pair of rubber gloves (to remove any powdery residue from the packaging), then cut off the fingers and use permanent markers to draw a face, hair, and other details. Allow the ink to dry, then let the show begin. (For safety, be sure little kids don't put the finger puppets in their mouths.

by Catherine Newman and Jodi Butler

What you'll need

  • Pair of rubber gloves
  • Scissors
  • Permanent markers

How to make it

1. Instant Activities: Fun in the Tub -  With water and a little imagination, kids can turn a bevy of kitchen castoffs - plastic funnels, measuring cups, squeeze bottles, a plastic baster -- into a tubful of terrific toys. Check out these ideas for inspiration.

  • Fill 'er Up: Learning to fill and empty a plastic baster and squeeze bottle offers plenty of good, clean fun for the littlest bathers. Once your child gets the hang of it, see if he can fill an ice cube tray with the baster or the squeeze bottle with a funnel and a measuring cup.  
  • Target Practice: Draw a bull's-eye on the side of the tub with a bath crayon, then have your child test his aim with the baster or squeeze bottle. For a bigger challenge, he can try propelling a floating object, such as rubber duck, across the water.  
  • Aquatic Volcanoes: To create your own water fountain, slap a plastic funnel large-end down on the bath's surface and watch as a plume of water comes shooting out its spout. Just be sure to have some towels nearby.

Wicked Witch Puppet Craft

Wicked Witch Puppet Craft

Total Time 1 hour Ages all-ages

Let your kids enjoy some real "witchcraft" and create this fun puppet.

What you'll need

  • Knit Glove
  • Paper
  • Yarn
  • Toothpick
  • Glue
  • Scissors

How to make it

  1. Cut off a finger of a knit glove.
  2. Draw the witch's face on a piece of paper and then glue it onto the knit finger.
  3. Glue on twisted-yarn hair.
  4. For the witch's hat, cut out a black paper donut shape and a black paper fan. Curl the fan into a cone and tape the edges. Place the bottom of the cone into the hole of the other black paper. Secure it with glue and then trim with red yarn.
  5. Create her broom with a fringed square of yellow paper glued onto a toothpick. Stick it through the glove finger, and she's off.

Rock Family Plaque Craft

Rock Family Plaque Craft

Total Time 1 hour Ages school-age

This adorable craft is so easy and looks marvelous sitting on a shelf or on Dad's desk. A great gift for Father's Day!

by Amanda Formaro

What you'll need

  • Wood plaque
  • Rocks, one for each family member
  • Wiggle eyes, 2 for each rock
  • Black acrylic paint
  • Acrylic sealer spray
  • Paintbrush
  • White craft glue
  • Label maker or silver paint and a black marker

Helpful Tip:

Parental supervision is recommended.

If you prefer a more colorful plaque, paint each of the rocks with colorful paint before adding the eyes.

Be sure to let this project dry completely before giving it to Dad. Allow about 4 hour's worth of drying time.

If you really want to play around with this, use yarn and construction paper to add hair and hats to the rock faces!

How to make it

Rock Family Plaque step 1

1. Paint the wood plaque with a coat of black paint and let dry.

2. Wash the rocks and let them dry.

3. Paint a second coat of black paint on the plaque and let dry.

Rock Family Plaque step 4

4. Have an adult spray the plaque with a coat of acrylic sealer spray. Let dry.

Rock Family Plaque step 6

5. Position rocks on the table and find the "resting spot" on the rock so that they will sit solidly on your plaque.

Rock Family Plaque step 6

6. Glue wiggle eyes on to the rocks, using a generous amount of glue. The glue will dry clear. Let dry.

Rock Family Plaque step 7

7. Position rocks on the plaque, then add a generous amount of white glue to the bottom of each rock and gently press onto the plaque. Let dry completely.

8. Use a label maker to create your family name. If you don't have a label maker, paint a strip on the plaque with silver paint. Let dry completely.

9. When strip is dry, use a black marker to write your family name.

Sand-Filled Bottles Craft

Sand-Filled Bottles Craft

Total Time 30 minutes or less Ages school-age

Take a bit of the beach home with you by crafting these cool sand-filled bottles. Kids will have fun making these at the beach or cottage and they make a great summer souvenir to take home.

by Amanda Formaro

What you'll need

  • Sand
  • Newspaper
  • Wax paper
  • Colored chalk (as many different colors as you like)
  • Clear glass or plastic bottles
  • Stick or pencil
  • White glue or bottle cap
  • Cutting board

Helpful Tip:

Parental supervision is recommended.

You can use small plastic bottles available at your local craft store or empty jars and bottles that you have on hand.

If using sand from the beach, be sure to sift it with a flour sifter first to remove any bits of debris and rock.

You can purchase sand from your local craft store.

How to make it

  1. Cover the work surface with newspaper.
  2. Place a sheet of wax paper on a cutting board.
  3. Place some sand on the wax paper. Roll a piece of colored chalk across the sand until the sand is completely changed to that color.
  4. Carefully lift the wax paper and gently shake the sand to the center of the wax paper. Hold both ends of the paper up to use it as a pour spout to pour the colored sand into the bottle. You can use a funnel if you find it easier.
  5. Use a stick or the eraser end of a pencil to make a few dips in the sand.
  6. Repeat these steps until you have several colors of sand layered in your bottle(s).
  7. If you have a cap for your bottle, be sure to fill it completely with sand and press down firmly on the sand to compact it. Place cap on tight. If you do not have a bottle cap, fill sand to about ½” from the top of the bottle. Compact the sand with a pencil or your finger if it fits in the opening and then fill to the top with glue and let dry.

Wire Wrap Necklace Craft

Wire Wrap Necklace Craft

Total Time 1 hour Ages all-ages

Here's a way for your kid to show off that lucky pebble or one-of-a-kind beach find he picked up during a recent adventure.

What you'll need

  • Scissors
  • 20-gauge silver-colored or copper wire
  • Special stone, beach glass, shell, or other small treasure
  • Leather cording
  • Lanyard hook (sold at most craft stores)

How to make it

  1. Cut two 10-inch lengths of wire.
  2. Wrap the midsection of one wire around the chosen treasure and tightly twist together the ends.
  3. Likewise, attach the second wire from the opposite side, just below the first one.
  4. Bend the twisted wire pairs up alongside the treasure and join them together at the top with a few more twists.
  5. Form a small loop (large enough to thread the cording through).
  6. Wrap at least 1/4 inch of wire around the base of the loop, then snip off the excess.
  7. Cut the leather cording to the desired length plus 2 inches.
  8. Tie a lanyard hook onto one end and tie the other end into a loop.

Sleepy Bunny Craft

Sleepy Bunny Craft

Ages 5 to 8

Hide this cute sleepy Easter bunny inside your kids Easter eggs. Shhh, don’t wake him - he needs his strength to deliver those goodies.

by Amanda Formaro

What you'll need

  • ½ egg shell
  • Wooden doll stand
  • 2 large white pom poms
  • 4 medium white pom poms
  • 1 miniature pink pom pom
  • Scrap of black felt
  • White felt
  • Pink and white acrylic paint
  • White craft glue
  • Scissors
  • Thin white ribbon

Helpful Tip:

Pom poms can be purchased in large value packs with different colors and sizes.

Be sure to check the craft stores following each holiday for major clearance priced items.

You could get even more creative and add a sleeping cap to the project by cutting a piece of pastel colored felt and rolling into a cone. Glue it to the top of the head and bend the end downward and glue to bunny’s back.

How to make it

Sleepy Bunny step 1

1. Be sure egg shell is clean and dry. Paint outside of egg shell pink.

2. Paint the doll stand with a mixture of white and pink paint. Let dry.

3. Glue the egg shell to the doll stand.

Sleepy Bunny step 4

4. Add some glue to the inside of the egg shell. Place one of the large white pom poms inside the egg shell. Glue the other large white pom pom on top of the first one.

5. Glue two medium white pom poms to the inside of the egg shell so that they show at the top of the shell (paws).

6. Glue the other two medium white pom poms to the head for the cheeks.

Sleepy Bunny step 7

7. Glue the miniature pink pom pom in between the two cheeks.

Sleepy Bunny step 8

8. Cut two long ears from the white felt and glue to the top of the head at the sides. Fold them downward and glue the ends to the egg shell.

9. Cut two small crescent shaped slits from the black felt and glue on to head for sleepy eyes.

10. Tie ribbon around the bottom of the egg shell and form a bow, trim the ends.

Woody's Faux Cowhide Vest Craft

Woody's Faux Cowhide Vest Craft

Total Time 1 to 2 hours Ages preschooler

Not until he meets Jessie and Stinky Pete the Prospector does Woody realize he's a valuable collectible. Dressed in boots and jeans and his distinctive white-and-black cowhide vest, the amiable pull-string cowboy was the star of a popular children's TV show called "Woody's Roundup." Using a simple pattern and felt, you can whip up a spotted vest just like Woody's - no sewing machine required.

Download Woody's Faux Cowhide Vest Template

by Cindy Littlefield

What you'll need

  • Faux Cowhide Cowboy Vest Template
  • Scissors
  • Straight pins (for pinning the pattern pieces to the felt)
  • White felt (about 1 yard)
  • Felt Scraps (black, tan, and yellow)
  • Hot glue gun or fabric glue
  • Thin black yarn or embroidery floss (optional)
  • Large-eye sewing needle or embroidery needle (optional)
  • Safety pin

Notes:

The vest shown here measures about 16 inches wide and 14 inches from the shoulder to the lower hem. For a different size, cut the pattern pieces larger or smaller as needed.

How to make it

Woody's Faux Cowhide Vest step 1

1. Print the template and cut out the pieces. Create patterns by taping the vest front pieces together and the vest back pieces together, as shown.

2. Next, cut two vest fronts from white felt. To create the vest back, fold a large piece of white felt in half and pin the pattern to it with the straight edge along the fold, as shown. Cut around the other edges of the paper but not along the fold. Next, cut a larger sheriff's star from tan felt, and a smaller sheriff's star from yellow felt.

3. Glue the front and back vest pieces together at the shoulders, overlapping the edges by 1/2 inch. Then hot glue the side seams, overlapping them by an inch.

4. Cut out a bunch of large irregular-shaped cowhide spots from the black felt and glue them to the vest.

Woody's Faux Cowhide Vest step 4

5. Now you can embellish the edges of the vest with stitching, if you like. Simply thread the needle with black yarn or embroidery floss and use a quick whipstitch, as shown.

Woody's Faux Cowhide Vest step 5

6. For the finishing touch, glue the smaller star atop the larger one to create a sheriff's badge, and safety pin it to the vest.

Wreck-It Ralph Pixel Placemat Craft

Wreck-It Ralph Pixel Placemat Craft

Tired of playing the villain, Wreck-It Ralph abandons his home game hoping to prove he can be helpful instead of destructive. This colorful placemat, featuring a pixilated portrait of the sensitive “bad guy,” illustrates just how handy he can be to have around.

Download Wreck-It Ralph Pixel Placemat Template

by Cindy Littlefield

What you'll need

  • Template for Wreck-It Ralph Pixel Placemat
  • Cardstock or heavy-weight craft paper (red, orange, white, and black)
  • Scissors
  • Colored markers or pencils
  • Glue stick
  • 2 self-adhesive laminating sheets (sold at office supply stores)

How to make it

1. Print the template, using red cardstock for the first page, orange cardstock for the second, and white cardstock for the third. Use colored markers or pencils to color in the pixels on page 3, as specified. (Note: Another option is to print all three pages on white cardstock and then have your child color the pixels on the first page red, and the pixels on the second page orange.) Cut out the pixel clusters.

Wreck-It Ralph Pixel Placemat step 2

2. Glue the red border pixels onto a sheet of black cardstock, creating a frame along the paper’s edge. Then glue the hair and the cheeks-and-ears pixel clusters in place, centering them on the placemat, as shown. Next, glue the forehead and chin pixels in place.

Wreck-It Ralph Pixel Placemat step 3

3. Add the eyebrows and teeth pixels, followed by the nose pixels.

Wreck-It Ralph Pixel Placemat step 4

4. Finally, glue the tan and then the reddish-brown shading pixels in place.

5. Seal the finished placemat between two self-adhesive laminating sheets, and it’s ready to use.

Snowman Ball Ornament Craft

Snowman Ball Ornament Craft

This cute snowman is easy to make and fun to hang on the tree. Make extras to give as gifts!

by Amanda Formaro

What you'll need

  • Glass ball ornament
  • White and black acrylic craft paint
  • Water
  • Measuring cup
  • Orange and pink felt scraps
  • 4" piece of green yarn
  • 2 small glittery green pom-poms
  • 1 gold chenille stem
  • White craft glue
  • Scissors

Helpful Tip:

You can make this a much faster project by purchasing white glass ornaments.

Use felt strips instead of yarn for the ear muffs.

All supplies for this craft can be purchased from your local discount department store.

How to make it

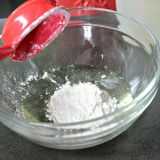
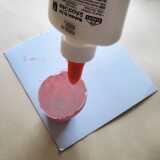
1. Squeeze some white paint into the measuring cup, then a little bit at a time add small amounts of water and mix. You want the paint to be of pourable consistency, but not too thin.

Snowman Ball Ornament step 2

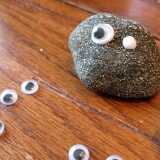
2. Remove hanger top from ornament and set aside. Pour some thinned white paint into the open ornament, about the size of a quarter.

Snowman Ball Ornament step 2

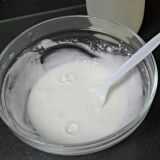
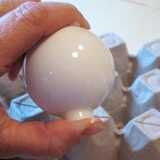
3. Cover the opening with your thumb and shake the ornament so that the white paint covers the inside of the ball.

Snowman Ball Ornament step 4

4. Pour the excess paint out of the ball and back into the measuring cup so that it does not pool at the bottom. Place ball ornament upside down onto an egg carton to dry.

Snowman Ball Ornament step 5

5. Repeat steps 1 through 4 once or twice until your get the coverage that you want.

6. Cut the yarn in half. Measure enough to go from the top of the ornament to the middle, about an inch or so. Glue in place on both sides of the ornament.

Snowman Ball Ornament step 7

7. Cut each pom-pom on one side, making one side flat. Glue the pom-poms to the ends of the yarn, these are your ear muffs.

Snowman Ball Ornament step 8

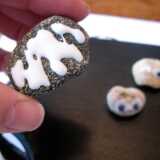
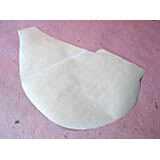
8. Cut a long triangle from orange felt and two circles from pink for the nose and cheeks. Glue to the front of the ornament.

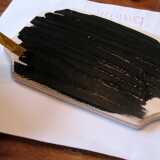
9. Dot on eyes and mouth using the handle end of a paintbrush dipped in black paint.

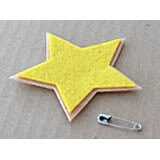
10. Replace the ornament's hanger top. Insert chenille stem into the loop of the hanger top and twist closed.

//