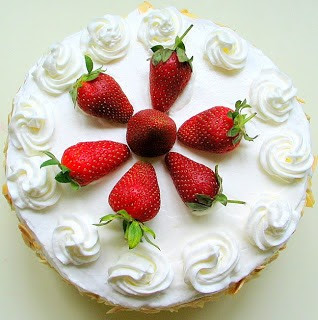
I attempted to bake a "proper" layer cake that is fully frosted and decorated with fresh cream today. Although I know that piping with whipped cream is not as easy as buttercream, I went ahead with my little project as I find buttercream too sweet to my liking. Little did I know that my project turned out to be such a tedious task!
I started off making the sponge cake using a recipe from a Chinese cookbook. The recipe is slightly different from the usual ones that I have came across. It uses quite a large amount of sugar (1 cup), salad oil instead of the usual butter, with the addition of fresh milk and some salt. As my intention was to make a strawberry layer cake, I thought it was ok for the sponge cake to be on the sweet side, as the strawberries that I bought were a little too tart. I was hoping the recipe would give a moist sponge unlike those genoise which tend to be dry.
All went well until the cake was in the oven for 20mins. The cake top started to brown quickly, likely due to the high sugar content. The baking time is supposed to be around 35mins as stated in the recipe. After another 5 mins, coupled with the cake top "going-to-turn-black" and a slight burning smell, I made the decision to change the cake to a lower-rack position. When the recommended baking time was up, the cake was still not ready. It wobbled when I gave the cake pan a slight jerk. As such I let it baked...and baked...and baked! The cake was only done after it was in the oven for more than 55mins! I didn't know what went wrong, but I think having closed and opened the oven too many times to check, lowered the temperature too much. I had to slice off the slightly burnt top before frosting it.
I engaged my little assistants to help me assemble the cake. They took turn to fill the cake with whipped cream and lined the layer with circles of strawberries.
I arranged the strawberries vertically, thinking that the effect would be great on the cake slice. But with this arrangement, it was not easy to fill up the strawberry layer with the cream. I poured and filled the cream haphazardly and top it with the other cake layer...keeping my fingers crossed that the cake would be ok. My elder boy was eager to frost the exterior and so I let him have a go. Eventually I got to shoo them off as they were merrily "scraping" away the crumbs instead of frosting the cake! I proceed to cover the sides with toasted almond silvers. I didn't know it would be such a challenging affair...I had to tilt the cake a little with one hand, and cover the sides with the almond silvers with the other...and all the while taking great care not to drop the entire cake.
The final step was to pipe some rosettes to decorate the top. ***Sigh***, sad to say the result was not too satisfactory. With the lack of skills and technique, plus, the fact that the whipped cream was not stiff enough(good excuse isn't it?) the rosettes appeared like some weired tornadoes.
I was dead tired after the whole cake was finally done! The photos didn't turn out well too, as it was too dark...not much naturally light in my house as it was a rather gloomy day. Nevertheless, the entire project was a great experience for me. By the way, the cake tastes good with the cream, strawberries and nutty almond combination. The sponge layer is sweet and moist, overall a tasty and yumilious cake.
Ingredients:
- 4 eggs, bring to room temperature
- 206g caster sugar (advisable to reduce sugar amount by half, see comments here)
- 4g salt
- 140g cake flour
- 30g salad oil
- 30g fresh milk
Filling & frosting:
- 300ml whipping cream (I used non-dairy)
- 250g strawberries
How to make the recipe
- Sift cake flour, set aside. Grease and line a 20cm round pan, set aside. Pre-heat oven to 180degC. Position rack at the lower bottom of the oven.
- With an electric mixer, whisk eggs and sugar & salt on HIGH speed for about 5 to 7mins, until the batter double in volume and is ribbon-like (the batter should leave a ribbon-like texture when the beater is lifted up). Turn to LOW speed and whisk for another 1 to 2 mins. Whisking at low speed helps to stabilise the air bubbles in the batter.
- Add sifted cake flour into the batter. With a spatula, gently fold in the flour until well blended.
- With a spatula, mix about 1/3 of the batter with the salad oil in a separate bowl. Fold in this mixture into the remaining batter. This method will help to ensure the oil will be fully blended and at the same time will not deflate the batter.
- Add in fresh milk and fold in gently with spatula.
- Pour the batter into the pan and bake for 35 mins, or until a skewer inserted in the centre comes out clean. Unmold and cool completely.
Assemble the cake
- With an electric mixer, whip the whipping cream still stiff.
- Slice the cake horizontally into 2 layers. Place one of the cake layers cut-side down on a cake plate. Spread the whipped cream over the layer.
- Arrange rings of strawberries to cover the whole layer.
- Fill with some more whipped cream. Top with the other cake layer, cut-side up.
- Spread the whipped cream over the top and side of the cake. Decorate as desired.
Source Happyhomebaking
Food


