
Ages school-age
Make a stunning floral Halloween outfit with this autumn fairy costume. It's the perfect solution for crafters who can't (or don't want to) sew.
Autumn Fairy Leaf Table Toppers
by Amanda Formaro
What you'll need
- Two bouquets of silk flowers in autumn colors
- One bag of fake autumn leaves
- Store bought fake butterflies
- 1 ½ - 2 yards shimmery organza fabric
- 2-3 yards of 2" (or wider) satin ribbon
- 2 Rolls of 1" wide satin ribbon
- 1 Roll of ½" wide organza ribbon
- 1 Roll of 2" wide wired organza ribbon
- Long-sleeved shirt or leotard in coordinating color
- Plastic headband
- Hot glue and glue gun
- Store-bought wings (butterfly type, not angel wings!)
- Floral tape
- Safety pins or needle and thread
- Store-bought fairy wings (optional)
Helpful Tip:
1. Finish off the costume by adding a pair of store-bought fairy wings. 2. Add some self-adhesive jewels found at the local craft store at the corners of your fairy's eyes for a little extra sparkle. 3. This costume can easily be modified into a spring, summer, or winter fairy. Use sunflowers and brighter green leaves for a summer fairy, or poinsettias and holly for a winter fairy. For an older fairy, try grape vines and lightweight plastic grapes.
How to make it
1. Begin by measuring your child's waistline. Cut the 2" satin ribbon to a length three times longer than your child's waist measurement. Locate the center of the ribbon and lightly mark a width two inches shorter than your child's waist measurement. This is where you will attach your organza, ribbons, and some of the leaves and flowers.
2. Cut a few of the flower stems to 4-6" lengths and set them aside for use on the headdress. Remove the remaining flower heads from their stems; some types will pop right off, others will have to be cut; be sure to remove the entire stem.
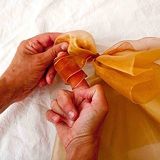
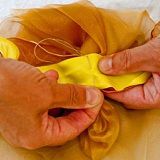
3. Cut the organza into seven 24" squares. (Note: You may need to make more squares depending on the width of your child's waist.) For each square, gather a three inch section of fabric near one of the corners and tie a length of wired organza ribbon at the bottom of the gathering, leaving long ends. The ends of the wired organza ribbon can be wrapped around a finger to curl them.
4. Safety pin or hand sew the first square onto the center of the 2" ribbon at the place where you made the knot with the organza ribbon.

5. Hot glue a flower and/or leaf over the stitch to hide it.
6. Stitch or pin remaining squares on either side of the first square at even intervals (we spaced ours about 4" apart on center). Work outward until you reach your marks.

7. Cut the two rolls of 1" wide satin ribbon into two foot lengths. Criss-cross each piece of ribbon at its center to form a loop and stitch or pin them between the squares of organza. You may opt to glue a flower or leaf over this stitch as well.

8. Hot glue leaves and flower heads evenly over the organza squares and ribbons. There is no need to fully cover the skirt.
9. To make shoulder piece: Cut two small slits about 1 ½" apart in a 1 – 1 ½ foot long scrap piece of felt and insert a large safety pin. Glue or sew scraps onto the felt from the shimmer organza fabric, satin and organza ribbons as well as some leaves and flowers. Pin the finished piece onto the shoulder of your child's shirt or leotard.
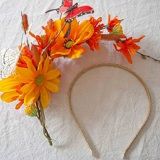
10. To make the headband: Wrap together the flower stems you had set aside earlier. As you work, bend the stems into an arch.
11. When you are satisfied with their positioning, attach the flowers to the headband by wrapping them together with ½" organza ribbon and hot glue the ends in place.
Crafts


