
Total Time 1 hour Ages school-age
Learn how to make beautiful roses using duct tape and a pipe cleaner. These make great gifts, or leave off the stem and wear as a brooch! Perfect for Valentine's Day or Mother's Day.
by Amanda Formaro
What you'll need
Red (or white) and green duct tape
2 pipe cleaners
Cutting mat
Craft knife
Scissors
Variations:
To make a closed rose bud (like the white one pictured), do not follow the instructions for gathering the tape, but rather just wrap the petals around the pipe cleaner, one at a time. Continue working around the flower, working from side to side, until all of the petals have been used. Each flower uses 21 petals each.
How to make it

1. Measure out a 3-inch piece of red duct tape.

2. Fold one corner down toward the center, use the 1 1/2" mark on the cutting mat or a ruler to help you. You want to leave a small amount of sticky tape open at the bottom.
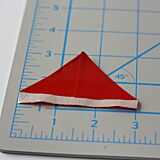
3. Fold down the other corner so that the two pieces meet in the middle, creating a triangle with exposed sticky tape at the bottom.

4. Use scissors to trim off and round the pointed tip of the triangle, creating your rose petal.

5. Lay one pipe cleaner on the left end of the sticky section of your triangle. Wrap the tape petal completely around the pipe cleaner.

6. Make 20 more petals, rounding the pointed tips of each one.

7. To make a rose that appears open, like the red one pictured, you will need to gather the sticky part of the tape as you wrap around the stem. Take the pipe cleaner with the first petal wrapped around it and place it in the center of a new petal. Gather the bottom of the petal, as if folding accordion style, sticking it onto itself at one fold, and then back onto the pipe cleaner at the second fold. This will help "poof" out the petals.

8. Keep working around the pipe cleaner, one petal at a time, gathering as you go.

9. As your flower begins to form, you will start to notice a pattern forming in the petals. To keep them evenly spaced, alternate in a plus sign (+) pattern (left, right, top, bottom) as you add petals.

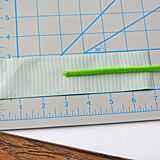
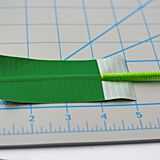
10. When all of your petals have been added, cut a 6-inch strip of green tape, and cut it in half lengthwise. Use your craft knife to cut a simple scallop along one edge.

11. Wrap the scalloped green tape around the bottom of the red flower. Wrap the stem of the flower (pipe cleaner) with green tape.
12. To make a leaf, measure out a 7-inch strip of green tape. Place the second pipe cleaner in the center 4-inches in on the tape. There should be 3-inches of untouched tape remaining.
13. Fold the untouched 3-inches of tape over onto the pipe cleaner. That should leave 1-inch of sticky tape exposed.

14. Cut the folded section of tape into a leaf shape, leaving the sticky tape in tact.

15. Trim off all but about an inch of the pipe cleaner that is not touching the tape. Bend the end of the pipe cleaner around the flower stem.

16. Fold one side of the sticky tape over onto the leaf stem. Fold the other side of the sticky tape over to complete the leaf stem. Cover any other exposed pipe cleaner with green tape.
Crafts


