
Total Time 30 minutes or less Ages school-age
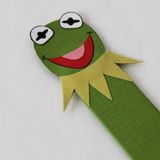
Being the magnanimous leader that he is, Kermit is ever ready to hop to it when someone in the Muffet world needs a helping hand. In my book, that makes him the perfect prop for young readers. With little more than a wooden craft stick and scraps of paper, you can make a colorful page-keeper modeled after the plucky green puppet.
Download Kermit Bookmark Template
by Cindy Littlefield
What you'll need
- Template for Kermit Bookmark
- Scissors
- Cardstock or heavyweight craft paper (frog green, white, olive green, red, and pink)
- Extra jumbo (1 inch wide) wooden craft stick
- Tacky glue
- Toothpick and small stiff paintbrush for applying the glue
- Glue sealer, such as Mod Podge, and a small foam brush or soft paintbrush for applying it
How to make it
1. Print the first page of the template on frog green cardstock or craft paper and the second page on white. Cut out the green pieces from the first page and the eyes from the second page. Use the remaining template pieces as patterns for cutting out the shapes in the specified colors of paper.
2. Wrap and glue the green rectangle around the wooden craft stick, overlapping the edges on the back of the stick.

3. Glue the eyes, mouth, and tongue pieces onto the Kermit face (note: a toothpick comes in handy for applying glue to these small pieces).
4. Glue the lower ¾ inch of the Kermit face to the top of the paper-covered stick. Then glue the head backing to the back of the face, sandwiching the stick top between them and matching up all the edges.
5. Glue one of the collar pieces to the front of the bookmark, positioning it right below Kermit’s mouth so that it covers his chin.
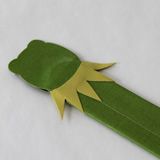
6. Glue the second collar piece to the back of the bookmark, matching up the points that extend beyond the sides of the stick with those of the front collar piece.
7. Brush a protective coat of glue sealer on both sides of the bookmark, to seal it and to give it a little sheen.
Crafts


