
Total Time 30 minutes or less Ages school-age
Straight from Radiator Springs, these standup paper cars make the perfect vehicles for kids to deliver sweet messages, such as "You auto be my valentine!" or "I wheelie like you." You can even attach pinch-style clips to turn them into backpack or keychain charms.
Ninja Chocolate Bar Valentines
Download Charm-ing Cars Valentines Template
by Cindy Littlefield
What you'll need
- Charm-ing Cars Valentines Template
- Scissors
- Cardstock (white, red, blue, tan, and black)
- Permanent markers (black, brown, green, and red)
- Glue stick
- Glue dots
- Heart-shaped stickers and/or sequins
- Faux gems (optional)
- Clear packing tape
- Hole punch
- Keychain ring and clip (or lanyard clip)
How to make it
1. Print the first page of the template on plain white paper. Use the pieces as patterns to cut out the shapes from the specified colors of cardstock.

2. Print the second template page on white cardstock. Use a black marker to color in the eye pupils on the windshields. Leave a small white square "glint" near the center of the pupil, if you like, as shown. Then use green marker to color in the irises on the Tow Mater windshields.

3. Color in the Tow Mater mouths with brown marker (leaving the teeth white). Now cut out all of the windshields and mouths.
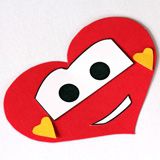
4. To assemble each valentine, first glue a windshield and mouth on the face heart (For the Sally valentines, use heart stickers for the mouths and draw a thin red smile line across each one). Add heart stickers, sequins, or faux gems for headlights.
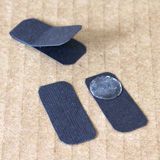
5. For each tire, glue the top portion of two of the black cardstock pieces together, as shown. Leave the bottoms unattached so you can spread them apart later when they are attached to the valentine (this will allow you to stand the cars upright).

6. Glue the tire tops to the back heart of each valentine, as shown. Position them so that the tire bottoms are just below the tip of the heart.
7. Glue the face heart atop the back heart, sandwiching the tire tops between them.
8. Now your child can print his or her valentine messages on the backs of the assembled cars.
9. To turn a valentine into a backpack charm, first stick another heart sticker to the upper corner. Then punch a hole through the center of the sticker, and attach a keychain ring and clip.
10. To set the valentines upright on a tabletop or other flat surface, simply spread the tire bottoms slightly apart.
Crafts


