
The ABCs of decorating stand for “Always Be Creative.” And a great way to be creative is to recycle old things and turn them into art. Here is some alphabet artwork that is actually made from cereal boxes, and decorated with craft paper and old maps. Now that’s thinking outside the box – the cereal box, that is.
What you'll need
- Cereal box
- Piece of blank paper
- Black marker
- Paperweight, e.g. an old battery
- Duck tape
- Craft paper
- Double sided tape
- Old maps
- Glue
How to make it

1. Trim a blank piece of paper so it is the same size as the front of the cereal box. Then draw a large alphabet letter on it so that it goes to the edges. If you can do this on the computer, it’s even easier. Cut out the letter, and trace the letter on the front of the cereal box with a black marker. Then flip the letter over so it’s backwards, and trace the backwards letter on the back of the cereal box (on some letters like “A,” flipping it over isn’t as important because the letter looks the same either way. But letters like “E” or “Z” are in reverse when you flip them over).

2. Cut along the lines, but don’t cut out the letter from the top and bottom sides, so that the front and back are connected.
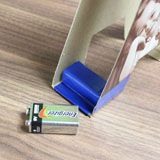
3. Tape a paperweight to the bottom of the letter, on the inside, with some duck tape. An old battery works well. This will help the letter stand without tipping over.
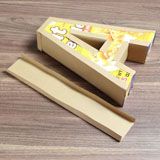
4. Now cover the sides of the letter with some craft paper. Measure the depth of the cereal box, and cut paper strips that will overlap the sides. For example, if the box is 2 inches deep, then cut 3-inch strips – 2 inches to cover the side, and a half-inch tab on either side to wrap around the box. Cut the strips to fit each section of the letter, fold over the tabs, and use double sided tape to attach the tabs the box.
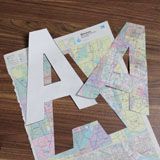
5. With the same letter template that you used to trace on the cereal box, trace the letter on an old map, and cut out the letter. Flip the letter template over, and trace on another old map so you have artwork for the back of the letter.
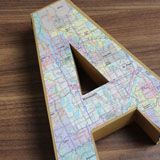
6. Glue the map letters onto the front and back of the cereal boxes. The great thing about wrapping the sides first with craft paper is that the map letters don’t need to fit perfectly; the craft paper acts like a border.
Crafts


