
Total Time 1 hour Ages all-ages
I hope I'm not the only one out there with nostalgia for a certain light box toy of the 1980's. With the fun of creating shapes with little lights in mind, I came up with simple star craft. The perfect addition to your holiday mantle, this Christmas light star is modern and chic.
by Carla Wiking
What you'll need
- 20" x 30" Foam board in white (sometimes called foam core)
- 100 bulb strand of indoor use Christmas lights
- Ruler
- Craft knife or box cutter
- Pen
- Chopstick or screwdriver
Notes:
A quick fire safety note: Do not ever leave your lit star unattended or left plugged in for many hours.
Variations:
Use a colored foam board or apply decorative paper to the board before adding the lights. Experiment with different shapes, a snowflake would look great!
How to make it
1. Using a craft knife or box cutter and ruler carefully cut 10" off of the long edge of your board to create a 20" x 20" square.
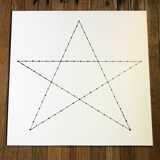
2. On the back of your board draw a star. Use a ruler to help you get nice straight lines. You want each line to be about 18" long. Mark dots about every 1" along your star, this is where your holes will go.
3. Using a chopstick, screwdriver or other slightly sharp object, punch holes through the board at each dot. Optional: You might want to clean up the front of your board by poking any bits of board back through the holes with the same tool.

4. Insert one bulb into each hole to create your shining star. Any extra lights can be tucked behind when you display your piece.

5. Set your board on the mantle, plug it in, and marvel at your handiwork!
Safety first: be sure you do not leave your lit star unattended or plugged in for many hours at a time.
Crafts


