
Ages school-age
1-2-3-4. Here’s a backpack you’ll adore. 5-6-7-8. It’s so easy to create. Show your pride with this spirited backpack adorned with stripes and a varsity letter in your school colors. It really is something to cheer about.
What you'll need
- Backpack
- Duct tape in two different colors
- Felt in three different colors (two of these colors would be the same as the duct tape)
- Yarn or embroidery floss in two colors
- Iron-on patch with your mascot or a cheerleading theme
- Fabric glue
How to make it
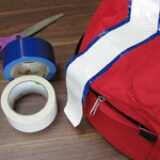
1. Decide which color duct tape will be the wider stripe, and which color will be the narrow stripe. In our example, the blue stripe is the wider one. Apply a strip of blue duct tape along the top and sides of the backpack. To help it stick really well, press down on the tape with one hand while your other hand presses against it from inside the backpack.

2. Apply another strip of the same color duct tape, overlapping the first strip about an inch to create a wider stripe.
3. Apply the contrasting color duct tape in the middle of the wider stripe.
4. Using this same technique, create a “V” shape on the front of the backpack above the pocket. Here’s a hint: don’t worry about measuring the exact length to cut the duct tape strips. Just make them long, and you can trim them afterwards.

5. To create the varsity letter on the pocket, cut the initial of your school out of felt in three different colors and sizes. Start by tracing and cutting the smallest letter, and then use that letter to trace and cut the next size up, and so on. Glue the layers together with fabric glue, and then glue the varsity letter to the backpack pocket.
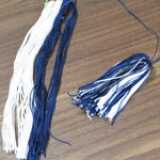
6. Three cheers for our pom pom zipper pulls. Cut forty pieces of yarn to about six inches in your two colors. (Don’t cut each one individually; that will drive you crazy. Grab a bunch of yarn that looks like it’s got forty strands in it and snip off two ends six inches apart.) Then, mix the colors up a little bit, and tie a knot around the middle of the strands with another longer piece of yarn. You can use that long piece to tie the pom pom to the zipper pull.
7. The backpack already looks awesome, but an iron-on patch with your school mascot, or a cheerleading theme, makes a fun final touch. When ironing onto a backpack, be sure to use a press cloth between your iron and the patch because you don’t want the hot iron to melt the backpack. If you don’t want to go through the trouble of ironing the patch, just glue it on with fabric glue.
Crafts


