
Total Time 1 to 2 hours Ages school-age
While he's best known for his dynamic performance as a space ranger, Buzz is ever ready to take his role to, well, infinity and beyond. This eggs-traordinary Easter tribute is a case in point.
Download Buzz Lightyear Easter Egg Template
by Cindy Littlefield
What you'll need
- Hardboiled white egg (or wooden egg), painted purple
- Laundry detergent jug cap (to use for Buzz's body)*
- Scissors
- Craft paper (silver/gray and other assorted colors)
- Cardboard tissue tube (1 1/4 inch or so in diameter and cut to the same length as the height of the jug cap)
- Fine-tipped black marker
- Paper hole punch
- Glue stick
- Glue dots
- White cardstock
- Template for Buzz Lightyear Easter Egg
- Colored pencils
- Black marker
- White craft paint
- Toothpick
- 2 small purple buttons (1/2 inch or so in diameter)
Notes:
If you don't have a cap, another option is to create several tubes from rolled up cardstock and nest them inside each other.
How to make it
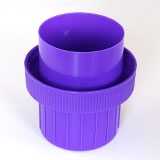
1. Begin by creating an egg stand that resembles Buzz's upper chest.
2. First, decorate the laundry detergent cap by gluing on strips of green paper, as shown.
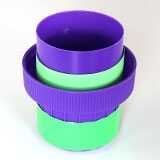
3. Then create a 2-inch-tall silver/gray paper ring to fit around the widest point of the cap.

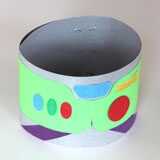
4. Decorate the ring with colored paper stripes and control buttons/panels, and slide it around the cap. Set the cardboard tissue tube inside the cap, as shown. Place the egg atop the tissue tube, with the narrower end down.
5. Print the template on white cardstock and cut out the pieces. Shade in the face and eyebrows with colored pencils. Tip: To achieve a more opaque look, you can periodically dip the pencil points in water.

6. For the eyes, simply color them in or make a 3-dimensional pair out of buttons.To do this, just use the hole punch to create two blue circles and then draw an eye pupil on each one with black marker.

7. Use the tip of a toothpick dipped in white craft paint to add a gleam to each eye. Glue the circles onto the buttons and then glue the button eyes onto the paper face.

8. Use glue dots to stick the face to the front of the egg, but leave the chin free to jut out over the tissue tube. For the finishing touch, glue the purple buttons in place on the sides of the egg for ear flaps/coverings.
Crafts


