
They say a picture is worth a thousand words. Well, here’s a gift that allows you to insert a picture and use a thousand words. It’s a beautiful journal that doubles as a picture frame.
See more crafts:
What you'll need
- Fabric of your choice
- Thick cardboard, poster board or mat board
- Polyester batting
- Craft glue
- Plain paper, 10 sheets
- Card stock, 1 sheet
- Scissors or paper cutter
- Hole punch
- String
- Clear plastic
- Fabric trim
How to make it
1. Cut three pieces of poster board: two 5” x 7” pieces and one ½” x 7”. Cut two pieces of polyester batting, both 5” x 7”. Then cut a piece of fabric that is about 13” x 10”.
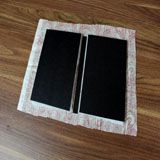
2. Place the ½” x 7” piece of poster board in the middle of the fabric and glue it down. On either side of this poster board, place the two pieces of 5” x 7” polyester batting. Then place the two pieces of 5” x 7” poster board directly on top of the batting.
3. Glue the fabric edges to the poster board, starting with the corners and then gluing down the four sides. Let it all dry before adding the inside paper sheets.

4. Cut 10 sheets of plain white paper and one sheet of cardstock so that when folded in half, they are slightly smaller than 5” x 7”. The cardstock should be on the outside. Place the folded sheets in the folded journal cover to make sure that the pages fit within the cover and don’t stick out.
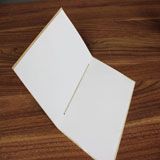
5. Punch a hole in all sheets about an inch in at both the top and the bottom of the fold. Thread a string through the two holes and tie a knot in the back, securing all the sheets together with the cardstock.
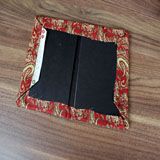
6. Glue the cardstock to the inside of the front and back covers. Let it dry with the journal closed.

7. Attach a small piece of clear plastic to the front cover, only putting glue on the sides and the bottom. You don’t want to glue the top edge, this is where the photo will be inserted. Where is a good place to get some clear plastic? Save old plastic packaging. Just be careful when cutting, the plastic edges can be sharp.

8. Cover the edge of the plastic with some fabric trim. Place the trim above the opening at the top so you don’t block it.

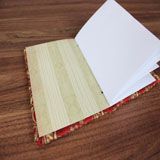
9. Insert a photo into the frame.
Crafts


