
Total Time day projects Ages school-age
No doubt, the Beast often wished he could replay the moment when, as a prince, he sneered at the beggar woman who offered him a rose in exchange for shelter from the cold. Not just for his own sake, but for those of his loyal servants, as well. Even Mrs. Potts' young son Chip wasn't exempt from the spell the enchantress-in-disguise cast. Using a fun-to-use, clay-like foam called Model Magic, your child can shape an enchanting little teacup reminiscent of the animated tot.
by Cindy Littlefield
What you'll need
- Model Magic air-drying modeling compound, white and yellow (sold in craft stores)
- Scissors
- Egg carton cup
- Pencil
- Colored markers
How to make it
1. Roll a small hunk of white Model Magic into a ball. Then flatten the ball into a disk about 3 1/2 inches wide and 1/4 inch thick to use for the base of the cup.
2. Roll a small hunk from the yellow Model Magic between your palms to create a long thin snake. Coil it around the perimeter of the cup base, gently pinching it against the white Model Magic to stick it in place.
3. Next, roll a larger hunk (about the size of your child's fist) of white Model Magic into a ball. Use your thumbs to make a depression in the center of the ball. Then gently pinch and stretch the modeling compound around the depression to shape the bowl of the teacup, making it about 2 inches deep and 3 1/2 inches in diameter.
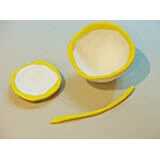
4. Add a rim of yellow to the top of the cup, just as you did to the base in step two.
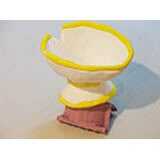
5. Set the cup bowl atop the base and with one hand under the cup and the other inside, gently press the two pieces together. Coil another piece of yellow Model Magic around the joint.
6. Roll one last piece of the yellow and shape it into a cup handle. Press the handle ends against the face of the cup, being sure to leave room above and below them for facial features. Then, use the scissors to cut a notch in the cup rim for a chipped appearance.
7. Now let the modeling compound dry overnight. To make sure the teacup holds it shape in the process, set it atop an egg carton cup, gently molding the base around it.
8. Once the compound sets (it will feel spongy but not moldable), your child can draw on eyes and a mouth with colored markers or paints.
Crafts


