
Total Time 1 hour Ages school-age
Ask any princess and she's likely to say the most treasured item in her jewelry box is her charm bracelet -- particularly if it's a gift from someone charming, such as a smitten beast whose really a prince at heart. This colorful wristlet is sure to woo Princess Belle fans, and it makes an enchanting accessory to wear to a Halloween party, or ball, as the case may be. Making the charms will require help from Mom but, once assembled, they're easy for young crafters to string onto beading elastic.
by Cindy Littlefield
What you'll need
- Scrapbook paper
- Scissors
- Pencil (for drawing the charms)
- Colored pencils or markers
- Thin jeweler's wire or craft wire (flexible enough to bend without pliers)
- Glue stick or glue dots
- Beading elastic
- Pony beads
- Drop of craft glue
How to make it

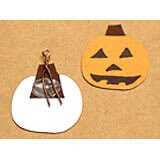
1. For each charm, you'll need to cut out a matching pair of miniature Halloween symbols, such as mini pumpkins or skulls, for example (the ones shown here measure about 3/4 inch to 1 1/4 inches wide/tall). An easy way to accomplish this is to put two squares of paper back-to-back so you can cut out both at once. Then, your child use colored pencils or markers to embellish the charms as she likes. You can even create candy corn by gluing strips of yellow, orange, and white paper together, as shown, and then cutting the shapes from it.
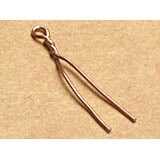
2. Cut a 2 1/2-inch length of wire for each charm. Loosely bend each length in half and twist the ends together a few times about 1/8 inch below the bend to form a small loop, as shown.
3. Use glue dots to sandwich the ends of one of these little hangers between the two pieces of each charm (you can trim the wire ends with scissors if they are too long). Firmly squeeze together the two layers of the charm to make sure they are well adhered to the wire and each other.
4. Cut a length of beading elastic that is several inches longer than the circumference of your child's wrist.
5. With each charm, slide a pony bead down over the wire loop so that it rests just above the charm and then string the charms onto the elastic, spacing them apart with several pony beads.
6. When the bracelet is the desired length, tightly tie the ends of the beading elastic together with an overhand knot, leaving a little bit of slack so the charms will dangle. Use a dab of glue to secure the knot, if needed. Trim the elastic ends about 3/4 inch from the knot and thread them back through the adjacent beads to hide them.
Crafts


