Total Time Needed: Afternoon Or Evening
Stitch up this adorable guy, complete with a miniature fleece scarf and an orange felt nose, in an hour or two. The bonus? He'll never melt!
Materials
- White fleece (You'll need a piece 15 inches long and wide enough to fit around your child's head. To figure the width, measure the circumference of your child's head and add 2 inches for seam allowance. Be sure the fleece is cut so that it stretches width
- Ruler
- Sewing machine and white thread
- Scissors
- Pinking shears
- Black embroidery floss or fabric marker or fabric paint
- Needle
- 2 black beads, 7 millimeters each (eyeballs; optional)
- Fiberfill (a large handful)
- Colorful fleece for scarf, cut approximately 1 1/2 by 24 inches and so the stretch runs the scarf's length
- 1- by 1 1/2-inch piece of orange felt cut into a triangle (nose)
- Fabric glue (we used Fabri-Tac)
- 3 buttons
Instructions
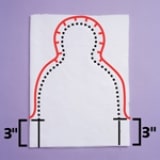
1. Fold the fleece in half. Be sure that the stretch is horizontal and that the right sides are together. Center a round object (such as a roll of tape) that's approximately 4 inches in diameter and a plate on the fleece to create a snowman pattern. Trace around them with a pencil as shown, then remove the objects. Mark a point 3 inches up from the bottom on each side. These 3-inch marks are your starting and ending points for stitching.
2. Stitch along the pencil line from one 3-inch mark to the other (see dotted line). Use regular scissors to trim the fleece outside of the seam to approximately 1/2 inch from the stitched line (see red line). Do not trim below the 3-inch marks. If the fabric is scrunching up around the curves, smooth it by making tiny snips perpendicular to the seam around the curves. Use pinking shears to finish the bottom edge of the hat.
3. Turn the hat right side out and stitch the remaining 3 inches to the bottom on each side. Trim the excess fabric next to the seam, then turn up the brim.
4. Either stitch or draw on the mouth and eyes. To stitch: Being sure to go through only 1 layer, use black embroidery floss and a needle to stitch a mouth, as shown, and sew on black bead eyes. To draw: Use fabric paint or a fabric marker. Follow the directions on the product for prewashing.
5. Loosely stuff the snowman's head with fiberfill and hand-stitch to close off the neck. Knot the scarf around the snowman's neck. Snip the ends of the scarf to make fringe. Gently pull the fringe to curl it.
Glue the felt carrot nose in place. Glue or sew on the buttons. Let the glue dry for 24 hours.
Tips:
Laundry Instructions for hat:
- Place the hat in a pillowcase and knot the case closed.
- Wash in cold water on a gentle cycle with mild detergent.
- Lay the hat flat to dry.


