
For every blogger featuring your posts allows you to put your best contents in front or on top of your blog page, where your readers can see it more easily.
Featured posts are very helpful and it’s also a way to welcome your readers to your blog or highlight the important posts or announcements.
Benefits of featured posts widgets in Blogger
As Featured posts widgets allow you to feature your selected contents and more exposure, it has many benefits. Some of them are:
Your best and most important posts get more attention and attract your readers.
Search engine bots can easily access your best and important articles.
As feature posts widgets are generally placed on top. It easily allows your readers to easily read the article and this reduces the bounce rates.
More: How to create Automatic Table of Contents in Blogger
Features of Automatic Featured Posts Slider Widget
Featured posts slider is an advanced widget equipped with these features:
Author Avatar.
It displays your recent posts automatically.
It has Clickable Animated Featured Image Thumbnails
It can extract and display your recent posts dynamically from a specific category/label.
It has 2 animation effects, Slide & Fade.
It supports Third-party Images and YouTube Video thumbnails as well.
Clickable Comments Count
It has custom Date Format
You have the option to increase or decrease Image Resolution and gives you a quality image.
Title Length also adjustable. So
More: 9 Best Recent post widget for Blogger
How to Add Automatic Featured Posts in Blogger
Just follow the few simple steps and you will be done within no time.
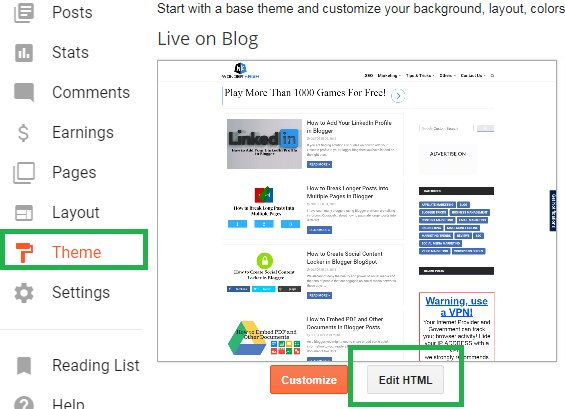
Step 1. Login to your Blogger blog, select Template/Theme and click on Edit HTML.
Step 2. Search for the </head> tag and paste the below JS & CSS source links just above the </head> tag.
Code
<script src='http://ajax.googleapis.com/ajax/libs/jquery/1/jquery.min.js' type='text/javascript'></script>
<link href='http://fortawesome.github.io/Font-Awesome/assets/font-awesome/css/font-awesome.css' rel='stylesheet'/>
<link href='http://fonts.googleapis.com/css?family=Oswald' rel='stylesheet' type='text/css'/>
<link href='https://cdnjs.cloudflare.com/ajax/libs/flexslider/2.6.1/flexslider.min.css' rel='stylesheet' type='text/css'/>
<script src='https://cdnjs.cloudflare.com/ajax/libs/flexslider/2.6.1/jquery.flexslider.min.js' type='text/javascript'></script>
Featured Posts Widget
Step 3. Now, search for ]]></b:skin> code and paste the below code just above the ]]></b:skin> code.
.mbt-s{margin:0 5px;border:0;width:100%;overflow:hidden}
.mbt-s .slides{list-style-type:none;margin:0 auto;padding:0}
.mbt-s li{color:#fff;font-family:helvetica;font-size:12px;overflow:hidden;padding-top:10px}
.mbt-s .flex-control-nav li{display:inline-block;margin:0 2px}
.mbt-s .flex-control-nav a{text-indent:9999px;display:block;width:10px;cursor:pointer;height:10px;background-color:#000;border:1px solid #000;border-radius:0!important}
.flex-direction-nav .flex-prev{left:-50px}
.flex-direction-nav .flex-next{right:-50px;text-align:right}
.mbt-s .flex-control-paging{display:none}
.flex-direction-nav{position:relative;top:-250px}
.mbt-s .flex-control-nav a.flex-active{background-color:#84db06;border:1px solid #90f128}
.mbt-s .flex-div{margin:0 auto;display:block;padding:0!important;position:relative;height:370px}
.mbt-s li a{color:#0080ff;text-decoration:none}
.mbt-s i{color:#999;padding-right:5px}
.mbt-s .iline{line-height:2em;margin:0;position:relative;top:-90px;background:#31363a;padding:3px 10px;display:inline-block}
.mbt-s .icontent{line-height:1.5em;margin-top:5px}
.mbt-s div span{margin:0 5px 0 0;display:inline-block;font-weight:400}
.mbt-s .mbttitle{font-family:oswald;font-size:20px;color:#ff0;font-weight:400;text-decoration:none;position:relative;top:-90px;background:#222;padding:15px 10px;display:block}
.mbt-s .mbttitle:hover,.mbt-s .itotal a:hover{color:#fff;text-decoration:none}
.mbt-s .iedit a{text-decoration:none;color:#999;cursor:pointer}
.mbt-s .iedit:before,.mbt-s .iauthor:before,.mbt-s .itag:before,.mbt-s .icomments:before,.mbt-s .idate:before,.mbt-s .itotal span:before{font-family:fontAwesome;position:relative;padding-right:8px;color:#fff}
.mbt-s .iauthorpic{width:17px!important;height:17px!important;border-radius:50%;float:none;display:inline-block!important;margin:0;padding-right:3px;position:relative;top:3px}
.mbt-s .iFeatured{overflow:hidden;position:relative;margin:0;padding:0;width:100%}
.mbt-s .iFeatured a{background:none;padding:0;display:block;border:0px solid #eee;margin:0 -1px}
.mbt-s .iFeatured img{height:305px!important;-moz-transition:all .3s;-webkit-transition:all .3s;transition:all .3s;border-radius:0;margin:0;padding:0;opacity:.7}
.mbt-s .iFeatured:hover img{opacity:1;-moz-transform:scale(1.4);-webkit-transform:scale(1.4);transform:scale(1.4)}
.mbt-s .icomments a{color:#0080ff;font-family:arial;font-size:12px}
.mbt-s .icomments a:hover{text-decoration:underline}
.mbt-s .icomments:before{content:'\f086';padding:0 3px 0 7px;color:#fff}
.mbt-s .idate{color:#fff;padding:3px 4px;font-family:arial;font-size:11px}
.mbt-s .idate:before{content:'\f073';padding:0 5px;color:#fff}
Customization
Change #222 in order to change the black background behind the title.
Change #ff0 in order to change the yellow color of the slide title font.
Change #0080ff in order to change the comment link color.
Change #fff in order to change the mouse hover color.
Step 4. Click on Save in order to save your settings.
More: How to create Social Content Locker in Blogger
Step 5. Now select Layout and click on Add a Gadget.

Step 6. Select HTML/JavaScript and paste the below code inside the empty space.

Code
<script type="text/javascript">
$(window).load(function() {
$('.mbt-s').flexslider({
animation: "slide",itemWidth: 600,itemMargin: 25,directionNav: true,touch: true,slideshowSpeed: 2500,pauseOnHover: true,animationSpeed: 700,});});</script>
<div class="flexslider mbt-s">
<ul class="slides">
<script type="text/javascript">
//################### Defaults
var ListBlogLink = "http://mybloggertricks.com";
var ListCount = 6;
var ListLabel = "Events";
var TitleCount = 66;
var ImageSize = 600;
//################### Function Start
function mbtslide(json) {
for (var i = 0; i < ListCount; i++)
{
//################### Variables Declared
var listing= ListImage = ListUrl = ListTitle = ListImage = ListContent = ListConten = ListAuthor = ListTag = ListDate = ListUpdate = ListComments = thumbUrl = TotalPosts = sk = AuthorPic= ListMonth = Y = D = M = m = YY = DD = MM = mm = TT = "";
//################### Category
if (json.feed.entry[i].category != null)
{
for (var k = 0; k < json.feed.entry[i].category.length; k++) {
ListTag += "<a href='"+ListBlogLink+"/search/label/"+json.feed.entry[i].category[k].term+"'>"+json.feed.entry[i].category[k].term+"</a>";
if(k < json.feed.entry[i].category.length-1)
{ ListTag += " ";}
}
}
//################### URL
for (var j = 0; j < json.feed.entry[i].link.length; j++) {
if (json.feed.entry[i].link[j].rel == 'alternate') {
break;
}
}
ListUrl= "'" + json.feed.entry[i].link[j].href + "'";
//################### Info
TotalPosts = json.feed.openSearch$totalResults.$t;
if (json.feed.entry[i].title!= null)
{
ListTitle= json.feed.entry[i].title.$t.substr(0, TitleCount);
}
if (json.feed.entry[i].thr$total)
{
ListComments= "<a href='"+json.feed.entry[i].link[j].href+"#comment-form'>"+json.feed.entry[i].thr$total.$t+"</a>";
}
ListAuthor= json.feed.entry[i].author[0].name.$t.split(" ");
ListAuthor=ListAuthor.slice(0, 1).join(" ");
AuthorPic = json.feed.entry[i].author[0].gd$image.src;
//################### Date Format
ListMonth= ["Jan", "Feb", "Mar", "Apr", "May", "Jun", "Jul", "Aug", "Sep", "Oct", "Nov", "Dec"];
ListDate= json.feed.entry[i].published.$t.substring(0,10);
Y = ListDate.substring(0, 4);
m = ListDate.substring(5, 7);
D = ListDate.substring(8, 10);
M = ListMonth[parseInt(m - 1)];
ListUpdate= json.feed.entry[i].updated.$t.substring(0, 16);
YY = ListUpdate.substring(0, 4);
mm = ListUpdate.substring(5, 7);
DD = ListUpdate.substring(8, 10);
TT = ListUpdate.substring(11, 16);
MM = ListMonth[parseInt(mm - 1)];
//################### Thumbnail Check
if (json.feed.entry[i].media$thumbnail)
{
thumbUrl = json.feed.entry[i].media$thumbnail.url;
sk= thumbUrl.replace("/s72-c/","/s"+ImageSize+"/");
ListImage= "'" + sk.replace("?imgmax=800","") + "'";
}
// YouTube scan
else if (json.feed.entry[i].content.$t.match(/youtube\.com.*(\?v=|\/embed\/)(.{11})/) != null)
{
var youtube_id = json.feed.entry[i].content.$t.match(/youtube\.com.*(\?v=|\/embed\/)(.{11})/).pop();
if (youtube_id.length == 11) {
var ListImage = "'//img.youtube.com/vi/"+youtube_id+"/0.jpg'";
}
}
else if (json.feed.entry[i].content.$t.match(/src=(.+?[\.jpg|\.gif|\.png]")/) != null)
{
// Support For 3rd Party Images
ListImage = json.feed.entry[i].content.$t.match(/src=(.+?[\.jpg|\.gif|\.png]")/)[1];
}
else
{
ListImage= "'https://blogger.googleusercontent.com/img/b/R29vZ2xl/AVvXsEjefOHnbRw9XQO1i0_ZMWxMJMG6SfZOk8jJMjj6bTjPLvuHwzatUMUMmWo6GjP0QPfIKCmxcsJihIz4FBOZWcOKTed5gfe9cXKAQ7SSsMwR7Aoyd0ypVC0OeXE9IPFqZZCKe5J9iM_MFlY/s200/Icon.png'";
}
//################### Printing List
var listing = "<li><div class='flex-div'><div class='iFeatured'><a href="
+ ListUrl+
"><img src="
+ListImage+
"/></a></div><div class='iline'><span class='iauthor'><img class='iauthorpic' src='"+AuthorPic+"'/>"
+ListAuthor+
"</span><span class='icomments'>"
+ListComments +
"</span> <span class='idate'>"
+ D +
" "
+ M +
"</span></div><a class='mbttitle' href="
+ListUrl+
"target='_blank'>"
+ListTitle+
"</a></div></li>";
document.write(listing);
} }
<!-- #### Invoking the Callback Function #### -->
document.write("<script src='"+ListBlogLink+"/feeds/posts/default/-/"+ListLabel+"?alt=json-in-script&callback=mbtslide'></"+"script>");
</script>
</ul></div>
Customization
You can change the below option so to enhance or Featured Post widget slider.
animation: You can select two values here. "slide" or "fade"
slideshowSpeed: You can set the speed of the slideshow cycling, in milliseconds
animationSpeed: You can also set the speed of animations, in milliseconds
pauseOnHover: Pause the slideshow when hovering over the slider, then resume when no longer hovering
If you don't want to use the title then delete the yellow highlighted code.
ListBlogLink: Insert your Blog URL here
ListCount: Decide how many posts do you wish to display.
ListLabel: Insert your blog label here. Remember that labels are case sensitive. Therefore type it exactly as it is shown in your browser address bar.
TitleCount: Choose how many characters to display in slide title.
ImageSize: You can control the resolution or aspect ratio of thumbnails by editing ImageSize = 600; where the value 600 means that you want your images to be within 600 x 600 pixels in dimension.
/-/"+ListLabel+" Delete this line if you wish to display the latest posts of your blog without mentioning a label.
Step 7. Click on Save and that’s it.
Now view your blog.
Conclusion for Automatic Featured Post Widget for Blogger
The above scripts and codes have been taken from My Blogger Tricks. And if this tutorial has helped you or found any difficulties adding the scripts. You may leave a comment below.
Also, don’t forget to thank My Blogger Tricks for creating such a great tutorial.
Blogger , Tips and Tricks


