Total Time Needed: 2-3 Hours
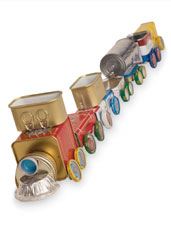
Don't let looks fool you. Assembling a shiny freewheeling toy train like this one is a cinch - the pieces are simply stuck or clipped together. Chances are, most of the parts you'll need for this model-making project are ready and waiting in your recycling bin.
Materials
- Double-sided foam tape
- An assortment of small, clean metal tins and cans (such as spice or tea tins and sardine cans)
- Disposable mini tart pan (for making the cowcatcher)
- Hammer and nail
- Bottle caps (for each car, you'll need 4 that are about 1½ inches in diameter, like the type you find on juice and iced tea bottles, and 4 that are small enough to fit inside them, such as the type on soda bottles)
- Metal washers (1 inch in diameter)
- Paper clips
- Duct tape
- Small bulldog clips
- Small suction cup hooks
Instructions
1. Using pieces of double-sided foam tape, stick together assorted cans to create an engine and several cargo cars. For example, the engine pictured here was fashioned from a tea tin set on its side with smaller tins taped to the top and front. A twist-off bottle cap was added for a headlight, and a disposable mini tart pan folded in half and turned upside down was taped in place to serve as a cowcatcher.
2. Attach 2 sets of wheels to each car. First, use a hammer and nail to make a hole in the center of each bottle cap (A); you'll need a larger and a smaller cap to make each wheel. Using small squares of double-sided tape, stick metal washers to the sides of the cars where the wheels will go, making sure that the washer holes remain uncovered (B).
3. For each axle, straighten one end of a paper clip and thread it through the washer hole. Slip on a larger bottle cap (inside facing out), followed by a smaller cap (inside facing in), and bend the tip of the paper clip to hold them on (C). Now duct-tape the opposite end of the paper clip to the bottom of your car, positioning it so that the wheel turns freely.
4. To connect the finished cars, simply attach a bulldog clip to the back of each one and a suction cup hook to the front, then hook them together (D).
Crafts


