Total Time Needed: Afternoon Or Evening
What's the most popular costume among girl tricksters under the age of seven? When we asked, we heard many a vision filled with fairy dust and brightly colored flowers. "I want my costume to have jingly bells that I can flap," said Taylor, age six. "And a crown of pink flowers," added Amelia, five.
Materials
- Pipe cleaners
- Hot-glue gun
- Artificial flowers (we purchased several bunches and pulled off the flowers and leaves)
- 3 fabric or feather butterflies (available at fabric stores)
- 7-inch piece of 20-gauge wire
- Package of jingle bells
- Four 27-inch lengths of ribbon
- One 3/8-inch dowel, cut to an 18-inch length
- Acrylic paint and paintbrush
- Tape measure
- Scissors
- Large safety pins
- Cardboard for templates
- 1/2 yard each of purple and pink satin or other shiny fabric
- 1/3 yard of green satin or other shiny fabric
- Sparkly fabric paint (we used Scribbles Dimensional) and paintbrush
- Straight pins (optional)
- Needle and thread
- 1 yard of 1/2-inch-wide non-roll waistband elastic
- Wings (we used Disguise sheer fabric wings, sold in party supply stores)
Instructions
1. A Jingly Crown:
Make a ring from 2 pipe cleaners to fit your child's head, overlapping and twisting the ends. To strengthen the crown, wrap 2 more pipe cleaners around the ring. Using the hot-glue gun, attach flowers and leaves to the top and sides of the crown.
Attach a butterfly to one end of the wire and wrap the other end around the crown, securing it with glue. Use 2 of the ribbons to tie a cluster of bells to the crown.
2. Wand:
Paint the dowel with the acrylic paint and let it dry. Tie the remaining ribbons to the top of the dowel, glue on flowers and leaves, and tie on the bells.
3. Butterfly Ring and Pin:
To make a ring, glue a butterfly to the middle of a 4-inch length of pipe cleaner. Coil the pipe cleaner around the Fairy's finger. For a pin, glue a butterfly to a safety pin.
4. A Flowery Skirt, part 1:
Make cardboard templates for the flower petals and leaves using the dimensions shown (A).
If you have a tall Flower Fairy, you may need to lengthen the petals. Create a row of petals on both the purple and the pink satin by repeatedly tracing around the template so that the edges of the adjacent petals are touching as shown in B, below.
The final length of each row should be approximately 2 1/2 times your child's waist measurement. Use the leaf template to create a similar row of leaves on the green satin. (To make a gathered skirt with a 21-inch waist, we ended up with 8 petals each in the pink and purple rows and 12 leaves in the green row.)
5. A Flowery Skirt, part 2:
Paint a 1/2-inch-wide line over each tracing line with the fabric paint and let dry. Cut out the petals and leaves using the tracing lines as a guide, being sure to leave the top 2 1/2 inches between the petals/leaves uncut, as shown (B).
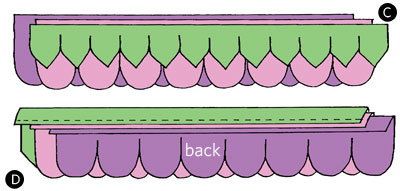
6. Next, arrange the layers for the skirt as shown (C).
Line up all the edges at the top and fold over about 1 1/4 inches of the layered fabric, making a casing, as shown (D).
You may want to use straight pins to hold the fabric in place. With a double-threaded needle, sew a running stitch along the bottom of the casing. Attach a safety pin to one end of the elastic and thread it through the casing, gathering the skirt as you go. Tie the elastic in a knot, trimming the ends if needed, and even out the gathers around the elastic.
Complete the ensemble with the leotard, tights, and wings.
Crafts


