
Homemade croissants – the sort of treat I never would have envisioned making in my kitchen a few years ago but now I can say I’ve done it!! And oddly, now that I’ve made them, I find myself wondering why I didn’t do it sooner. These croissants are perfection – buttery, flaky, just a bit crisp on the outside but yielding to a wonderfully soft interior. The only thing that could improve them would be chocolate and that is next up on the list!

I actually made these last week while house sitting for my in-laws because they have lots of wonderful, uncluttered, usable counter space. My kitchen is fairly large, but doesn’t have much counter space, so a project like this would be a bit challenging (especially since I don’t always work neatly). This recipe is long and there are a lot of steps, but I promise it’s really not very difficult if you take your time and read the instructions carefully. The end result is SO worth the effort. I’ve never made a laminated dough before so I have no basis for comparison, but this dough was wonderful to work with – very silky and smooth and it rolled out beautifully. The only thing I found challenging about the recipe was trying to pound 3 and a half sticks of butter into an 8-inch square. Eventually, it did cooperate somewhat (you’ll see in the pictures that my square is far from perfect) – I found that once I got going and the butter became malleable it got easier, so don’t be too frustrated if it seems impossible at first.
By Tracey
Croissant Dough
from Baking, by James Peterson
Ingredients:
- 3 1/2 cups all-purpose flour
- 1 cup barely warm water
- 1 teaspoon active dry yeast
- 1/3 cup heavy cream
- 1 teaspoon salt
- 1 3/4 cups cold unsalted butter (3 1/2 sticks)
Directions:
In a medium bowl, mix 1 cup of the flour with the water and yeast just until the lumps of flour are broken up. Set the bowl aside and let rise for 1 hour. (I couldn’t see a noticeable rise in mine after an hour but there were bubbles all over the surface.)
Add the remaining flour, the cream and salt and knead the mixture for 1 minute. Cover the bowl with plastic wrap and let rest for 20 minutes.
Knead the mixture by hand for 10 minutes or in a stand mixer fitted with the dough hook (on low speed) for about 20 minutes. The dough should be smooth and elastic by the time you finish kneading. (I kneaded mine with the mixer and it was a breeze. I did give the mixer a brief 2 minute rest after 10 minutes out of an abundance of caution to make sure it didn’t overheat, but the motor never got very warm so it probably wasn’t necessary. The dough is silky and smooth and just gorgeous after it’s been kneaded.) Wrap the dough in plastic wrap and refrigerate for 30 minutes.
Place the butter between two sheets of plastic wrap and using a rolling pin, pound the butter into an 8-inch square.

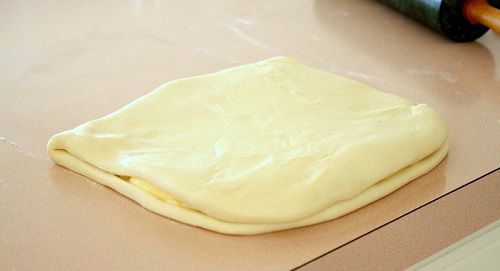
Remove the dough from the refrigerator and on a lightly floured surface, roll it into a 9 x 17-inch rectangle. Place the square of butter on the bottom half of the rectangle. You can use your hands to align the dough and the sides of the butter square.

Fold the top half of the rectangle of dough down over the bottom half so the square of butter is now enclosed. Press together the edges of the square to seal in the butter. Use your hands to even out the square. (You can see my butter peeking out here if you look closely on the side – I hadn’t yet sealed it in.)
Gently pound the square with a rolling pin to stretch the dough and the butter in it. Roll the dough into a 9 x 18-inch rectangle. Next, you want to fold the rectangle into thirds like a letter – start with a narrow end facing you. I began by folding the bottom third up.

Then folded the top third down… You’ve now completed one “turn!”

Turn the dough so the single fold (like the spine of a book) is on your left.

You’re now ready to start the second turn. Repeat the process shown above of rolling the dough into a 9 x 18-inch rectangle, then folding the rectangle into thirds by bringing the bottom up and the top down over it. Use your fingers to make two imprints on the dough to keep track of the fact that you’ve completed two turns.

Wrap the dough in plastic wrap and refrigerate for at least 1 hour. Once the dough has been refrigerated, remove it and complete two more “turns” – for a total of four turns in all. At this point, the dough is ready to be rolled out and used. Alternatively, you can wrap in plastic and refrigerate it for up to 24 hours before you shape and proof (in fact, the recipe notes that 12-24 hours in the fridge before proofing improves the flavor of the dough).
Before you begin to shape the dough, line two large baking sheets with parchment. Also, make sure you have a ruler handy. Cut the dough in half. (I took a photo of the dough at this point because I was amazed by all of the layers you could see!)

On a lightly floured surface, roll each half of the dough into a 6 1/2 x 20-inch rectangle. (You can trim the edges of the dough if they’re ragged or really uneven.) The dough will be about 1/8 – 1/4-inch thick and look something like this:

Transfer each large rectangle onto one of the prepared baking sheets and refrigerate for about 20 minutes. You want the dough firm, but not brittle.
When the first rectangle is ready to work with, transfer it back to your work surface with one of the long ends facing you. The next step is to cut the triangles from the dough that will be formed into individual croissants. Starting on the left side of the bottom edge of the rectangle, measure 5 inches from the end and make a tiny notch to mark the base of the first triangle. Measure another 5 inches from that notch and make a second notch to mark the base of the second triangle. Finally, repeat one more time – measure another 5 inches and make a notch. You should now have marked off four 5-inch sections. (Sorry, looks like I didn’t get a picture until I had cut the triangles. I actually think it might be easier to skip ahead and look at that photo to get an idea of the finished product before you read through the next two paragraphs. It sounds a lot more difficult than it is and knowing what the end result looks like gives the written instructions context.)
Turn the rectangle 180 degrees so the opposite long side (the one that hasn’t been notched) is facing you. Starting on the left side, make a notch 2 1/2 inches from the end. Measure 5 inches from the first notch and make a second notch. Measure another 5 inches from the second notch, make a third notch and finally, measure 5 inches from the third notch and make your final notch. This second side of the triangle should now be marked into 5 sections – the 2 sections at the ends will each be 2 1/2 long and the ones in the middle 5 inches long.
You’re ready to cut the triangles which will form the croissants now. Leave the rectangle as is – so the second side you notched is closest to you. The notches on the far side are for the bases of the triangles and the notches on the near side form the tips of the triangles. Use a large knife to cut the triangles by connecting the notches on the near and far sides. You should end up with 6 full triangles, each 5 by 6 1/2-inches, as well as some trimmings on the ends. I took this photo just after I’d cut the triangles. (I followed the process exactly as outlined above so you can work backward from this photo if you’re at all confused. )

Repeat the process above with your second rectangle so you have a total of 12 triangles. Make a small slit in the base of the center of each triangle.

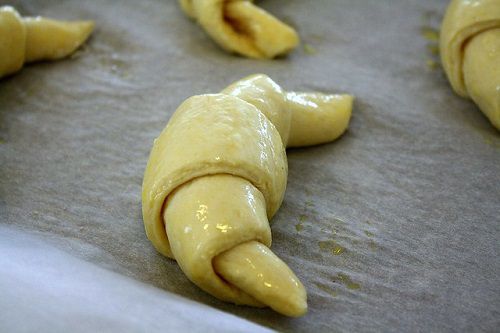
Begin to roll the triangles to form the croissants by curling the two sides of the triangle on each side of the slit away from each other. You want to roll tightly.

Using both hands, continue to roll the base of the triangle – one hand working with the dough on each side of the slit. Point your hands away from each other – at about 45 degree angles from center – as you roll. Rolling in this manner will help make the classic croissant shape. (If I’d had a second person, I’d have taken a shot with my hands actually on the dough but I think you get the idea.)

Roll each triangle so the tip is underneath and then bend the 2 ends toward each other to form a shape like a little crab. Hopefully you can see 3 distinct layers as the dough curls to form the croissant. Arrange the croissants on a sheet pan and cover them with plastic wrap to proof.

You have several options for proofing: overnight in the fridge, ~3 hours in a cool place or ~1 hour in a warm place. The book indicates that overnight proofing is best because the croissants develop more flavor thanks to the slow rising time. (I proofed mine overnight in the fridge and then took them out in the morning and let them sit at room temperature for a few hours before baking.)

(I didn’t notice a huge difference in the size of my croissants after they’d proofed. They looked slightly more puffy so I baked them and luckily it all worked out. If you compare the photos directly above and below this paragraph to the one showing the croissants from the night before you may be able to discern a slight difference in size too.)
Preheat the oven to 375 F. Adjust your oven racks so one is in the top third and one is in the bottom third of the oven. Combine 1 egg with a splash of cream to form an egg wash and brush the proofed croissants. Bake for about 35 minutes, or until the croissants are puffed and golden brown. Remove them to a wire rack to cool to room temperature before serving.


