Total Time 1 hour Ages school-age
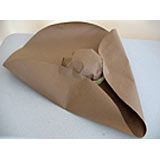
Among Captain Sparrow's most prized possessions, his hat places second only to his trusty compass. It's no wonder then, that he spends so much time trying to find a suitable replacement after Barbossa's pet monkey throws the tricorn overboard and it is eaten by Davy Jones' sea monster, the Kraken. Fortunately, in the end, Jack gets his hat back when the Kraken regurgitates it. After shaking off the slime, he fits it right back on his head, none the worse for wear. With little more than brown packing paper and paint, and some help from you, your child can sport a fashionable faux leather tricorn of his own.
by Cindy Littlefield
What you'll need
- Heavyweight brown packing paper
- Scissors
- Medium-size mixing bowl
- Masking tape
- Glue stick or glue dots
- Large-eye sewing needle
- Black embroidery floss or thin string
- Tape
- Small container (for mixing paint and water)
- Brown acrylic paint
- Water
- Sponge
- Hair dryer
How to make it
1. Cut two circles from the packing paper, one 14 inches in diameter (for the cap portion of the hat) and another 26 inches in diameter (for the brim).
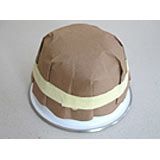
2. To create the cap, invert the mixing bowl and place the 14-inch circle on top of it. Use your hands to mold the paper around the bowl, overlapping and creasing it along the circumference as needed. Tightly wrap masking tape around the molded cap about an inch from the bottom (it's helpful if you have someone else hold the paper against the bowl while you do this).
3. Center the cap on top of the brim circle and trace around it. Remove the cap and cut the traced circle from the center of the brim circle and discard it. At this point, the brim should look like a giant donut.
4. Make a series of snips in the lower edge of the cap (below the tape), and fold up the tabs, as shown.
5. Set the cap on a tabletop and apply glue to the tops of the tabs. Pull the brim down over the cap and press the edge of the inner circle firmly down on the tabs to stick the two hat pieces together.
6. Thread a length of embroidery floss or thin string through the needle.
7. Fold the hat brim up against the left and right sides of the cap so that the edges come together to form a long point (the first of the three corners) directly in front of the hat.
8. Tack the upper edge of the folded brim to each side of the cap with a couple of stitches, as shown, knotting the thread ends together inside the cap and trimming them short. Cover each knot with a piece of tape.
9. Fold the remaining portion of the brim up against the back of the cap to form the other two corners. Again, stitch the upper edge to the cap.
10. Now it's time for the fun part — giving your pirate hat the look of weathered leather. First, mix brown acrylic paint with enough water to make it runny. Then, working on a newspaper-covered surface, use a damp sponge to rub paint onto the surface of the hat, as if you were polishing shoes. The paper should become fairly limp and wrinkly in the process. Don't worry about applying an even coat of paint; the hat will look even better if it's a bit blotchy.
11. When you've finished coloring the hat, use the hair dryer to dry it, stopping periodically to gently pinch the hat corners together and to curl the edges of the brim in a few places.
Crafts


