
Total Time 1 to 2 hours Ages 5 to 8
This playful tabletop Mickey scarecrow may be ear-ry, but don't count on it to keep the birds at bay. In fact, you're likely to find young Mickey fans quickly flocking around it.
Note: The scarecrow shown here was made with a 6-inch-wide bag. For a smaller bag, you will have to reduce the page size of the template accordingly before printing. For example, print the template at 85 percent or so for a 5-inch-wide bag.
Download Mickey's Paper Bag Scarecrow Template
by Cindy Littlefield
What you'll need
- Template for Mickey Paper Bag Scarecrow
- Scissors
- Craft paper (black, white, red, pink, orange, and yellow)
- Brown paper lunch bag *
- Glue stick
- Glue dots
- Black permanent marker
- Pencil
- Brown colored pencil
- Rafia
How to make it
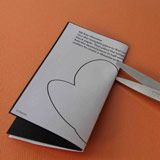
1. Print the template. Use the Mickey stencil piece as a pattern for first cutting out a rectangle from black paper. Then, with the template piece atop the black cutout, fold the two layers in half vertically, as shown, and cut along the face outline to create a Mickey stencil.

2. Glue the stencil to the lower face of the brown paper lunch bag, as shown.
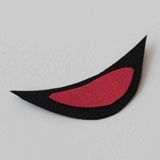
3. Use the remaining template pieces as patterns for cutting the shapes from the specified colors of paper. Glue the tongue atop the mouth, and use the black marker to color pupils on the eye pieces (as shown on the template).

4. Glue the eyes, nose, and mouth to the bag, positioning them on the face as shown. Pencil grin lines on both sides of the mouth and a curved line immediately below the eyes, as shown. Trace over the pencil lines with black marker.

5. Fold down the top of the bag (just above the stencil) and use glue dots to attach the ears to the upper corners of the head, as shown. Next, draw a dotted line down the center of Mickey's face to simulate scarecrow stitching.

6. Glue the hatband to one of the hat pieces. Pencil a couple crosshatching patches on the hat to simulate the texture of a straw hat. You can also add dimension by using a colored pencil to shade the hat along the outer edge and just above and below the hatband.

7. Fold the mini colored leaves in half to create a center crease that will make them look more dimensional. Then stick the leaves to the hatband.
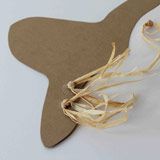
8. Snip raffia into a bunch of 3- or 4-inch lengths. Divide the lengths into small groups, knotting the strands together in the center. Then use glue dots to stick them to the back side of the brim, as shown.

9. Use a couple of glue dots to stick the second hat piece to the back of the first one just along the top edge and at one end of the brim. Leave the opposite end of the brim and both sides (between the hat top and brim ends) open for Mickey's ears to fit through.

10. Fit the hat over the bag top, as shown, and then glue the open end of the brim together to hold the hat in place. Gently pull open the lower portion of the bag so the bottom is flat, and your Mickey scarecrow decoration is ready to display on a tabletop or windowsill.
More Mickey Crafts:
Crafts


