
Ages 5 to 8
What does a princess-to-be do when she misses her ride to the ball? Stand back and make way for some special magic, courtesy of her fairy godmother. Made from paper and embroidery floss, this majestic pair of coach horses is inspired by a couple of fairy tale mice and the quick wave of a magic wand.
More Horse Crafts:
Courageous Khan Paper Horse Craft
Download Cinderella's Magical Paper Coach Horses Template
by Cindy Littlefield
What you'll need
- Cinderella's Magical Paper Coach Horses Template
- Scissors
- Pencil
- White heavy cardstock *
- Gray colored pencil
- Craft paint (dark gray and blue gray)
- Fine-tipped black marker
- Glitter glue (optional)
- Glue sealer (such as Mod Podge) and medium-size paintbrush or foam brush
- Off-white and silver embroidery floss (a mix of cotton and shiny rayon floss looks especially nice)
- Glue dots
- Pink craft feathers (or paper feathers)
- Pinch-style clothespins (for holding the glued pieces together)
- 2 paper clips
- Pliers
- Good quality glue stick or tacky glue
- Gold or yellow craft paper
- Yellow faux gems
Notes:
Ideas for creating a scene for Cinderella's Coach Horses:
- For the ground, use a tile floor or patio stones to simulate a castle courtyard. Or, cover a tabletop with stone-motif craft paper.
- For a background, tape sparkly craft paper to a sheet of cardboard propped upright. Or, drape sparkly tulle material over the cardboard.
- For a coach, use a silver foam pumpkin. Or, spray or sponge nontoxic silver craft paint on an orange foam pumpkin.
How to make it
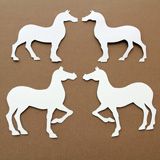
1. Print and cut out the template, and then trace it onto a sheet of cardstock. Flip the template over and trace it onto a second sheet of cardstock. Cut out the tracings and use one for the front of the horse and the other for the back.
2. Using the template as a guide, draw the detail lines and facial features on both the front and back horse pieces with a gray colored pencil.
Tip: To make it easier, you can place the template on top and use a regular pencil to draw over the lines using enough pressure to leave a light imprint on the horse pieces. Then you can go over the imprints with the colored pencil.

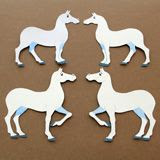
3. Paint the hooves and the nostrils dark gray (don't forget to paint both the front and back horse pieces). Paint the shading on the legs blue gray, as shown.
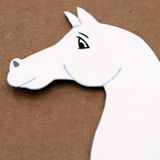
4. Use black marker to outline the eyes and eyebrows and to fill in the pupils. If you like, once the paint is dry you can embellish the horses by brushing on a few patches of glitter glue.
5. Coat both of the painted horse pieces with glue sealer and allow them to dry thoroughly. This will protect the paint and keep the pencil lines from smudging.
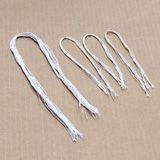
6. For the tail, gather a dozen or so 12-inch pieces of embroidery floss in a bunch and tie another piece tightly around the middle. Then unravel the strands to make the tail fuller. For the mane, cut a bunch of 8-inch lengths of embroidery floss and divide them into groups of 4 or 5 strands. Tie each group and unravel the strands, as you did the tail. You'll need 13 or so groups to complete the mane and forelock.
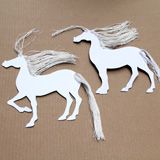
7. Place the back horse piece painted side down. Use a glue dot to attach the top of the tail to the rump, positioning it as shown. Then apply glue dots along the upper neck and attach mane sections, placing them close together until you reach the ears. For the forelock, position one of the mane sections at the base of the ears, as shown, and then pull the floss strands between the ears.
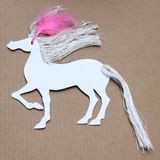
8. Attach a pink craft feather to the neck between the top of the mane and the forelock.

9. Now it's time to create a pair of stands so the finished horse can be set upright. For each stand, use pliers to bend the curved portion in the center of a paper clip so that it sticks straight up, as shown. The short end of the clip will be the front of the stand and the long end will be the back.

10. To attach the stands to the horse, first place the back horse piece (the one with the mane and tail attached) painted side down on a tabletop or cutting board so that the hooves are at the edge. Wrap a glue dot around the upright portion of each paperclip stand. Attach one stand to the right hind hoof and the other to the right front, as shown.
11. Now you're ready to join the two horse halves. Brush an even coat of tacky glue on the inner back piece, going right over the knotted portions of the tail and mane sections as well as around the attached portions of the paperclip stands. Don't forget the tips of the ears.

12. Set the front horse piece in place on top of the glued back piece, carefully matching up all of the edges. Press the two halves together firmly, using pinch-style clothespins to hold the layers together wherever needed until the glue dries.
13. Remove the clothespins and trim the mane to about 3.25 inches long, the forelock to about 1 inch long, and the tail to about 4 inches long.
14. Stand the horse up. Ideally the front and back of each paper clip should rest on the tabletop. If not, you may need to adjust one or both of the stands. To do so, firmly pinch the lower leg and hoof between your fingertips to stabilize the leg while gently leveling the bottom of the stand. It might take a couple of tries to get it right, but you shouldn't have to move the clip too much. If all else fails, you can simply use a rolled piece of masking tape to stick the back of the stand to the tabletop.
15. For each of the coach horse's harnesses, cut two long strips of gold or yellow craft paper. Wrap the strips around the chest and stomach and use glue dots to hold them in place. For the finishing sparkly touch, decorate the harness with faux gems.
Crafts


