
Ages 5 to 8
As chief guard horse of the Kingdom of Corona, Maximus is tenacious. Nothing will deter him from apprehending the fugitive Flynn Rider -- at least not until Rapunzel appeals to his compassion. It's her birthday, and rather than ruin her day, he agrees to postpone his mission. In the end, he and Flynn team up for the greater good -- completing a journey that leads the tower-bound princess back to her royal parents. Here's how to make a paper model of this virtuous equine.
* If you don't have heavy cardstock, you can glue craft paper onto a file folder or thin cardboard, such as the front or back panel of a cereal box.
Ideas for creating a scene for Maximus:
- For the ground, use a faux grass hobby mat, green craft paper, or wrapping paper.
- For a background, tape an enlarged nature photo, a drawing, or a poster to a sheet of cardboard propped upright.
- For a tower, roll a faux stone hobby mat into a cylinder and fasten it with binder clips. Or, glue a stone-motif craft paper onto poster board and then roll the poster board into a cylinder.
- For Rapunzel's hair, drape yellow wool or unraveled yarn over the top of the tower.
Download Amazing Maximus Paper Horse Template
by Cindy Littlefield
What you'll need
- Template for Amazing Maximus Paper Horse
- Scissors
- Pencil
- 2 sheets white or off-white heavy cardstock *
- Gray colored pencil
- Craft paint (brown, pink, dark gray, and light gray)
- Small paintbrush
- Small piece of a soft sponge (a synthetic craft sponge works especially well)
- Fine-tipped black permanent marker
- Glue sealer (such as Mod Podge) and medium-size paintbrush or foam brush
- Off-white cotton yarn (medium-weight multi-ply yarn works especially well)
- Glue dots
- Pinch-style clothespins (for holding the glued pieces together)
- 2 paper clips
- Pliers
- Tacky glue
How to make it
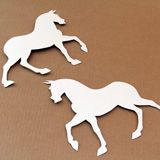
1. Print and cut out the template, and then trace it onto a sheet of cardstock. Flip the template over and trace it onto a second sheet of cardstock. Cut out the tracings and use one for the front of the horse and the other for the back.
2. Using the template as a guide, draw the detail lines and facial features on both the front and back horse pieces with a gray colored pencil.
Tip: To make it easier, you can place the template on top and use a regular pencil to draw over the lines using enough pressure to leave a light imprint on the horse pieces. Then you can go over the imprints with the gray colored pencil.
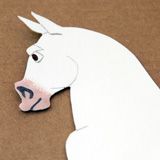
3. Swirl a little bit of brown paint into some pink paint. Use a small piece of sponge to blot the paint onto the muzzle as shown (don't forget to paint both the front and back horse pieces). When the paint is dry, retrace the nostril and mouth lines with the colored pencil or dark gray paint. For the eyes, paint each iris brown and then use the black marker to draw on small round pupils.
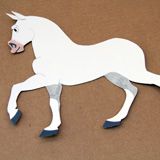
4. Paint the hooves dark gray. Then use light gray paint to shade the upper portions of the far legs, as shown. (Again, don't forget to paint both the front and back horse pieces).

5. Coat both of the painted horse pieces with glue sealer and allow them to dry thoroughly. This will protect the paint and keep the pencil lines from smudging.

6. For the tail, gather ten 12-inch pieces of cotton yarn in a bunch and tie another piece tightly around the middle. Then unravel the individual strands to make the tail fuller. For the mane, cut a bunch of 6-inch lengths of cotton yarn and divide them into groups of 3 or 4 strands. Tie each group and unravel the strands, as you did the tail. You'll need six or so groups to complete the mane and forelock.

7. For the tail, gather ten 12-inch pieces of cotton yarn in a bunch and tie another piece tightly around the middle. Then unravel the individual strands to make the tail fuller. For the mane, cut a bunch of 6-inch lengths of cotton yarn and divide them into groups of 3 or 4 strands. Tie each group and unravel the strands, as you did the tail. You'll need six or so groups to complete the mane and forelock.

8. Now it's time to create a pair of stands so you'll be able to set the finished horse upright. For each stand, use pliers to bend the curved portion in the center of a paper clip so that it sticks straight up, as shown. The short end of the clip will be the front of the stand and the long end will be the back.
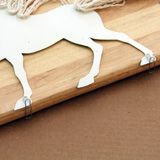
9. To attach the stands to the horse, first place the back horse piece (the one with the mane and tail attached) painted side down on a tabletop or cutting board so that the hooves are at the edge. Wrap a glue dot around the upright portion of each paperclip stand. Attach one stand to the right hind hoof and the other to the right front hoof, as shown.
10. Now you're ready to join the two horse halves. Brush an even coat of tacky glue on the inner back piece, going right over the knotted portions of the tail and mane sections as well as around the attached portions of the paperclip stands. Don't forget the tips of the ears.
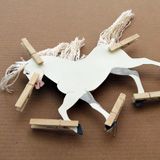
11. Set the front horse piece in place on top of the glued back piece, carefully matching up all of the edges. Press the two halves together firmly, using pinch-style clothespins to hold the layers together wherever needed until the glue dries.
12. Remove the clothespins and trim the mane to about 2 inches long, the forelock to about 1 inch long, and the tail to about 4 inches long.
13. Stand the horse up. Ideally, the front and back of each paper clip should rest on the tabletop. If not, you may need to adjust one or both of the stands. To do so, firmly pinch the lower leg and hoof between your fingertips to stabilize the leg while gently leveling the bottom of the stand. It might take a couple of tries to get it right, but you shouldn't have to move the clip too much. If all else fails, you can simply use a rolled piece of masking tape to stick the back of the stand to the tabletop.
See more crafts:
Courageous Khan Paper Horse Craft
Crafts


