
Ages school-age
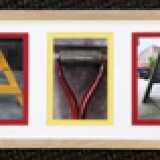
This project makes a great learning tool for young kids and a fun keepsake for older ones. To highlight the ABC's for new readers, we've put vellum over each photo, then used a paint pen to trace the letter underneath. Here's how to make our 5- by 7-inch book; the dimensions are easily adjusted to suit your pictures.
What you'll need
- Letter photos
- Acid-free glue stick
- Colored card stock
- Vellum
- Black card stock
- Rule
- Plastic knife
- Hole punch
- Ribbon or string
- Paint pen
How to make it
1. Trim the photos into 4-inch squares. Use the glue stick to mat them on pieces of colored card stock cut into 4 1/2-inch squares.
2. Cut the vellum into 4 3/4- by 6 3/4-inch rectangles, and the black card stock into 5- by 7-inch rectangles.
3. To make each page, glue a matted photo on a piece of black card stock, leaving a wide margin on the left edge. (For our cover, we glued on small matted shots, 1 3/4 inches square.)
4. Use a ruler and a plastic knife to score the card stock pages an inch inside the left edge, then stack them in order, slipping a sheet of vellum between each page.
5. Working a few pages at a time, use a hole punch to make four holes an inch apart, about 1/2 inch from the left edge. Bind the book with ribbon or string as shown and tie the ends in a bow.
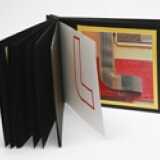
6. Carefully outline the letters on the vellum overlays with a paint pen and let dry.
Crafts


