
It was a slippery downhill slope for Wheezy the penguin once his squeaker was broken. After being shelved, he was set curbside to be sold in Andy's mom's yard sale. Luckily Woody, with help from Andy's dog Buster, retrieved the unfortunate little seabird before being whisked away himself by the unscrupulous owner of Al's Toy Barn. It all turned out well in the end though with Woody being rescued by Buzz and Wheezy getting his squeak back. Made in Wheezy's likeness, this chubby little penguin pal will be right at home perched on your child's nightstand or bedroom windowsill.
Download Wheezy the Bean Bag Penguin Template
by Cindy Littlefield
What you'll need
- Template for Bean Bag Penguin
- Scissors
- Felt (black, white, and yellow)
- Hot glue gun
- Kitchen funnel
- Dried beans or peas
- Googly eyes
- Thin red ribbon
How to make it
1. Print out the template and use the pieces to cut two body shapes and two wings out of black felt, a chest/belly out of white felt, and two pairs of feet and a beak out of yellow felt.
2. Glue the chest/belly in place atop one of the body pieces. Then place that body shape atop the other one and glue the edges together all the way around leaving just the top of the head open.
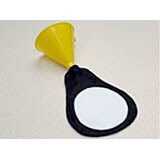
3. Use the funnel to fill the body with dried beans or peas, as shown. Then glue the top of the head closed.

4. Fold the beak in half and cut a mouth notch through the fold, as shown.

5. Apply a couple drops of glue to the inner fold to secure the crease, and then glue the beak onto the body. Glue on the googly eyes.
6. Stack the two pairs of feet and glue them together to double the thickness. Then glue the feet to the bottom of the body.
7. Attach the wings by gluing the base (the straight edge) of each one to the back of the body so that the tips extend about 3 1/2 inches beyond the sides of the body.
8. For the finishing touch, shape the ribbon into a small bow tie and glue it onto the chest.
Crafts


