
Total Time 30 minutes or less Ages school-age
Inspired by: Bambi
Ever since he was a wee bunny, Thumper made his share of blunders, starting with his proclamation that the newborn prince Bambi was "kinda wobbly." Still, it was thanks to the encouragement of this precocious, foot stomping critter that the young fawn eventually gained his footing -- and learned to speak. Using the classic paper rolling technique of quilling, you and your child can round up a rabbit in Thumper's likeness to convey a personalized Easter greeting to someone special.
by Cindy Littlefield
What you'll need
- Note card or cardstock folded into a card
- Construction paper or other lightweight colored paper
- Scissors
- Craft scissors (optional)
- White glue or glue stick
- Paintbrush with a thin handle or wooden kitchen skewer
- Toothpick
- Colored pencil
How to make it
1. First, create a simple landscape scene on the note card by cutting grassy hills and/or patches of garden soil from the colored paper and gluing them in place. Or, have your child draw or color a scene.
2. Now you're ready to start quilling. To create the rabbit, begin by cutting strips from the colored paper that measure 1/4-inch wide and about 12 inches long. You'll need 5 gray or brown ones, 3 white or tan ones, and 2 pink ones.

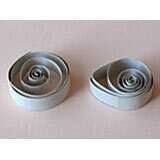
3. Glue the ends of 2 gray or brown strips together to form a single extra long strip. (Note: A toothpick comes in handy for applying the glue.) Wrap that strip around the paintbrush handle or skewer, as shown.
4. Slide the finished coil off the handle or skewer and let it expand into a circle that's about 1 1/4 inch in diameter. Apply a drop of glue to the end of the strip and stick it in place. Gently pinch the top of the circle to form a raindrop shape. This will serve as the rabbit's body.
5. Next, use a 12-inch strip to make a 3/4-inch circle and use it to create a teardrop shape for the rabbit's head. Tear an 8-inch length from another strip and make a smaller teardrop for the rabbit's foreleg. Set the remaining gray or brown strips aside for now.

6. For each of the rabbit's ears, coil one of the pink strips into a circle and then pinch both the top and bottom. If you like, wrap a piece from the remaining gray or brown strips around each ear and use a couple spots of glue to secure it.
7. Use 2 of the white or tan strips to create the rabbit's large hind feet in the same manner you did the ears.

8. Use 2 of the white or tan strips to create the rabbit's large hind feet in the same manner you did the ears.
9. For carrots, coil strips of orange paper (6 to 8 inches long). Pinch the bottom of the circle and then pinch the upper circle in two places, as shown. For carrot tops, simply fold short strips of green paper in half to form a V shape. Apply a bit of glue near the fold to hold the shape and then loosely coil the ends of the strip.
10. For the finishing touches, add a big round sun to the upper corner of the card. Then draw motion lines under one of the rabbit's feet so that he appears to be "thumping," and have your child print his or her holiday greeting inside.
Crafts


