
When the weather is chilly outside, this snowman thermometer is the perfect project for kids stuck indoors.
by Amanda Formaro
What you'll need
- 1 jumbo craft stick
- White acrylic paint
- White and red glitter glue
- 2" piece of white chenille stem
- 2 medium blue pom-poms
- Wax paper
- ½ orange toothpick
- 1 blue toothpick (colored toothpicks are not required, plain will work)
- Scrap of material for scarf
- Scrap of white paper for sign
- Black marker
- White craft glue
- Glue stick
- Scissors
Helpful Tip:
Jumbo craft sticks are available at discount department stores and craft supply stores.
Hint: Start your number 0 where the red and white meet, then fill in remaining numbers from there.
Glitter glue takes several hours to dry, so be sure and plan accordingly.
How to make it
1. Paint craft stick white and let dry. Repeat if needed.
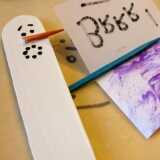
2. Make the snowman face by using a black marker to draw on eyes, eyebrows, and a mouth. Glue the orange toothpick piece between the eyes and the mouth.
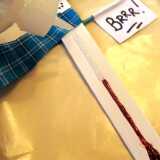
3. Place a piece of wax paper on the work surface. Glue the blue toothpick to the back of the craft stick, about 2.5" down from the top. Leave about 2/3 of the toothpick visible. Cut a piece of white paper, about 2"x3" (approximately) and fold in half. On one half, use a black marker to write "BRRR!" Line the inside with a glue stick and fold it around the blue toothpick to create the sign.
4. Glue a piece of scrap material around the neck area to create a scarf.
5. Bend the chenille so that it is rounded and fits around the top of the craft stick. This is the band for your ear muffs. Glue in place. Trim a little off the side of a pom-pom (to make one side flatter) and glue to the side of the craft stick where the chenille ends. Repeat on the other side.
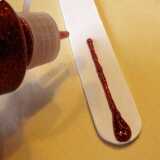
6. Starting at the bottom of the craft stick, use the red glitter glue to create a "ball" of mercury, then draw a line halfway up the stick.
7. Switch to the white glitter glue and continue up the craft stick until you reach the scarf. Let glitter glue dry, this will take several hours.
8. Use a fine tip black marker to add dashes and numbers to your thermometer, including the Fahrenheit and Celcius symbols (F and C).
Crafts


