
Ages school-age
Put Dad in the winner's circle with the likes of Doc Hudson and Lightning McQueen by presenting him with a personalized Father's Day trophy crafted by his loyal pit crew.
Download Dad's Parent Cup Template
by Cindy Littlefield
What you'll need
- Template for Dad's Parent Cup
- Scissors
- Pencil
- Craft paper (shades of gold or yellow and a small piece of tan)*
- Glue stick
- Glue dots
- Ruler
- Sticker letters
Notes:
*Using different textures and/or patterns of paper will make the finished cup look even more dimensional.
How to make it
1. Print out the template and use the pieces to cut out the shapes from the specified papers and cardboard.

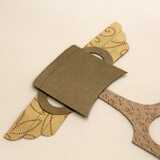
2. Glue the paper connecting rod pieces to the front and back of the cardboard trophy base, as shown.

3. Glue the two right wing cutouts together back-to-back. Do the same with the two left wings. Then use the pencil and ruler to draw horizontal ridge lines on each assembled wing, as shown.
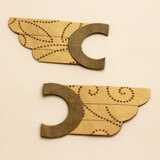
4. Stick the paper handles to the fronts and backs of the wings, as shown.

5. Glue the tab portion of the handles to the sides of the cardboard trophy base, as shown.
6. Glue the paper piston/cup pieces to the front and back of the trophy base. Then pencil a rim line 1/4-inch from the top of the cup, following the curve of the paper edge.

7. Fold the paper and cardboard stand pieces where indicated on the template. Then, glue one of the paper stand pieces to the front of the cardboard base. Glue the assembled trophy to the back of the cardboard, as shown, using the tabs marked on the connecting rod template to gauge the overlap.

8. Glue the remaining paper stand piece to the back of the cardboard, covering the rod ends.

9. For the finishing touch, glue the plaque pieces together and apply the lettering. Use glue dots to attach the plaque to the front of the cup.
Crafts


