
Terra cotta pots are great gifts because they can be used all year long in a variety of ways. The seeds of creativity are in full bloom with these colorful pots that are not only personalized with photos but even have a chalkboard surface allowing you to write messages on them.
What you'll need
- Terra cotta pots
- Masking tape
- Chalkboard paint
- Artwork
- Scissors
- Decoupage glue
- Paint brush
How to make it

1. Cover the base of each terra cotta pot with masking tape, leaving the rim of the pot exposed.

2. There are two types of chalkboard paint you can use. The liquid paint that comes in a can is easier to use but it does not go on as evenly. Chalkboard spray paint goes on evenly but is very messy, and should only be used in a ventilated area, with goggles and a mask (under adult supervision). Paint the rim of each terra cotta pot and let dry. Next, remove the masking tape.

3. Cut photographs and other desired artwork to fit on the sides of the pots. It’s easier to work in sections rather than using one whole piece of art. Remember, the pots are curved so your artwork should be rounded at the top and bottom. Also, the tops of the pots are wider than the bottoms so your pictures should be wider on top as well.
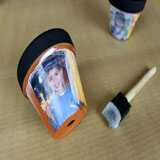
4. Apply a layer of the decoupage glue on the side of the pot. Place your photo or artwork on the glued surface. Then apply another layer on top of the image to seal it. Keep going around the pot until the sides are covered with artwork. Let the decoupage glue dry.
5. Place a seed packet in each pot and write a message on the chalkboard rims.
Crafts


