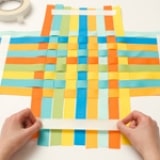
Cute and colorful, this no-sew throw pillow has a woven ribbon front tied to a fleece back.
Materials
- 18 (18-inch) lengths of 7/8-inch-wide cloth ribbon
- Masking tape
- Ironing board and iron
- Iron-on mending fabric (we used Dritz brand), cut into 2- by 6-inch strips
- Pressing cloth (such as a clean dish towel)
- 18-inch square of fleece fabric
- Marker
- Scissors
- Fiberfill
Instructions
1. Weave 4 lengths of ribbon together at their centers, as shown. Secure the center with a piece of masking tape to keep it from slipping as you add more ribbon.
2. Working from this center, weave in more ribbon pieces until you have a square with 9 ribbons on each side. Add strips of masking tape to all four of the ribbon edges.
3. Move the woven ribbon panel to the ironing board. Adjust the ribbons so that they are even, straight, and centered. Remove the piece of masking tape you added in step 1. Follow the instructions on the package of iron-on mending fabric to attach strips diagonally and along the edges of the woven square. Use the pressing cloth as shown when ironing the square. (A parent should help younger children with the hot iron.) Make sure the mending fabric does not extend past the woven area.
4. Remove the strips of masking tape. Flip over the panel and place it on the fleece square, lining up the edges exactly. Use the marker to make dots on the fleece between ribbons, along the edge of the woven square, as shown. Make dots at the corners of the woven square as well. Put the ribbon panel aside.
5. With scissors, cut a straight line from the edge of the fleece to each dot. Remove the four square corner pieces.
6. Return the ribbon panel to the fleece. Along three sides and half of the fourth, tie each ribbon and its matching fleece strip with a double knot. Stuff the pillow with fiberfill, then tie the last strips and ribbons. Trim the ends of the ribbons and fleece strips at a diagonal, if desired.
Crafts


