Sidebars are the widget-area of your blog’s layout and that is used to typically display information that is not a part of your main content.
But many bloggers do not feel it be necessary because you might want to keep your blog clean and does not want to clutter and confuse your visitors.
Advantages of removing your sidebar(s)
As of nowadays, trends of mobile browsing sidebars are buried under your contents at the bottom and hence it is not compatible on mobile devices.
Read further: How to open links in a new window
If you cannot create attractive and beautiful sidebar contents then it will unnecessary clutter and annoy your visitors.
If you own a business then you might need a sidebar as you don’t need to display ads or show extra links or buttons. So,
How to remove sidebars in Blogger and create a full-width page
You can hide or remove your Blogger sidebar by using 3 (three) different methods and create a full-width is really very simple by just carefully following the below few steps.
Method 1
Step 1. Login to your Blogger blog and select Template/Theme, then click on Edit HTML as shown in below image.
Step 2. Pressing Ctrl+F search for the </head> tag and paste the below code just above the </head> tag.
Code
<style>
#rsidebar-wrapper { display: none; }
#main-wrapper { width: 1000px!important; }
</style>
Step 3. Now click on Save button in order to save your settings.
So, you are done with the first method, but if it does not work for you or found some difficulties then try the second method.
Learn further: How to insert hyperlink in Blogger comments
Method 2
Step 1. Login to your Blogger blog and select Template/Theme, then click on Edit HTML as shown in below image.
Step 2. Pressing Ctrl+F search for the </b:skin> tag and paste the below code just below or after the </b:skin> tag.
Code
<b:if cond='data:blog.pageType == "item"'>
<style>
.main-inner .columns {
padding-left: 0px !important;
padding-right: 0px !important;
}
.main-inner .fauxcolumn-center-outer {
left: 0px !important;
right: 0px !important;
}
.main-inner .fauxcolumn-left-outer, .main-inner .fauxcolumn-right-outer, .main-inner .column-left-outer, .main-inner .column-right-outer {
display: none !important;
}
</style>
</b:if>
Step 3. Now click on Save button in order to save your settings.
I think you are done with the second method and still if you could make it then try the second method which is very simple.
Method 3
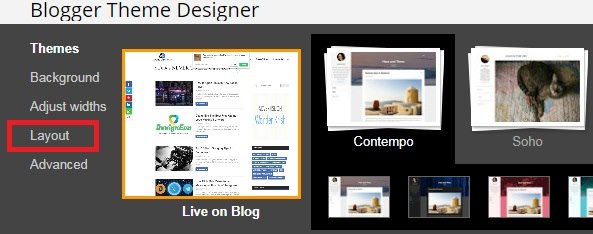
Step 1. Login to your Blogger blog and select Template/Theme, then click on Customize as shown in below image.
Step 2. Then select Layout, you will find it on the left side of the top screen.
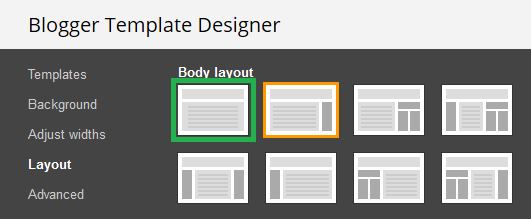
Step 3. Now a menu call Body Layout will come up just on the right side. Select or choose the layout that is relevant or which does not have sidebars.
Step 4. Now click on Apply to Blog in order to save your settings and view your blog.
Learn further: How To Add Table Of Contents In Blogger Post
Method 4
Step 1. Login to your Blogger blog and select Template/Theme, then click on Customize as shown in below image.
Step 2. Then select Advanced, you will find it on the left side of the top screen.
Step 3. Now a CSS menu called Add Custom CSS will come up just on the right side. Copy and paste the below CSS code on the box under the Add Custom CSS.
Code
#sidebar-wrapper {display: none;}
.content-blog {padding-right: 0;}
.content-main {margin: 0 auto;}
#content {padding-right: 0 !important;}
Step 4. Now click on Apply to Blog in order to save your settings and view your blog.
Conclusion
These are the simplest methods in Blogger to remove sidebars and make your content area full width. I hope using these methods has helped you to remove your Blogger sidebar from your blog.
And if you have any query feel free to leave it on the comment below.
Blogger , Tips and Tricks


