Total Time Needed: Weekend Project
Hear ye! Hear ye! Is your home overrun by your child's ever-growing collection of play figures? Well, get them out from under your feet and into a home of their own! On the following pages, you'll discover just how easy - and inexpensive - it is to construct a one-of-a-kind castle fit for any miniature kingdom.
Materials
- Cardboard
- Scissors
- Tape
- Tissue box
- Pizza box
- Foam core
- Mail tube
- Egg carton
- Newspaper
- Snack container
- Paper cups
- Shoe box
- Soap boxes
- Paint
- Sponge
- Wooden skewer
Instructions
1. Cardboard box keep
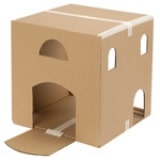
To make the main structure of your castle (known as the keep), choose a box that will be proportionate to your action figures. Cut the back off the box for interior access and reinforce all the seams with masking tape. Cut windows, doors, and a drawbridge where you like.
2. Tissue box turrets
Cut a large rectangular tissue box in half, then cut windows from both halves to make 2 turret bases. Cut a small upright tissue box into battlements and tape them to the tops of the bases. Cut the secret passages from the cardboard keep (see step 7), then tape the completed turrets to the top.
3. Pizza box foundation
Tape your cardboard keep to a clean pizza box (taped shut). You can also use a sheet of strong cardboard or a piece of foam core.
4. Mail tube towers
Determine where your towers will attach to the keep, then draw in the tower doorways and windows accordingly. Cut them out and tape the towers in place.
5. Egg carton balcony
Cut a section from an empty cardboard egg carton and tape it under an opening in the keep.
6. Newspaper archway
Roll a section of newspaper and tape it above the main doorway. Tape supports of cord to each side of the drawbridge and attach a loop of cord to the top of the door as a handle.
7. Secret passageways
Before attaching the turrets, cut holes in the top of the cardboard keep for your tube slide and chute (see next page). Make sure the holes are big enough for the figures to fit through.
8. The King's Decree
If you don't have these very same materials around your house, don't cease construction! Simply scan the cupboards for nearly empty containers or adapt others. Empty wrap-ping paper rolls and old toy and gift boxes can take on a whole new life. In this castle, creativity is the real king.
9. Cardboard box mezzanine
Cut a cookie, cracker, or cereal box in half, cut a door opening, and tape the box to the top of the keep.
10. Snack container quarters
Cut doors and windows from a round plastic or cardboard container (a peanut or margarine tub works well). Tape it to your mezzanine.
11. Paper cup veranda
Cut and spread open a paper cup, creating side tabs, as shown, then tape the cup in front of a window or door.
12. Shoe box loft
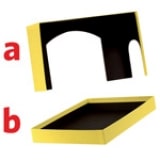
Cut a shoe box or another small box as shown (a), then place it inside your cardboard keep to form an interior room. Next, tape the shoe box lid (b) atop the room to create a loft or second floor. For stability, also tape the loft to the inside walls of the keep.
13. Mail tube chute and slide
Cut a cardboard tube to fit between the floor and the rooftop opening for the secret passageway, angling the ends and cutting a doorway at the bottom. For the slide, cut a tube in half lengthwise and tape in place between the loft and the other opening.
14. Soap box staircase
Cut soap boxes in half and tape them together as shown. Tape the stairs in place.
15. Base paint
Cover all the joints and seams with masking tape for a smoother finish, then paint your castle inside and out with acrylic paint.
16. Sponge bricks
Once the base paint is dry, use a small piece of sponge and a different-colored paint to add bricks.
17. Paper tower tops
Figure out approximately how tall you want your tower tops to be, then cut a circle from colored paper with this measurement as the radius. Cut the circle in half, roll each half into a cone, and tape it closed. Tape it to the top of a tower, as shown above right.
18. Skewer flagstaff
Glue strips of colored paper around one end of a wooden skewer. Cut the paper into a flag shape and stick the skewer into a tower top.
19. Finally, set the castle on a large piece of blue paper and an even larger piece of green paper to complete the scene. Then lower the drawbridge and give the tiny courtiers the keys to their new kingdom.
Crafts


