Total Time Needed: 2-3 Hours
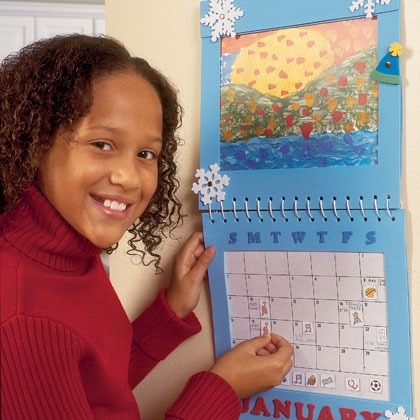
It's once again time to replace the family calendar, so this year, why not try one that's a little more personalized and fun? Made from craft foam, this simple design invites kids to show off their creativity and even practice their organizational skills. The top frame acts as a rotating gallery for kids' artwork, while the bottom frame holds your monthly calendar.
At the start of each month, just slide a new calendar grid into the lower frame. Backed with a magnetic sheet that's part of the foam frame, the grid does double duty: write notes directly on the paper or use reminder magnets to mark special days. Kids will love choosing their best work for the top frame and changing the foam accents and magnets each month. (This also makes a great gift for grandparents since few ever tire of showing off their grandchildren's masterpieces.) Now if only there were a way to squeeze an extra day into the week.
Materials
- 5 (12- by 18-inch) sheets of blue craft foam
- Scissors
- Ruler
- 14- by 11-inch piece, approximately, of thick (.03-inch or thicker) magnetic sheeting, adhesive-backed if possible
- 5 feet of white plastic lacing
- Duct tape or packing tape
- 11 1/2- by 1 1/2-inch piece of cardboard (we used part of the back of a notepad)
- Foam glue or carpet tape (or other strong double-sided tape)
- Hole punch
- 1-inch-tall foam numbers and letters, adhesive or not, for months and year
- 5/8-inch-tall foam letters, adhesive or not, for days of the week
- Pushpin
- 3/4-inch paper fasteners
- Decorative foam shapes
Instructions
1. Make the Top Half of Frame
Cut 2 squares from the craft foam. Due to variations in the sizes of the precut sheets, ours ended up 11 3/4 by 11 3/4inches. Cut a 7 1/2- by 9 1/2-inch rectangle from the center of one of the squares to create a frame.
2. To make the hanger, cut a 10-inch length of plastic lacing and knot both ends. Center the lacing on the cardboard and attach it with duct or packing tape, allowing it to span about 4 inches. Foam-glue or carpet-tape along 3 sides of the foam square (see glue lines), adding extra glue or tape where the hanger will go. Be sure your glue line or tape is no more than 1/2 inch from the outer edge so that papers can slide in and out. Press the hanger in place, add more glue or tape on top of it, then set the frame in place as shown. Let the glue dry.
3. Make the Bottom Half of Frame
Cut 2 more foam squares (the same size as in step 1) and, again, cut a 7 1/2- by 9 1/2-inch rectangle from the center of one. Set aside the rest of the foam. Stick a 3/4- by 7-inch strip of magnetic sheeting (C) to the back of the frame as shown. Secure the magnet with foam glue or carpet tape if it doesn't have an adhesive backing.
4. Next, carpet-tape, foam-glue, or adhere an 11- by 11 1/2-inch piece of magnetic sheeting to the last foam square (D), bringing it flush to the bottom edge. If your magnet has adhesive backing and it's difficult to peel from such a large piece, cut the piece in quarters first. Again, foam-glue or carpet-tape along 3 sides of the square (see glue lines) no more than 1/2 inch from the outer edge.
5. Lace the 2 Halves Together
Punch holes, 3/4 inch apart, along the top of the bottom piece and the bottom of the top piece. (Depending on your hole punch, you may need to really force the foam into the punch.) Place the pieces right sides together, knot one end of the lacing around 2 of the end holes, then loosely stitch together the frames. Open the calendar, straighten the lacing, knot the end, and trim. Dab glue on each knot to keep it from coming undone.
6. Add the Details
The Gallery
Let your child slide his favorite 8 1/2- by 11-inch drawing into the top frame. Change it every month, or every day!
7. Help you child create calendar grids for each month of the year, then download our assortment of fun icons to turn into reminder magnets (a party hat for a birthday party, a dollar bill for allowance day, and so on).
Cut out the icons and attach them to adhesive backed magnetic sheeting (available at most craft stores). If your magnetic sheeting does not have adhesive backing, use a glue stick to attach the paper icon. If the magnet isn't strong enough, double the magnet layer.
8. Days
Insert the paper grid, then center and attach a 5/8-inch foam letter to mark each day of the week.
9. Year and Month Signs
Cut 13 blue foam strips, each 2 by 11 3/4 inches. Adhere or foam-glue on precut 1-inch foam letters and numbers to create the year sign and all 12 month signs. Be sure to leave blank about 2 inches on either end of each sign for decorations. Set each sign in place and use a pushpin to poke starter holes through all the layers. Widen the holes with scissors if necessary (a parent's job). Use paper fasteners to hold everything together, including decorative foam shapes (make your own or buy them precut from most craft stores).
Crafts


