Total Time Needed: 2-3 Hours
Here's a bold accessory that's part no-sweat craft, part personal A/C. Plus, after the ice melts, the owner's still got a great-looking piece of waterproof homemade jewelry.
Materials
- 3 feet of Plastic Lanyard
- Ice Cube Tray (ours had 14 cube slots)
- Plastic Beads, Buttons, and/or Colored Plastic Drinking Straws cut into 1-inch lengths
- Clear Tape
Instructions
1. Tie a knot in one end of the lanyard. Count the number of ice cube slots in one side of the tray and thread at least 1 bead, button, or straw per cube slot onto the lanyard (larger beads and such work best since they stay in the middle of the cube). Knot the other end of the lanyard when you're done.
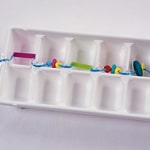
2. Center the lanyard over 1 row of an empty ice tray so that several inches drape over each end. Push the beads, buttons, or straws down into each ice cube slot. To keep the beads submerged when you add water, tape the lanyard to the edge of the tray and between each cube, as shown above.
3. Use a small pitcher to fill the slots with water. To avoid ice "bridges" between the cubes, don't overfill. Place the tray in the freezer and remove it when the ice is solid. Pop out the necklace, tie it on, then step outdoors to chill in style.
Crafts


